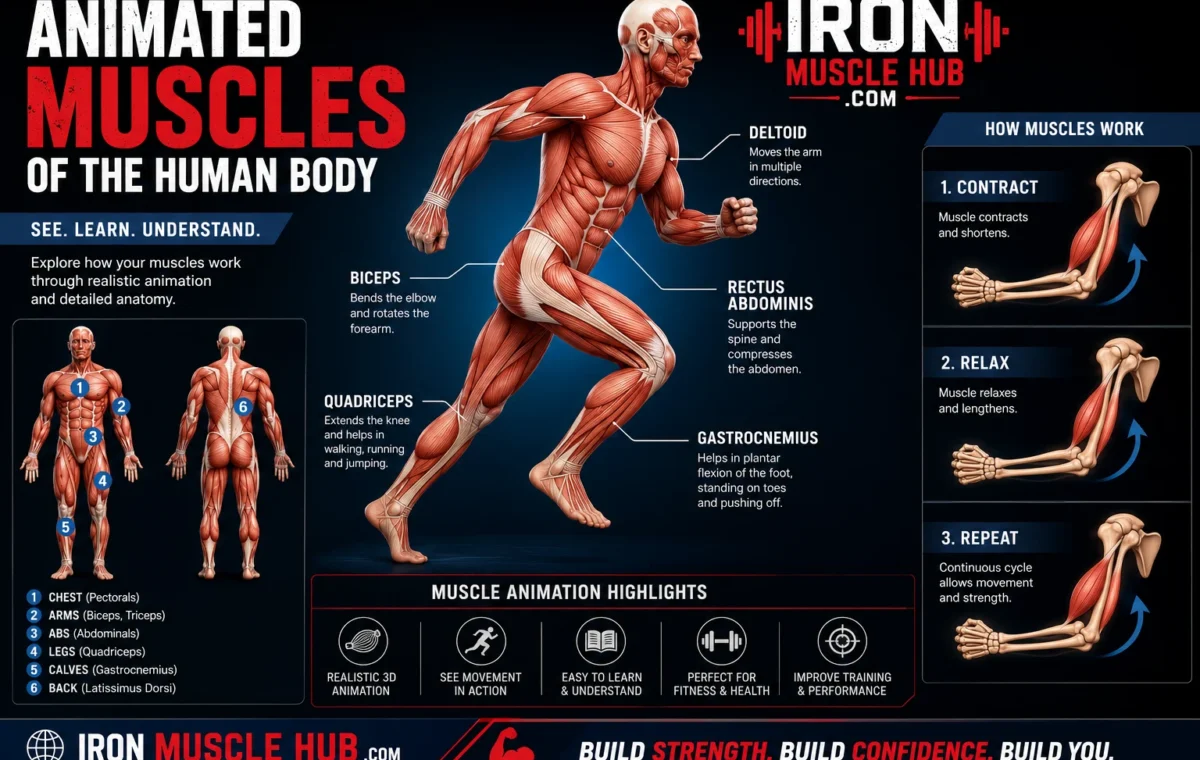
Animated muscles are moving visual representations used to show how muscles are structured, contract, relax, and create movement. Instead of looking at a static anatomy picture, you can watch a muscle shorten, see a joint move, or follow the microscopic interaction between actin and myosin.
- Animated Muscles at a Glance
- What Are Animated Muscles?
- How Muscle Animation Shows Contraction
- Why 3D Muscle Animation Can Be Easier to Understand
- Animated Muscles vs. Static Muscle Charts
- What Should a Good Muscle Animation Include?
- 1. Clear labels
- 2. A logical zoom
- 3. A visible contraction sequence
- 4. Accurate terminology
- A Simple Example: Watching an Animated Biceps Curl
- Animated Muscle Contraction: The Biggest Beginner Mistake
- How to Use Animated Muscles for Studying
- Step 1: Watch once without taking notes
- Step 2: Watch again at the anatomical level
- Step 3: Zoom into the microscopic process
- Step 4: Explain the process yourself
- Step 5: Test yourself with a static diagram
- Are Animated Muscles Useful for Beginners?
- How to Tell if a Muscle Animation Is Trustworthy
- Copyright-Safe Ways to Use Muscle Animations on a Website
- Frequently Asked Questions
- What are animated muscles?
- How does a muscle contraction animation work?
- What is the best animation for learning muscle contraction?
- Do animated muscles show real muscle movement?
- Why are 3D muscle animations useful?
- Can animated muscles replace a textbook?
- Helpful Related Resources
- A Better Way to Think About Animated Muscles
- How Animated Muscles Help You Understand Exercise
- Example: Animated Squat
- Animated Muscles and Muscle Roles
- Animated Muscles and the Brain-Muscle Connection
- Why Muscle Contraction Isn't the Same as Movement
- How an Animation Can Show Eccentric Muscle Action
- Animated Muscles at the Microscopic Level
- What ATP Does in a Muscle Animation
- Common Problems With Poor Muscle Animations
- 1. Overly dramatic muscle movement
- 2. Incorrect muscle labels
- 3. Missing scale
- 4. Confusing force with visible shortening
- 5. Too much visual clutter
- A Simple 5-Minute Study Method
- Minute 1: Identify the movement
- Minute 2: Identify the major muscles
- Minute 3: Follow the force
- Minute 4: Zoom inward
- Minute 5: Explain it without the animation
- A Worked Learning Example: Understanding an Arm Curl
- Animated Muscles vs. Real Medical Imaging
- Can Animated Muscles Help With Fitness Content?
- How to Make Your Own Animated Muscle Visual
- Scene 1: Whole-body view
- Scene 2: Highlight the muscles
- Scene 3: Show the joint
- Scene 4: Zoom into the muscle
- Scene 5: Show contraction
- Scene 6: Return to the whole movement
- The Best Length for an Educational Muscle Animation
- A Beginner's Checklist for Choosing Animated Muscles
- What You Should Remember
- Frequently Asked Questions
- What is a muscle animation used for?
- Can animated muscles show how muscles grow?
- What is the difference between muscle anatomy and muscle physiology?
- Why do muscles need calcium to contract?
- Do muscles pull or push bones?
- Conclusion: Use Animation to Connect the Dots
- Quick Guide to Animated Muscles
- How Muscles Work Together During Movement
- Muscles Don't Work Like Simple On-Off Switches
- What Is a Motor Unit?
- Animated Muscles and Muscle Fiber Types
- A Visual Hierarchy for Learning Muscle Anatomy
- Level 1: Whole body
- Level 2: Individual muscle
- Level 3: Muscle fiber
- Level 4: Myofibril
- Level 5: Sarcomere
- Level 6: Contractile proteins
- Why Tendons Matter in Muscle Animations
- Animated Muscles Can Show Joint Angles
- Why Slow Motion Helps
- A Common Mistake: Confusing Location With Function
- How to Compare Two Muscle Animations
- How to Use Animated Muscles for Exam Revision
- Animated Muscles for Children's Education
- Animated Muscles for Fitness Beginners
- How to Create Better Muscle Animation Content
- 1. Define one learning objective
- 2. Choose the correct level
- 3. Build the visual sequence
- 4. Add only necessary labels
- 5. Explain movement in plain English
- 6. Verify the science
- 7. Add context
- How to Avoid Misleading Muscle Visuals
- The Role of Color in Muscle Animation
- What Makes an Animation Memorable?
- Three Questions to Ask After Watching
- 1. What moved?
- 2. Which structures produced or transmitted force?
- 3. What happened inside the muscle?
- The Biggest Benefits of Animated Muscles
- The Limitations You Should Know
- Frequently Asked Questions
- What are animated muscles used for?
- How do animated muscles show contraction?
- Can animated muscles show which muscles are used in an exercise?
- Are 3D muscle animations accurate?
- Can animated muscles help with anatomy exams?
- Final Takeaway: Make the Movement Make Sense
For beginners, that can make a complicated subject much easier to understand. A good muscle animation connects the big picture, such as a person bending an arm, with what is happening inside individual muscle fibers. This guide explains what animated muscles show, how muscle contraction works, and how to use these visuals effectively for learning. For more insights read here :- what are muscles and muscles of the body.
Quick answer: Animated muscles are educational visualizations of muscle anatomy and movement. The most useful animations show both the anatomy of a muscle and the contraction process, including calcium signaling, actin-myosin interaction, and the role of ATP.
Animated Muscles at a Glance
| What the animation shows | What you can learn |
|---|---|
| Whole-body muscles | Where major muscles are located |
| Muscle and tendon movement | How muscles move bones |
| Muscle fibers | How a muscle is organized |
| Sarcomeres | Where contraction occurs |
| Actin and myosin | How microscopic force is produced |
| Calcium signaling | How contraction is switched on |
| ATP use | How muscle contraction requires energy |
| Relaxation | How a muscle returns toward its resting state |
What Are Animated Muscles?
The phrase animated muscles usually refers to digital illustrations, videos, interactive diagrams, or 3D models that demonstrate muscle structure and function.
They can operate at several levels. A basic animation might show the biceps shortening while the elbow bends. A more detailed animation can zoom into muscle fibers and eventually show sarcomeres, actin, myosin, calcium, and ATP.
This matters because muscle movement is the result of processes happening at several scales. Skeletal muscle contains bundles of fibers, while muscle fibers contain myofibrils made up of repeating sarcomeres.
How Muscle Animation Shows Contraction
A useful muscle contraction animation should make the sequence easy to follow rather than simply showing a muscle getting smaller.
Here is the simplified process:
- A nerve signal reaches the muscle.
Skeletal muscle fibers receive signals from motor neurons at the neuromuscular junction. - Calcium becomes available inside the muscle fiber.
The electrical signal triggers processes that release calcium into the muscle cell’s interior. - Calcium interacts with regulatory proteins.
Calcium binds to troponin, helping expose binding sites on actin. - Myosin attaches to actin.
Myosin heads form cross-bridges with actin. - The myosin heads produce movement.
Repeated cycles pull the actin filaments toward the center of the sarcomere. - The sarcomere shortens.
The filaments themselves don’t simply shrink. Instead, they slide relative to each other, shortening the sarcomere. This is the basis of the sliding-filament model. - The muscle relaxes when the contraction signal ends.
Calcium is returned to storage, helping cover the actin binding sites again and ending the contraction process.
An animation can show these steps in seconds, making the sequence easier to visualize than a page of text.
Why 3D Muscle Animation Can Be Easier to Understand
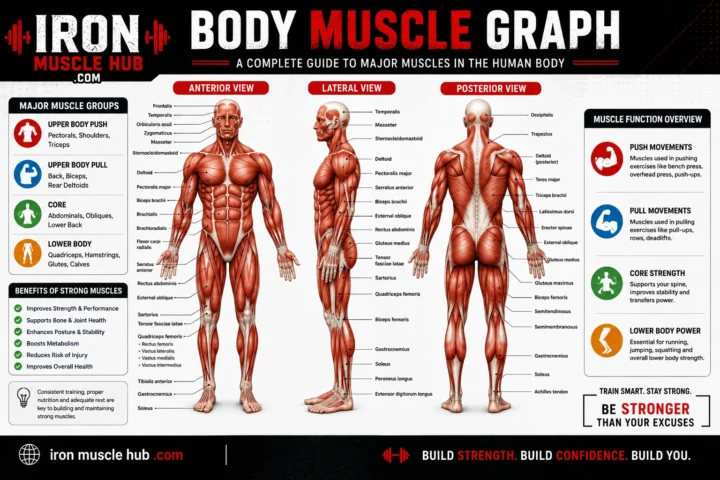
A flat muscle chart is useful for identifying muscles, but it has an important limitation: it doesn’t naturally show movement.
A 3D muscle animation can rotate the body, expose deeper structures, and demonstrate how a muscle changes position during movement.
For example, an animation of an elbow curl can show:
- the biceps contracting;
- the forearm moving toward the upper arm;
- the triceps acting on the opposite side of the joint;
- tendons connecting muscle to bone;
- the changing position of the joint.
Muscles create movement by contracting and producing pulling forces. Skeletal muscles attach to bones, with tendons transmitting the force generated by contraction.
That makes animation particularly useful for students who struggle to connect anatomy diagrams with real movement.
Animated Muscles vs. Static Muscle Charts
Both formats have a place in learning.
| Feature | Animated muscles | Static muscle chart |
| Shows movement | Excellent | Limited |
| Shows muscle location | Excellent | Excellent |
| Shows contraction | Excellent | Usually limited |
| Good for quick revision | Good | Excellent |
| Shows microscopic processes | Can be excellent | Depends on diagram |
| Easy to pause and label | Yes | Yes |
| Helps visualize sequence | Excellent | Limited |
A practical approach is to use the static chart for identification and animation for understanding movement and processes.
What Should a Good Muscle Animation Include?
Not every animation is equally useful. If you’re choosing one for studying, look for these features.
1. Clear labels
The animation should identify important structures instead of relying entirely on visual effects.
For skeletal muscle, useful labels may include muscle fibers, myofibrils, sarcomeres, actin, myosin, tendons, and the neuromuscular junction.
2. A logical zoom
The best educational animations often move from large to small:
body → muscle → muscle fiber → myofibril → sarcomere → actin and myosin
That progression helps you understand how the parts fit together.
3. A visible contraction sequence
A muscle animation should make the difference between relaxation and contraction obvious.
OpenStax describes contraction using the sliding-filament model: myosin interacts with actin and pulls the thin filaments, causing sarcomeres to shorten.
4. Accurate terminology
Be cautious with animations that use dramatic visual effects but don’t explain the biology correctly.
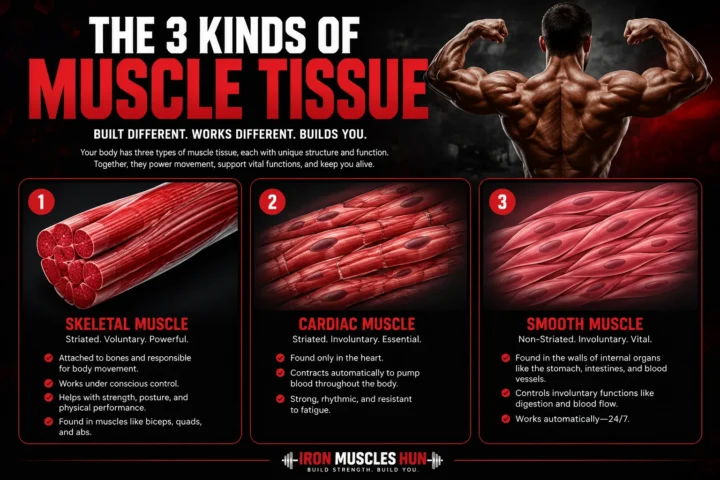
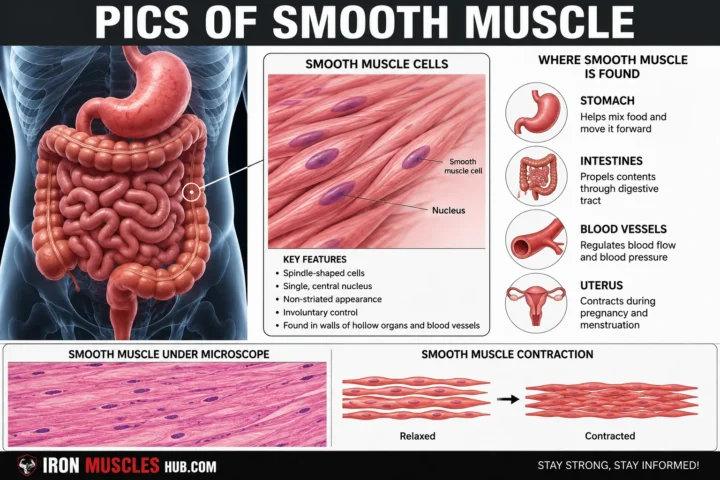
For serious study, educational resources should distinguish between skeletal, cardiac, and smooth muscle because these tissues have different structures and functions.
A Simple Example: Watching an Animated Biceps Curl
Imagine an animation showing someone lifting a dumbbell.
At the surface level, you see the elbow bend.
The animation can then zoom into the biceps. As the muscle contracts, its muscle fibers generate tension, which is transmitted through the tendon to the bone. The resulting force contributes to movement at the joint.
A more advanced animation can continue zooming inward until you see sarcomeres. At that level, actin and myosin interact through repeated cross-bridge cycles.
That’s the real advantage of animation: one movement can be connected to several layers of anatomy.
Animated Muscle Contraction: The Biggest Beginner Mistake
One common mistake is thinking that the individual actin and myosin filaments simply become shorter during contraction.
That’s not the basic sliding-filament model.
Instead, the thin and thick filaments slide relative to one another while the sarcomere becomes shorter. The interaction between myosin and actin produces the movement needed for contraction.
A good animation should make this distinction visually obvious.
How to Use Animated Muscles for Studying
You don’t need to watch a long video repeatedly. Use animation as an active study tool.
Step 1: Watch once without taking notes
First, understand the overall movement.
Ask yourself: What moved, and why?
Step 2: Watch again at the anatomical level
Identify the muscles involved and where they attach.
Step 3: Zoom into the microscopic process
Look for the sarcomere, actin, myosin, calcium, and ATP.
Step 4: Explain the process yourself
Pause the animation and describe what happens next without looking at the labels.
Step 5: Test yourself with a static diagram
After watching the animation, use a muscle chart and identify the structures from memory.
This combination is often more useful than simply replaying the same video.
Are Animated Muscles Useful for Beginners?
Yes. They can be especially helpful when a subject involves movement, sequence, or changing structure.
A static diagram tells you what something looks like. Animation can show what happens next.
That difference is important for topics such as muscle contraction because the process involves a chain of events rather than one isolated structure.
OpenStax, for example, uses interactive links and animations alongside written explanations of muscle fibers and contraction.
How to Tell if a Muscle Animation Is Trustworthy
Before using an animation as a study reference, check:
- Who created it? Look for a university, medical organization, established educational publisher, or qualified educator.
- Are the structures labeled clearly?
- Does the explanation agree with reliable anatomy or physiology textbooks?
- Does it distinguish skeletal, cardiac, and smooth muscle?
- Does it explain rather than exaggerate the movement?
- Is the publication or update information available?
For example, OpenStax provides openly available anatomy and physiology educational material, while Cleveland Clinic provides patient-oriented information about skeletal muscle structure and function.
Copyright-Safe Ways to Use Muscle Animations on a Website
If you’re publishing an article about animated muscles, don’t assume that an animation found through Google Images or YouTube is free to reuse.
A safer approach is to:
- Create your own original illustration or animation.
- Use material with a license that explicitly permits your intended use.
- Follow the attribution requirements of the license.
- Link to an external educational resource when embedding or referencing it is permitted.
- Don’t download and republish someone else’s animation simply because it’s publicly visible.
OpenStax materials can have specific Creative Commons licensing terms, but you should still check the license attached to the particular material before reuse.
Frequently Asked Questions
What are animated muscles?
Animated muscles are digital visualizations that demonstrate muscle anatomy, movement, contraction, or microscopic processes. They may show anything from a complete human muscular system to a magnified sarcomere. Their main educational benefit is showing change over time rather than presenting anatomy as a single still image.
How does a muscle contraction animation work?
A detailed animation can show a nerve signal activating a skeletal muscle fiber, calcium becoming available, actin and myosin interacting, and sarcomeres shortening. ATP supplies energy for the repeated cross-bridge cycle. When signaling ends and calcium is returned to storage, the muscle moves toward relaxation.
What is the best animation for learning muscle contraction?
The best animation is one that is scientifically accurate, clearly labeled, and shows the process in a logical sequence. For beginners, choose an animation that starts with whole-muscle movement and gradually explains muscle fibers, sarcomeres, actin, myosin, calcium, and ATP.
Do animated muscles show real muscle movement?
They show a visual model of muscle movement rather than recording every microscopic event exactly as it happens. Good educational animations simplify complex biology so that the viewer can understand the relationships between structures and processes.
Why are 3D muscle animations useful?
3D animation can help viewers understand depth, muscle location, joint movement, and relationships between muscles and bones. It can also make it easier to visualize structures that would otherwise overlap in a flat illustration.
Can animated muscles replace a textbook?
Not completely. Animation is excellent for visualizing movement and sequences, but written explanations, labeled diagrams, and reliable textbooks remain useful for terminology and detail. Using several formats together can give you a stronger understanding than relying on animation alone.
Helpful Related Resources
If you’re building a broader anatomy-learning section, useful related topics include:
- Muscle anatomy chart: explain the major muscles and where they’re located.
- Body diagram of muscles: create a beginner-friendly labeled overview.
- Musculoskeletal system diagram: explain how muscles, bones, joints, and tendons work together.
For a reliable educational reference, see OpenStax Anatomy and Physiology and Cleveland Clinic’s skeletal muscle guide.
A Better Way to Think About Animated Muscles
Animated muscles aren’t just moving pictures. Used properly, they’re a bridge between anatomy and physiology.
You can start with a person moving an arm, identify the muscles responsible, follow the force through the tendon, and then zoom all the way down to the sarcomere. At the microscopic level, actin and myosin interact to produce the shortening that underlies skeletal muscle contraction.
For beginners, that visual progression is often the easiest way to make muscle biology stick. Choose animations from credible educational sources, compare them with reliable written material, and use them actively rather than watching passively.
How Animated Muscles Help You Understand Exercise
Animated muscles can make exercise science easier to understand because they show movement rather than presenting muscles as isolated labels.
For example, an animation of a squat can show the hip, knee, and ankle moving together while highlighting the muscles involved. A more advanced animation can then show how muscle fibers generate force during the movement.
This is useful for beginners because a single exercise can involve several muscles working together.
Example: Animated Squat
A simplified animation might show:
- The body lowers toward the floor.
- The hip and knee joints bend.
- Muscles around the hips and thighs produce force.
- The body changes direction.
- The muscles produce force as the person rises.
The animation doesn’t need to show every microscopic event to be useful. Its main job is to help you connect muscle location, joint movement, and force production.
Animated Muscles and Muscle Roles
Muscles don’t all perform the same role during movement.
An animation can make these relationships easier to see.
| Muscle role | Basic meaning | What an animation can show |
|---|---|---|
| Agonist | Main muscle contributing to a movement | Muscle contracting during the action |
| Antagonist | Muscle that can oppose the movement | Opposite-side muscle activity |
| Synergist | Helps another muscle perform an action | Several muscles contributing together |
| Fixator | Helps stabilize a body part | Reduced unwanted movement |
The exact muscles involved depend on the movement, joint position, resistance, and technique. That’s why a good animation should avoid suggesting that one muscle is responsible for every part of an exercise.
Animated Muscles and the Brain-Muscle Connection
Muscle movement begins with communication between the nervous system and muscle tissue.
For skeletal muscle, motor neurons communicate with muscle fibers at specialized neuromuscular junctions. A muscle animation can illustrate this as a signal traveling from a nerve toward the muscle fiber. (OpenStax)
That doesn’t mean you should imagine a tiny electrical wire running through the entire muscle. The real process involves electrical changes across cell membranes and chemical signaling at the neuromuscular junction.
An animation simplifies that complicated biology into something you can see.
Why Muscle Contraction Isn’t the Same as Movement
One of the most important concepts to learn is that muscle contraction and visible movement aren’t always identical.
A muscle can produce tension while its length changes very little. In other situations, a muscle can produce force while lengthening.
For beginners, this is where animated muscles become especially useful.
A good animation can compare:
- Concentric action: the muscle produces force while shortening.
- Eccentric action: the muscle produces force while lengthening.
- Isometric action: the muscle produces force without an obvious change in muscle-tendon length at the joint level.
The terminology can vary depending on the educational context, so animations should explain the terms rather than relying on labels alone.
How an Animation Can Show Eccentric Muscle Action
Imagine slowly lowering a weight after a curl.
A basic animation may show the elbow extending while the biceps remains active. The visual helps explain why muscle activity isn’t limited to situations where a muscle visibly becomes shorter.
This is one reason animated demonstrations can be more informative than pictures showing only the “start” and “finish” positions.
Animated Muscles at the Microscopic Level
The most detailed animated muscle anatomy resources can move from the whole body to individual muscle fibers and eventually to sarcomeres.
The sarcomere is the repeating contractile unit found within skeletal and cardiac muscle cells. It contains organized protein structures, including actin and myosin, that participate in contraction. (OpenStax)
A useful visualization might progress like this:
Human body → muscle → muscle fiber → myofibril → sarcomere → actin and myosin
That sequence gives learners a mental map instead of presenting microscopic structures as unrelated vocabulary.
What ATP Does in a Muscle Animation
You may also see ATP appear in a muscle contraction animation.
ATP, or adenosine triphosphate, provides energy needed for processes involved in muscle contraction. Myosin uses energy from ATP during the cross-bridge cycle. (OpenStax)
A simplified animation might show:
ATP binds → ATP is broken down → myosin changes state → force-producing cycle continues
The real biochemical process is more detailed, but this simplified sequence helps beginners understand why energy is necessary.
Common Problems With Poor Muscle Animations
Not every online animation deserves to be treated as a scientific reference.
Watch out for these problems.
1. Overly dramatic muscle movement
Some animations exaggerate how much a muscle visibly changes size during contraction.
A visual effect can make the anatomy easier to see, but exaggeration shouldn’t be mistaken for an accurate measurement of physiological change.
2. Incorrect muscle labels
A wrongly labeled structure can teach the wrong information very quickly.
If you’re studying anatomy, compare unfamiliar information with a reputable anatomy textbook or educational institution.
3. Missing scale
An animation can jump from a whole body to microscopic structures without explaining the transition.
Look for resources that clearly tell you what you’re viewing.
4. Confusing force with visible shortening
A muscle can produce force without simply getting shorter in the way a beginner might expect.
Animations should explain the type of muscle action rather than showing every contraction as the same event.
5. Too much visual clutter
More detail doesn’t always mean better learning.
If an animation has dozens of labels moving simultaneously, pause it and focus on one structure at a time.
A Simple 5-Minute Study Method
You can turn an animated muscles video into a quick study session.
Minute 1: Identify the movement
Ask:
What joint is moving?
Don’t worry about memorizing every muscle yet.
Minute 2: Identify the major muscles
Pause the animation and name the main muscles involved.
Minute 3: Follow the force
Look for the muscle, tendon, and bone relationship.
Ask yourself how contraction can contribute to movement.
Minute 4: Zoom inward
If the resource provides microscopic detail, identify the muscle fiber, myofibril, sarcomere, actin, and myosin.
Minute 5: Explain it without the animation
Close the video and explain the movement in your own words.
If you can explain it without watching, you’ve learned something rather than simply recognizing the animation.
A Worked Learning Example: Understanding an Arm Curl
Suppose you’re studying an animation of someone performing a biceps curl.
At the beginning, the elbow is relatively extended. As the person lifts the weight, the elbow flexes.
The animation may highlight the biceps brachii and show its relationship with the forearm and upper arm.
Now pause the animation.
Ask yourself:
What changed?
The joint angle changed.
What produced force?
Muscles around the joint generated force through their attachments.
What happens at a microscopic level?
Inside activated skeletal muscle fibers, interactions between actin and myosin contribute to sarcomere shortening.
This simple three-level approach is powerful:
Movement → muscle anatomy → microscopic contraction
It prevents you from memorizing muscle names without understanding what they actually do.
Animated Muscles vs. Real Medical Imaging
A common misconception is that a 3D animation is equivalent to a medical scan.
It isn’t.
An animation is a model or educational representation. Medical imaging technologies such as MRI, CT, ultrasound, and X-ray produce information about actual structures using different physical methods.
An animation can combine anatomical information into a clean visual that would be difficult to see in a single clinical image.
That’s why animations are excellent teaching tools, but they shouldn’t automatically be treated as photographic evidence of what happens inside every person’s body.
Can Animated Muscles Help With Fitness Content?
Yes, provided the content is scientifically responsible.
For a fitness website, an original animation can explain:
- major muscle groups;
- exercise movement;
- joint actions;
- muscle contraction;
- basic anatomy;
- muscle recovery concepts;
- differences between muscle tissues.
However, avoid claiming that an animation proves an exercise will produce a particular result for every person.
Human movement varies with anatomy, technique, training experience, resistance, fatigue, and other factors.
How to Make Your Own Animated Muscle Visual
If you’re creating educational content, you don’t need an expensive medical production studio for every concept.
Start with a simple storyboard.
Scene 1: Whole-body view
Show the person performing the movement.
Scene 2: Highlight the muscles
Fade the rest of the body slightly and highlight the relevant muscles.
Scene 3: Show the joint
Demonstrate the direction of movement.
Scene 4: Zoom into the muscle
Show muscle fibers and their organization.
Scene 5: Show contraction
Move into the sarcomere and illustrate the actin-myosin interaction.
Scene 6: Return to the whole movement
Finish by connecting the microscopic process back to the original exercise.
This structure keeps the animation educational rather than turning it into a collection of disconnected graphics.
The Best Length for an Educational Muscle Animation
There isn’t one universal ideal duration.
A short animation may be better for one simple concept, such as showing the location of the biceps. A longer animation may be appropriate for explaining the entire contraction process.
The important factor is information density.
If viewers need to pause every few seconds because several new structures appear at once, the animation may be trying to teach too much simultaneously.
For beginners, one clear concept per animation is often easier to absorb.
A Beginner’s Checklist for Choosing Animated Muscles
Before spending time studying an animation, check these points:
- Does it clearly identify the body part?
- Are important structures labeled?
- Does it explain movement rather than simply show it?
- Does it distinguish muscle contraction from visible movement?
- Does it use accepted anatomy terminology?
- Does it come from a credible educational or medical source?
- Can you pause and replay important sections?
- Does the animation explain microscopic terms?
- Can you verify unfamiliar claims elsewhere?
If several answers are “no,” use the animation as a visual aid rather than your main source.
What You Should Remember
If you’re new to muscle anatomy, you don’t need to memorize every muscle before you can understand movement.
Start with the basic chain:
Nervous system signal → muscle activation → force production → tendon/bone interaction → joint movement
Then zoom inward:
Muscle → muscle fiber → myofibril → sarcomere → actin and myosin
That framework makes animated muscles much easier to understand.
Frequently Asked Questions
What is a muscle animation used for?
A muscle animation is primarily used to demonstrate anatomy, movement, contraction, and physiological processes visually. It can show how muscles relate to bones and joints or zoom into microscopic structures such as sarcomeres and the proteins involved in contraction.
Can animated muscles show how muscles grow?
They can illustrate concepts related to muscle growth, but an animation doesn’t directly measure an individual’s muscle growth. Muscle adaptation is a biological process influenced by training, nutrition, recovery, genetics, and other factors. An educational animation should therefore be treated as a model rather than a prediction of a specific person’s results.
What is the difference between muscle anatomy and muscle physiology?
Muscle anatomy focuses mainly on structure: where muscles are located and how they’re organized. Muscle physiology focuses on function: how muscles receive signals, produce force, contract, relax, and respond to different conditions. Animated resources can combine both subjects.
Why do muscles need calcium to contract?
Calcium helps regulate access to binding sites involved in the interaction between actin and myosin in skeletal muscle. When calcium levels inside the muscle fiber change in response to signaling, the regulatory proteins controlling contraction also change state. (OpenStax)
Do muscles pull or push bones?
Skeletal muscles primarily pull through contraction. They generate tension that is transmitted through tendons to bones. Because muscles generally produce pulling forces, movements at a joint often involve muscles working in opposing groups to control different directions of movement.
Conclusion: Use Animation to Connect the Dots
Animated muscles are most useful when they help you connect three things: what a muscle looks like, what the body is doing, and what is happening inside the muscle.
Start with a simple movement. Identify the joint and major muscles, then work inward toward muscle fibers, sarcomeres, actin, and myosin. Don’t worry about memorizing every label in one sitting.
The strongest learning comes from combining animation with reliable written explanations and static diagrams. If an animation looks impressive but can’t explain what you’re seeing, choose a clearer resource instead. A good visual should make muscle biology simpler, not more confusing.
Animated Muscles: Complete Visual Guide to Muscle Anatomy and Movement
Animated muscles can turn difficult anatomy and physiology concepts into something much easier to see and remember. A good animation can show a muscle’s location, how it interacts with bones and joints, and what happens inside muscle fibers during contraction.
For beginners, the biggest benefit is seeing structure and movement together. Instead of memorizing a list of muscle names, you can watch a movement, identify the muscles involved, and then connect that movement to the microscopic processes responsible for force production.
Quick Guide to Animated Muscles
| Learning goal | Best visual approach |
|---|---|
| Learn muscle names | Labeled anatomy animation |
| Understand movement | 3D movement animation |
| Learn contraction | Sarcomere animation |
| Study exercise technique | Muscle-and-joint animation |
| Understand muscle structure | Layered anatomy animation |
| Review quickly | Short labeled animation |
| Learn physiology | Step-by-step contraction animation |
How Muscles Work Together During Movement
A major advantage of animated muscle anatomy is that it can show several muscles working around the same joint.
Consider an elbow movement. Rather than thinking about one muscle in isolation, you can watch how the muscles on different sides of the joint contribute to controlled movement.
The animation can then connect the visible movement to deeper anatomy:
Muscle → tendon → bone → joint → movement
This is much easier to understand when the structures are shown moving together.
Muscles Don’t Work Like Simple On-Off Switches
An educational animation can sometimes make muscle activity look binary: the muscle is either “on” or “off.”
Real movement is more controlled.
The nervous system regulates muscle force through mechanisms including motor-unit recruitment and changes in firing activity. The amount of force produced can therefore vary rather than simply switching between zero and maximum.
For beginners, this is an important distinction. A muscle can contribute different amounts of force depending on the task.
What Is a Motor Unit?
A motor unit consists of a motor neuron and the muscle fibers it controls.
A detailed animation can show a nerve branching to several muscle fibers. When the motor neuron activates, the associated fibers receive the signal.
Motor units are fundamental to how the nervous system controls skeletal muscle force. (OpenStax)
A simple animation might represent this as:
Motor neuron → nerve branches → muscle fibers → force
That visual chain can be much easier to remember than a paragraph alone.
Animated Muscles and Muscle Fiber Types
Some educational animations also compare different skeletal muscle fiber characteristics.
Be careful here, because muscle-fiber classification can become complicated quickly. Different systems use different terminology, and a simplified animation may not capture every physiological detail.
For beginner study, focus first on the larger concept:
- Skeletal muscle contains individual muscle fibers.
- Muscle fibers contain myofibrils.
- Myofibrils contain repeating sarcomeres.
- Sarcomeres contain organized contractile proteins.
This structural hierarchy is more useful initially than trying to memorize every fiber classification.
A Visual Hierarchy for Learning Muscle Anatomy
One of the best ways to use an animation is to study anatomy from large to small.
Level 1: Whole body
Identify major muscle groups.
Level 2: Individual muscle
Look at the muscle’s location and attachments.
Level 3: Muscle fiber
Understand that the muscle is made from many specialized cells called muscle fibers.
Level 4: Myofibril
See the contractile structures arranged within the muscle fiber.
Level 5: Sarcomere
Study the repeating unit responsible for contraction.
Level 6: Contractile proteins
Look at actin and myosin and how their interaction contributes to force.
This progression prevents a common beginner problem: trying to memorize microscopic terminology before understanding the overall structure.
Why Tendons Matter in Muscle Animations
A muscle doesn’t directly move a bone simply because it contracts.
Skeletal muscles commonly connect to bones through tendons, which transmit force from muscle to the skeleton. (Cleveland Clinic)
That’s why an effective 3D animation should show the tendon instead of making the muscle appear magically attached to the bone.
A simple animation might demonstrate:
Muscle contracts → tension develops → tendon transmits force → bone moves
The exact mechanics depend on the joint and movement, but this basic framework is valuable for beginners.
Animated Muscles Can Show Joint Angles
Another useful feature is the ability to visualize changing joint angles.
A static picture might show a bent elbow, but an animation can show the entire path between positions.
This is helpful when studying:
- elbow flexion and extension;
- knee flexion and extension;
- hip movement;
- shoulder movement;
- ankle movement.
The animation can also reveal that the same muscle may contribute differently depending on the position of a joint.
Why Slow Motion Helps
If you’re studying an unfamiliar movement, normal-speed animation may move too quickly.
Use slow playback or pause after each major stage.
Try this sequence:
- Watch the movement normally.
- Replay it slowly.
- Identify the joint.
- Identify the major muscles.
- Watch the muscle-tendon relationship.
- Replay the movement at normal speed.
This turns animation into an active learning exercise.
A Common Mistake: Confusing Location With Function
Knowing where a muscle sits doesn’t automatically tell you everything about what it does.
Two muscles can be close together but contribute differently to movement.
Likewise, a single muscle can contribute to more than one joint action depending on its anatomical attachments.
That’s why animated muscles are useful when combined with written explanations. The movement gives you context, while the anatomy explanation gives you the terminology.
How to Compare Two Muscle Animations
If you’re deciding between two educational animations, don’t automatically choose the one with the most impressive graphics.
Use this comparison:
| Question | Animation A | Animation B |
| Are labels accurate? | Check | Check |
| Is movement explained? | Check | Check |
| Is the scale clear? | Check | Check |
| Are key terms defined? | Check | Check |
| Is the source credible? | Check | Check |
| Can you pause it? | Check | Check |
| Does it avoid unnecessary effects? | Check | Check |
The winner is the resource that helps you understand the biology, not necessarily the one with the highest visual quality.
How to Use Animated Muscles for Exam Revision
If you’re preparing for an anatomy or physiology exam, animation can be particularly useful for processes.
Try making a three-column revision note:
| What you see | What it means | What you should remember |
| Nerve signal | Muscle activation begins | Nervous system controls skeletal muscle |
| Calcium appears | Regulatory process changes | Calcium is essential for contraction |
| Myosin interacts with actin | Cross-bridge cycling | Force is produced |
| Sarcomere shortens | Filaments slide | Sliding-filament model |
| Calcium is returned to storage | Contraction ends | Muscle moves toward relaxation |
This technique converts a moving image into a compact revision sheet.
Animated Muscles for Children’s Education
Animations can also make basic anatomy approachable for younger learners.
For a child-focused resource, avoid unnecessary microscopic detail at first.
Start with:
- bones;
- major muscles;
- movement;
- simple muscle contraction;
- everyday actions.
For example, showing a person running can introduce the idea that muscles work with bones and joints to produce movement.
Then more detailed concepts can be added gradually.
Animated Muscles for Fitness Beginners
Someone starting strength training may want to know which muscles are involved in an exercise.
An animation can help answer basic questions such as:
- Where is the target muscle?
- Which joint is moving?
- Which direction is the movement?
- What other muscles contribute?
- What happens when the exercise changes position?
However, don’t treat an animation as proof that one exercise is automatically “best” for a particular muscle.
Exercise results depend on many factors, including the person, movement technique, resistance, training volume, and overall program.
How to Create Better Muscle Animation Content
If you’re publishing anatomy content yourself, accuracy should come before visual effects.
A useful production workflow is:
1. Define one learning objective
For example:
“Explain how a skeletal muscle produces movement at a joint.”
2. Choose the correct level
Don’t mix whole-body anatomy and microscopic physiology without explaining the transition.
3. Build the visual sequence
Show the structures in an order that makes sense.
4. Add only necessary labels
Too many labels can make an animation harder to follow.
5. Explain movement in plain English
Avoid assuming the viewer already knows technical terminology.
6. Verify the science
Check anatomy and physiology information against reputable educational or medical sources before publishing.
7. Add context
Tell viewers what the animation simplifies or leaves out.
That last step is important. Every educational model leaves out some details.
How to Avoid Misleading Muscle Visuals
Anatomical animations can look extremely realistic while still being simplified.
Before accepting a visual as fact, ask:
Is this a measurement, a diagram, or a model?
A model is designed to explain something. It doesn’t necessarily reproduce every detail of real biological tissue.
This distinction matters particularly for animations showing:
- muscle size changes;
- blood flow;
- nerve activity;
- microscopic movement;
- exercise mechanics.
The clearer the source is about its simplifications, the easier it is for viewers to use the animation correctly.
The Role of Color in Muscle Animation
Color can make an animation easier to follow.
For example, different colors can distinguish:
- muscle tissue;
- bone;
- tendon;
- nerve;
- blood vessels.
But color itself doesn’t carry biological meaning unless the animation explains what each color represents.
Don’t assume that a red muscle in an animation means the real tissue has exactly that appearance.
What Makes an Animation Memorable?
A good animation creates a mental connection.
Instead of remembering:
“Actin, myosin, sarcomere.”
You remember:
“The muscle activates, the contractile proteins interact, the sarcomere shortens, and the muscle produces force.”
That sequence is more useful because it connects terminology with function.
Three Questions to Ask After Watching
After finishing an animation, close it and answer:
1. What moved?
Identify the joint or body part.
2. Which structures produced or transmitted force?
Think about the muscle, tendon, and bone.
3. What happened inside the muscle?
For skeletal muscle, think about activation, calcium regulation, actin-myosin interaction, and sarcomere shortening.
If you can answer all three, you’ve probably gained more than you would from simply watching the animation repeatedly.
The Biggest Benefits of Animated Muscles
The strongest advantages are simple:
They show change over time.
A static image can’t naturally demonstrate a complete movement sequence.
They connect different levels of anatomy.
You can move from the whole body to microscopic structures.
They make abstract processes visual.
Events such as actin-myosin interaction are difficult to imagine from text alone.
They support active learning.
You can pause, predict what happens next, and explain the sequence yourself.
The Limitations You Should Know
Animation isn’t perfect.
It may simplify anatomy, exaggerate movement for visibility, omit important structures, or represent microscopic processes schematically.
For that reason, use animations alongside reliable written resources rather than treating every visual as an exact representation of human physiology.
Frequently Asked Questions
What are animated muscles used for?
Animated muscles are used to teach anatomy, physiology, movement, and exercise concepts. They can show the location of muscles, how muscles interact with bones and joints, and how microscopic processes contribute to contraction. They’re particularly useful when the subject involves movement or a sequence of events.
How do animated muscles show contraction?
A muscle-contraction animation may show nervous-system signaling, calcium release, regulatory changes, actin-myosin interaction, and sarcomere shortening. These visuals represent a simplified model of the biological process. The purpose is to make the sequence easier to understand, not to reproduce every molecular event exactly.
Can animated muscles show which muscles are used in an exercise?
Yes. An animation can highlight muscles involved in a movement and show their relationship with the relevant joints. However, muscle involvement can change with exercise technique, joint position, resistance, and other factors, so an animation should be treated as an educational guide rather than a universal measurement of muscle activation.
Are 3D muscle animations accurate?
A high-quality 3D animation can accurately represent important anatomical relationships, but it remains a model. Some features may be enlarged, simplified, or exaggerated so viewers can see them. Always check the creator and supporting information before using an animation as a serious anatomy reference.
Can animated muscles help with anatomy exams?
Yes. They are especially useful for processes involving movement and sequence. Watching an animation, pausing it, identifying structures, and then explaining the process without looking can turn a passive video into an effective revision activity.
Final Takeaway: Make the Movement Make Sense
The real value of animated muscles isn’t that they look impressive. It’s that they can connect anatomy with movement and physiology.
Start with the visible action. Identify the joint and major muscles. Follow the force through the tendon to the bone, then zoom inward to the muscle fiber and sarcomere. At the microscopic level, actin and myosin interactions help explain how skeletal muscle generates force.
Use animation alongside trustworthy textbooks, diagrams, and medical or educational resources. When you actively pause, predict, label, and explain what you’re seeing, the information becomes much easier to remember.