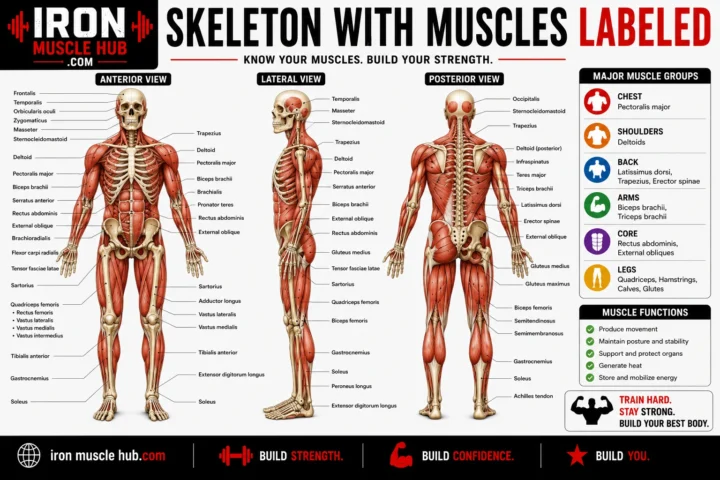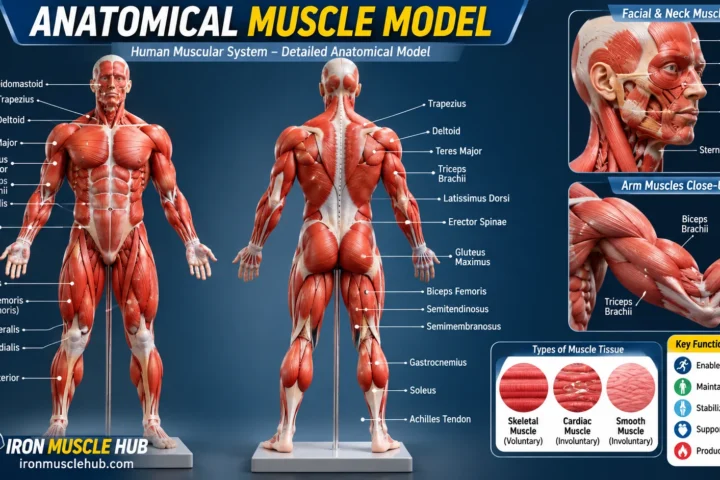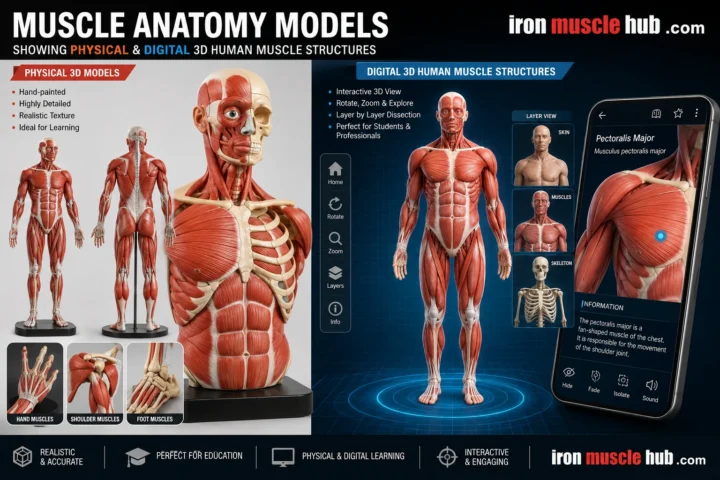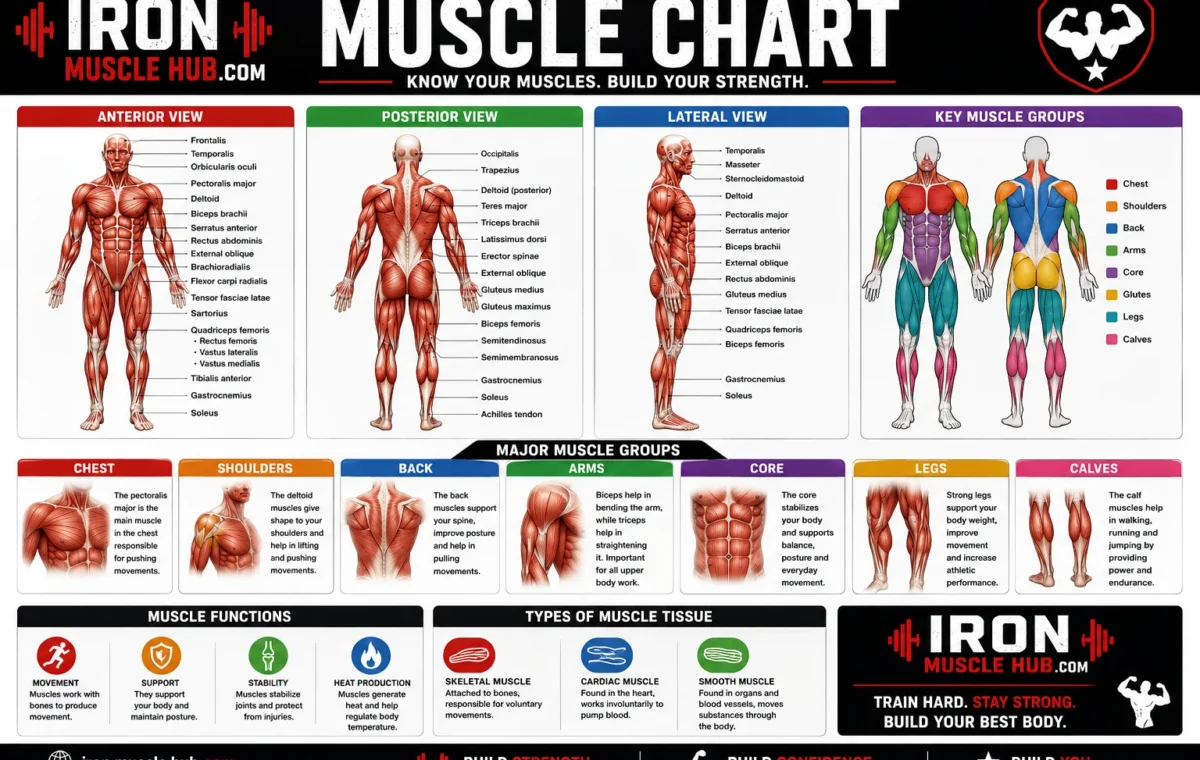
A muscle chart is a visual guide that shows where muscles are located and often identifies their names and basic functions. For beginners, a good chart makes it much easier to understand the major muscles of the chest, back, shoulders, arms, abdomen, hips and legs without trying to memorize hundreds of individual muscles at once.
- Muscle Chart at a Glance
- What Is a Muscle Chart?
- Why Use a Muscle Chart?
- 1. Chest Muscles
- 2. Shoulder Muscles
- 3. Upper-Back Muscles
- 4. Latissimus Dorsi
- 5. Biceps
- 6. Triceps
- 7. Abdominal Muscles
- 8. Gluteal Muscles
- 9. Quadriceps
- 10. Hamstrings
- 11. Calf Muscles
- Step 1: Identify the body view
- Step 2: Find the large landmarks
- Step 3: Learn the name
- Step 4: Learn one basic action
- Step 5: Test yourself without looking
- Mistake 1: Trying to Learn Every Muscle First
- Mistake 2: Confusing Muscle Groups With Individual Muscles
- Mistake 3: Assuming Every Chart Uses the Same Labels
- Mistake 4: Learning Names Without Functions
- What is a muscle chart?
- How many muscles are in the human body?
- What are the major muscle groups?
- What are the three types of muscle?
- What should I learn first from a muscle chart?
- Is a muscle chart useful for working out?
- Understanding Muscle Chart Labels More Clearly
- Head and Neck Muscles
- Masseter
- Sternocleidomastoid
- Chest and Upper-Back Anatomy
- Pectoralis Major
- Trapezius
- Latissimus Dorsi
- Shoulder Muscles
- Upper-Arm Muscle Chart
- Rectus Abdominis
- External Obliques
- Internal Obliques
- Transversus Abdominis
- Gluteus Maximus
- Gluteus Medius
- Gluteus Minimus
- Rectus Femoris
- Vastus Lateralis
- Vastus Medialis
- Vastus Intermedius
- Biceps Femoris
- Gastrocnemius
- Soleus
- Tibialis Anterior
- Why This Matters
- 1. Location
- 2. Action
- 3. Relationship
- Try the Blank-Chart Method
- Is a muscle chart the same as a muscular system diagram?
- Should I study the front or back muscle chart first?
- Why do some muscles appear missing from a muscle chart?
- What is the easiest way to learn muscle names?
- Can I use a muscle chart to understand gym exercises?
- Where can I find reliable anatomy information?
- How to Use a Muscle Chart for Better Anatomy Study
- Learn Muscles by Region
- Upper Body
- Core
- Lower Body
- Flexion and Extension
- Abduction and Adduction
- Agonist
- Antagonist
- Synergist
- Isolation vs. Compound Movement
- Step 1: Draw the front view
- Step 2: Draw the back view
- Step 3: Add basic actions
- Step 4: Test yourself
- Step 5: Add detail gradually
- Use Location Clues
- Use Opposites
- Use Layers
- Origin
- Insertion
- Action
- Innervation
- Blood Supply
- Anatomical Layer
- What is the best way to memorize a muscle chart?
- Should I memorize muscle origins and insertions?
- Why are some muscles hidden on anatomy charts?
- Are muscle charts useful for personal trainers?
- Can I use a muscle chart to diagnose an injury?
- How many muscles should a beginner memorize?
- Final Thoughts
The human body has more than 600 muscles, and they don’t all have the same job. Some help you move your skeleton, some maintain posture and stability, and specialized muscle tissue helps organs perform essential functions.
If you’re learning anatomy, starting with the major superficial muscles is much more useful than attempting to memorize every muscle immediately. For more insights read here :- lean and muscle body and lean muscle .
Quick answer: A muscle chart is a labeled visual reference for identifying muscles by location, name and sometimes function. For beginners, focus first on the major muscles of the head and neck, trunk, upper limbs and lower limbs.
Muscle Chart at a Glance
| Body area | Major muscles to learn first | Simple job |
|---|---|---|
| Chest | Pectoralis major | Helps move the arm and shoulder |
| Upper back | Trapezius, rhomboids | Helps position and stabilize the shoulder blades |
| Back | Latissimus dorsi | Helps pull and move the upper arm |
| Shoulders | Deltoid | Helps raise and move the arm |
| Front upper arm | Biceps brachii | Helps bend the elbow |
| Back upper arm | Triceps brachii | Helps straighten the elbow |
| Abdomen | Rectus abdominis, obliques | Helps move and stabilize the trunk |
| Buttocks | Gluteus maximus | Helps extend the hip |
| Front thigh | Quadriceps | Helps straighten the knee |
| Back thigh | Hamstrings | Help bend the knee and extend the hip |
| Lower leg | Gastrocnemius, soleus | Help move the foot and ankle |
This is a learning framework, not a complete list of every muscle. Anatomy resources commonly divide the muscular system into broad regional groups such as the head and neck, trunk, upper extremity and lower extremity.
What Is a Muscle Chart?
A muscle chart is essentially a map of the body’s muscles.
Depending on its purpose, a chart may show only large, visible muscles or provide much more anatomical detail, including muscle attachments, nerve supply and actions. Detailed anatomy charts can divide the body into regions such as the upper limb, lower limb, head and neck, and trunk.
For someone new to anatomy, you don’t need the most complicated chart available.
A simple front-and-back diagram with clearly labeled major muscles is often enough to build a useful foundation.
Why Use a Muscle Chart?
A visual chart can help you:
- Identify muscles by location.
- Connect a muscle’s name with its position.
- Understand basic movement.
- Study anatomy more efficiently.
- Follow exercise or rehabilitation terminology.
- Recognize the difference between major muscle groups.
- Build a foundation before studying deeper anatomy.
The key is to treat the chart as a map, rather than trying to memorize every label in one sitting.
Major Muscles on a Human Muscle Chart
Let’s work through the main regions from head to toe.
1. Chest Muscles
The pectoralis major is the large, superficial muscle covering much of the front of the upper chest.
It contributes to movements of the upper arm, including bringing the arm toward the body and moving it forward. Because it is relatively easy to see on a superficial muscle chart, it’s one of the first chest muscles beginners usually encounter.
A detailed anatomy chart may also show deeper or smaller chest muscles, but the pectoralis major is a sensible starting point.
2. Shoulder Muscles
The deltoid sits around the shoulder joint and gives the shoulder much of its rounded appearance.
Its different portions contribute to different arm movements. On a basic muscle chart, you’ll usually see it highlighted as a large cap-like muscle covering the shoulder.
Don’t confuse the deltoid with the trapezius. The deltoid is centered around the shoulder, while the trapezius extends across much of the upper back and neck region.
3. Upper-Back Muscles
The trapezius is a broad muscle extending across the upper back and neck area.
It helps move and stabilize the shoulder blades and participates in movements involving the neck and shoulders.
The rhomboids lie deeper beneath the trapezius and help position the shoulder blades.
A basic chart may emphasize the trapezius because it’s more superficial and easier to identify.
4. Latissimus Dorsi
The latissimus dorsi, often called the “lats,” is a large muscle covering part of the back.
It contributes to movements of the upper arm, including pulling the arm backward and toward the body.
On a back-view muscle chart, look for the broad muscle extending from the lower and middle back toward the upper arm.
5. Biceps
The biceps brachii is located on the front of the upper arm.
One of its best-known actions is helping bend the elbow. It’s the muscle people usually mean when they talk about “flexing the biceps.”
The name itself gives you a useful memory clue: bi- refers to two heads, or proximal attachments, of the muscle. Muscle names frequently contain clues about size, shape, location, number of origins or action.
6. Triceps
The triceps brachii sits on the back of the upper arm.
It works in opposition to the biceps for elbow movement, helping straighten the elbow.
Another useful name clue is tri-, referring to its three heads.
Understanding these name clues can make a muscle chart much easier to memorize rather than treating every anatomical term as a completely random word.
7. Abdominal Muscles
The rectus abdominis runs vertically along the front of the abdomen.
The external obliques are positioned on the sides of the abdomen and contribute to trunk movement and stabilization.
A muscle chart can make their locations much clearer than a written description alone.
It’s also important to remember that “the abs” isn’t the anatomical name of one single muscle. The abdominal region contains multiple muscles working together.
8. Gluteal Muscles
The gluteus maximus is the large superficial muscle forming much of the buttock.
It plays an important role in hip extension and other hip movements.
The gluteal region contains additional muscles, including the gluteus medius and gluteus minimus. A beginner’s chart may show the major superficial muscles first before introducing smaller or deeper structures.
9. Quadriceps
The quadriceps are a group of muscles at the front of the thigh.
The group includes four major muscles, which is reflected in the word quadri-. The quadriceps are especially important for extending the knee.
On a front-view muscle chart, they’re the large muscle group covering much of the thigh.
10. Hamstrings
The hamstrings are a group of muscles on the back of the thigh.
They participate in knee flexion and hip extension. On a back-view chart, they’re positioned behind the quadriceps.
A simple way to remember the relationship is:
Front thigh → quadriceps → knee extension
Back thigh → hamstrings → knee flexion
Real movement is more complicated than these shortcuts, but they’re useful starting points.
11. Calf Muscles
Two familiar muscles you’ll see on many charts are the gastrocnemius and soleus.
The gastrocnemius is the more superficial, prominent calf muscle. The soleus lies underneath it.
Together with other structures around the ankle, these muscles contribute to movements of the foot. The calf region is a good example of why a chart becomes more useful as you progress: a simple image can show that the visible surface muscle isn’t necessarily the only muscle underneath it.
Front vs. Back Muscle Chart
One of the easiest ways to study anatomy is to split the body into two views.
| Front view | Back view |
| Pectoralis major | Trapezius |
| Deltoid | Rear deltoid |
| Biceps brachii | Triceps brachii |
| Rectus abdominis | Latissimus dorsi |
| External obliques | Erector spinae region |
| Quadriceps | Hamstrings |
| Tibialis anterior | Gastrocnemius |
This approach prevents a common beginner mistake: trying to memorize the entire body from one crowded image.
MedlinePlus provides anatomy resources organized into areas such as the upper extremity, trunk, lower extremity, and head and neck, which is another useful way to break anatomy into manageable sections.
How to Read a Muscle Chart
A chart becomes much more useful if you know what you’re looking at.
Step 1: Identify the body view
First determine whether you’re looking at the anterior/front or posterior/back view.
This sounds obvious, but it prevents many identification errors.
Step 2: Find the large landmarks
Start with easily recognizable areas:
- Chest
- Shoulder
- Upper arm
- Abdomen
- Thigh
- Calf
Then work inward toward individual muscles.
Step 3: Learn the name
Read the anatomical name several times.
Don’t worry about perfect pronunciation at first. Concentrate on connecting the word to the location.
Step 4: Learn one basic action
Attach one simple function to the muscle.
For example:
Biceps → elbow flexion
Triceps → elbow extension
Quadriceps → knee extension
Hamstrings → knee flexion
This gives you a second memory hook.
Step 5: Test yourself without looking
Cover the labels and try to identify the muscles yourself.
Active recall is more useful than repeatedly staring at the same chart.
A Simple Muscle-Chart Study Method
If you’re studying anatomy for the first time, don’t try to memorize hundreds of muscles in a single session.
Use a regional approach:
- Day 1: Chest and shoulders.
- Day 2: Upper back and arms.
- Day 3: Abdomen and lower back.
- Day 4: Hips and glutes.
- Day 5: Front and back of the thigh.
- Day 6: Lower leg and foot.
- Day 7: Review the entire chart.
You can adjust this schedule to your needs. The point is to learn the body in sections rather than treating anatomy as one enormous list.
Detailed references such as Kenhub’s anatomy charts also organize muscles by body region and can include information such as origins, insertions, innervation and functions.
Common Muscle-Chart Mistakes
Mistake 1: Trying to Learn Every Muscle First
There are more than 600 muscles in the human body, so a complete anatomy reference can look overwhelming.
Start with major superficial muscles and gradually add detail.
Mistake 2: Confusing Muscle Groups With Individual Muscles
Terms such as “quadriceps” and “hamstrings” describe groups rather than one simple muscle.
A beginner chart may group structures together for convenience, while a detailed anatomy reference separates them.
Mistake 3: Assuming Every Chart Uses the Same Labels
Different resources can organize and label anatomy at different levels of detail.
For serious study, use a medically reviewed or educational anatomy source rather than relying on an unlabeled social-media graphic.
Mistake 4: Learning Names Without Functions
Knowing that a muscle is called the biceps is useful, but understanding its basic role makes the information much easier to remember.
Try pairing every new muscle with location + action.
Muscle Chart vs. Muscle Group Chart
These terms can sound interchangeable, but there’s a small practical difference.
A muscle chart may identify individual muscles and their locations.
A muscle-group chart generally combines muscles by region or function, such as chest, back, shoulders, arms, or legs.
There isn’t one universal way to divide muscles into “major groups.” Medical and fitness resources may organize them differently depending on their purpose. Cleveland Clinic notes that muscle groups are commonly discussed by location or by the movement they perform.
Why Muscle Names Can Be Easier Than They Look
Anatomical names often contain clues.
For example:
- Maximus can indicate a large muscle.
- Minimus can indicate a smaller muscle.
- Longus relates to length.
- Biceps indicates two heads.
- Triceps indicates three heads.
- Quadriceps indicates four heads.
- Flexor describes a muscle associated with flexion.
- Extensor describes a muscle associated with extension.
The National Cancer Institute’s SEER anatomy material explains that muscle names can reflect size, shape, direction, location, number of origins and action.
Once you recognize these patterns, a new muscle name becomes less intimidating.
A Practical Way to Choose a Muscle Chart
If you’re choosing a chart for learning, look for these features:
| Feature | Why it matters |
| Front and back views | Helps you understand location in 3D |
| Clear labels | Prevents confusion |
| Major muscles first | Easier for beginners |
| Anatomically accurate terminology | Useful for serious study |
| Regional organization | Makes revision manageable |
| Function information | Connects anatomy with movement |
| Copyright-safe use | Important if publishing the chart online |
For a personal study sheet, clarity matters more than having the largest possible number of labels.
If you’re publishing a chart on a website, don’t simply download and repost someone else’s anatomy illustration. Copyright ownership can apply to illustrations even when the underlying anatomical facts are public knowledge. A safer approach is to create your own original graphic or use an image whose license explicitly permits the intended use.
Frequently Asked Questions
What is a muscle chart?
A muscle chart is a visual reference showing the location and names of muscles, often with front, back or regional views. More detailed charts may also include information about muscle actions, attachments and nerve supply. For beginners, a labeled chart of the major superficial muscles is usually the easiest place to start.
How many muscles are in the human body?
The human body has more than 600 muscles, although exact counts can vary depending on how anatomical structures are defined and counted. For learning purposes, it’s more useful to understand the major muscle groups first and then add smaller muscles as your anatomy knowledge develops.
What are the major muscle groups?
Common regional groupings include the muscles of the head and neck, trunk, upper extremities and lower extremities. In fitness settings, people may use simpler groupings such as chest, back, shoulders, arms, abdomen, glutes and legs. These systems serve different purposes, so there isn’t one universal grouping.
What are the three types of muscle?
The three major types of muscle tissue are skeletal, cardiac and smooth muscle. Skeletal muscle is associated with movement of the skeleton, cardiac muscle is found in the heart, and smooth muscle is found in various internal organs and structures.
What should I learn first from a muscle chart?
Start with the large, easy-to-identify muscles: pectoralis major, deltoid, trapezius, latissimus dorsi, biceps, triceps, rectus abdominis, gluteus maximus, quadriceps and hamstrings. Learn each one’s location and one basic action before moving to smaller or deeper muscles.
Is a muscle chart useful for working out?
Yes, it can help you understand which muscles are involved in common movements and exercises. However, a chart isn’t a substitute for professional medical or exercise guidance, particularly if you’re dealing with pain, weakness or an injury. Skeletal muscles work together with bones, tendons and other structures rather than operating as isolated parts.
Build Your Muscle Anatomy Knowledge One Region at a Time
A good muscle chart doesn’t need to show every anatomical detail to be useful. For most beginners, the smartest starting point is a clear front-and-back reference that identifies the major muscles and gives you a basic idea of what each one does.
Once those landmarks become familiar, you can add deeper muscles, attachments, nerve supply and more detailed movement information. That approach is far less overwhelming than trying to memorize the entire muscular system immediately.
Understanding Muscle Chart Labels More Clearly
A detailed muscle chart can look confusing because several muscles may overlap, sit underneath one another, or share similar names. The easiest way to make sense of it is to stop viewing the chart as one giant picture and instead study it by body region.
Think of each region as a small map:
- Head and neck
- Chest and upper back
- Shoulders
- Upper arms and forearms
- Abdomen
- Lower back
- Hips and glutes
- Thighs
- Lower legs
Once you know the major landmarks in each area, more detailed anatomy becomes much easier to understand.
Head and Neck Muscles
Many beginner charts concentrate on the torso and limbs, but the head and neck contain numerous muscles involved in facial expression, chewing, swallowing and movement of the head.
Two familiar examples are the masseter and sternocleidomastoid.
Masseter
The masseter is a strong muscle associated with chewing. It is located along the side of the jaw.
If you’re looking at a side-view anatomy illustration, it is one of the easier facial muscles to identify.
Sternocleidomastoid
The sternocleidomastoid, often abbreviated SCM, runs along the side of the neck.
Its name can seem intimidating, but the name actually contains clues about its attachments. This is a good example of why learning common anatomical naming patterns can make a muscle chart easier to study.
Chest and Upper-Back Anatomy
The chest and back contain several muscles that work together to position the shoulders and move the upper limbs.
Pectoralis Major
The pectoralis major is the large superficial muscle covering much of the front of the chest.
Its actions include movements of the upper arm at the shoulder. A basic chart usually makes this muscle easy to recognize because of its size and location.
Trapezius
The trapezius occupies a large area across the upper back and neck.
Rather than thinking of it as simply a “back muscle,” remember that it plays an important role in positioning and stabilizing the shoulder blades.
Latissimus Dorsi
The latissimus dorsi is a broad muscle on the back.
It’s commonly called the lats in fitness conversations. It contributes to several movements of the upper arm and is particularly easy to spot on a posterior, or back-view, muscle chart.
Shoulder Muscles
The deltoid is the most recognizable superficial muscle around the shoulder.
A basic chart often divides it visually into front, middle and rear portions. These portions have somewhat different roles in shoulder movement.
For beginners, however, you don’t need to memorize every detail immediately.
Start with:
Deltoid → shoulder → moves and stabilizes the upper arm
Then add more specific actions as your knowledge improves.
Upper-Arm Muscle Chart
The upper arm is a particularly useful place to learn opposing muscle actions.
| Muscle | Location | Basic movement |
|---|---|---|
| Biceps brachii | Front of upper arm | Helps flex the elbow |
| Triceps brachii | Back of upper arm | Helps extend the elbow |
| Brachialis | Deep to biceps region | Strong elbow flexor |
| Coracobrachialis | Upper arm | Helps move the arm at the shoulder |
The important lesson isn’t simply memorizing the names.
You want to understand that several muscles can contribute to the same movement, while a single muscle can participate in more than one movement.
That is why a muscle chart should be treated as an introduction rather than a complete explanation of human movement.
Forearm Muscles on a Muscle Chart
The forearm is more complicated than the upper arm because it contains many muscles.
These muscles contribute to movements of the wrist, fingers and forearm.
For a beginner chart, it’s usually better to learn the broad regions first:
- Flexor side: associated with many wrist and finger flexion actions.
- Extensor side: associated with many wrist and finger extension actions.
- Pronator muscles: help rotate the forearm so the palm faces downward.
- Supinator: helps rotate the forearm so the palm faces upward.
Don’t worry if a detailed forearm diagram looks crowded. That’s normal. Once you’re comfortable with the major muscle groups, you can gradually learn individual muscles.
Abdominal Muscle Chart
The abdominal region is another area where simple fitness terminology can hide anatomical complexity.
People often say “abs” as though the abdomen contains one muscle. It doesn’t.
Major muscles of the abdominal wall include:
- Rectus abdominis
- External oblique
- Internal oblique
- Transversus abdominis
Rectus Abdominis
The rectus abdominis runs vertically along the front of the abdomen.
It contributes to trunk flexion and helps stabilize the trunk.
External Obliques
The external obliques are positioned on the sides of the abdomen.
They contribute to trunk movement and stability.
Internal Obliques
The internal obliques sit deeper than the external obliques and also contribute to trunk movement and stabilization.
Transversus Abdominis
The transversus abdominis is a deeper abdominal muscle with fibers that run broadly across the abdomen.
It is involved in abdominal compression and trunk stability.
A detailed muscle chart can show these layers much more clearly than a basic front-view diagram.
Lower-Back Muscles
The lower back contains several muscles and muscle groups that contribute to movement and stability.
One important group is the erector spinae.
The erector spinae is associated with extending and stabilizing the vertebral column. It is not a single simple muscle but a group of muscles.
This is another reason not to assume that every label on a muscle chart represents one individual structure.
Hip and Glute Muscle Chart
The hip region contains muscles that help move and stabilize the pelvis and thigh.
The three gluteal muscles are:
- Gluteus maximus
- Gluteus medius
- Gluteus minimus
Gluteus Maximus
The gluteus maximus is the large superficial muscle of the buttock.
It contributes significantly to hip extension.
Gluteus Medius
The gluteus medius is positioned on the outer surface of the pelvis and contributes to movement and stabilization of the hip.
Gluteus Minimus
The gluteus minimus lies deeper than the gluteus medius.
For basic chart study, learn the three names and their relative positions before trying to memorize every attachment.
Front-Thigh Muscle Chart
The front of the thigh is dominated by the quadriceps femoris group.
The quadriceps consists of four muscles:
- Rectus femoris
- Vastus lateralis
- Vastus medialis
- Vastus intermedius
Their major shared role is extending the knee.
A useful visual memory trick is to think of the quadriceps as a four-part team rather than four unrelated muscles.
Rectus Femoris
The rectus femoris sits toward the center of the front thigh and is the most superficial of the four quadriceps muscles in that central region.
It also crosses the hip, making its function more complex than simply extending the knee.
Vastus Lateralis
The vastus lateralis occupies the outer portion of the thigh.
On a front-view chart, it is generally easier to identify toward the lateral side of the leg.
Vastus Medialis
The vastus medialis is located toward the inner portion of the thigh.
It forms part of the quadriceps group and contributes to knee extension.
Vastus Intermedius
The vastus intermedius lies deeper, underneath the rectus femoris.
This is a good example of why a superficial muscle chart cannot show everything. Some muscles are hidden beneath others.
Back-Thigh Muscle Chart
The main hamstring muscles include:
- Biceps femoris
- Semitendinosus
- Semimembranosus
They are located on the posterior thigh.
The hamstrings contribute to knee flexion and hip extension.
Biceps Femoris
Despite the word “biceps,” this isn’t the same muscle as the biceps in your upper arm.
The name refers to the fact that the biceps femoris has two heads.
This illustrates an important anatomy lesson: similar names don’t always mean muscles are located in the same part of the body.
Lower-Leg Muscle Chart
The lower leg has several muscle compartments and individual muscles.
Three names beginners commonly encounter are:
- Gastrocnemius
- Soleus
- Tibialis anterior
Gastrocnemius
The gastrocnemius is the prominent superficial calf muscle.
It crosses both the knee and ankle joints and contributes to movement at both.
Soleus
The soleus lies deep to the gastrocnemius.
It contributes strongly to plantar flexion of the foot.
Tibialis Anterior
The tibialis anterior is located toward the front of the lower leg.
It helps dorsiflex the ankle, which means moving the top of the foot upward toward the lower leg.
Muscle Chart: Front, Side and Back Views
A single front image isn’t enough to understand the entire muscular system.
| View | Useful for identifying |
| Front/anterior | Chest, abdominal muscles, biceps, quadriceps |
| Back/posterior | Trapezius, latissimus dorsi, triceps, glutes, hamstrings |
| Side/lateral | Jaw, neck, shoulder, arm and leg relationships |
| Deep-layer view | Muscles hidden underneath superficial muscles |
If you’re creating or choosing an anatomy graphic, providing more than one view can dramatically improve its educational value.
Superficial vs. Deep Muscles
This is one of the most important concepts to understand before using a detailed muscle chart.
Superficial muscles are closer to the surface of the body.
Deep muscles are positioned underneath other structures.
Imagine looking at a layered diagram of a building. Removing the outer layer reveals structures that weren’t visible in the original picture.
The same principle applies to anatomy.
A basic chart might show the deltoid, while a deeper anatomical illustration may remove or hide it to reveal muscles underneath.
Why This Matters
If two charts appear to disagree about what is located in the same area, they may simply be showing different anatomical layers.
Always check:
- Which body region is shown?
- Is it a front or back view?
- Is the illustration superficial or deep?
- Is the muscle contracted or simply shown in anatomical position?
- Are the labels referring to individual muscles or muscle groups?
These questions can resolve a surprising amount of confusion.
Muscle Chart for Exercise Beginners
If you’re using a muscle chart to understand workouts, focus on movement first and muscle names second.
For example:
| Exercise movement | Muscles commonly involved |
| Pushing | Chest, shoulders, triceps |
| Pulling | Back muscles, biceps |
| Squatting | Quadriceps, gluteal muscles and other supporting muscles |
| Hip extension | Gluteal muscles and hamstrings |
| Calf raise | Calf muscles |
| Elbow flexion | Biceps, brachialis and supporting muscles |
These are simplified examples, not complete lists. Most exercises involve several muscles working together.
A chart can help you understand the anatomy behind an exercise, but it shouldn’t be used to diagnose pain or determine a treatment plan.
How to Memorize a Muscle Chart Faster
Instead of repeatedly reading labels, use a three-part system.
1. Location
Ask:
Where is the muscle?
For example:
Biceps → front of upper arm
2. Action
Ask:
What does it generally do?
Biceps → helps flex the elbow
3. Relationship
Ask:
What muscle or group is nearby or works in the opposite direction?
Biceps ↔ triceps
This creates multiple connections in your memory.
Try the Blank-Chart Method
A particularly useful study exercise is to take a blank body diagram and label it from memory.
Start with 10 major muscles.
When you can consistently identify those 10, add another five or 10.
This is generally more productive than trying to memorize every label on a highly detailed anatomy poster.
A Beginner’s 20-Muscle Study List
If you want a manageable starting point, learn these muscles and groups first:
- Trapezius
- Deltoid
- Pectoralis major
- Latissimus dorsi
- Biceps brachii
- Triceps brachii
- Rectus abdominis
- External oblique
- Erector spinae
- Gluteus maximus
- Gluteus medius
- Rectus femoris
- Vastus lateralis
- Vastus medialis
- Biceps femoris
- Semitendinosus
- Semimembranosus
- Gastrocnemius
- Soleus
- Tibialis anterior
This isn’t a complete anatomy curriculum. It’s a practical starting point for someone who wants to become comfortable reading a general muscle chart.
Common Questions About Muscle Charts
Is a muscle chart the same as a muscular system diagram?
Not necessarily. A muscular system diagram may provide a broad overview of the body’s muscles, while a muscle chart may focus on specific muscles, regions or anatomical details. The terms overlap, but the amount of information depends on the purpose of the illustration.
Should I study the front or back muscle chart first?
For most beginners, start with the front view because several major muscles are easy to identify there, including the pectoralis major, deltoid, biceps, rectus abdominis and quadriceps. Then move to the back view and learn the trapezius, latissimus dorsi, triceps, glutes and hamstrings.
Why do some muscles appear missing from a muscle chart?
The chart may be showing only superficial muscles. Other muscles may be located underneath them, or the illustrator may have simplified the anatomy for easier learning. Check whether the diagram identifies itself as superficial, deep, simplified or regional.
What is the easiest way to learn muscle names?
Connect each name with a location and a basic action. For example, learn “triceps” as the back of the upper arm and associate it with elbow extension. Breaking anatomy into body regions also makes memorization much easier.
Can I use a muscle chart to understand gym exercises?
Yes. A chart can help you understand which muscles are involved in a movement. However, exercises rarely isolate one muscle completely, and an anatomy chart doesn’t replace proper coaching, medical evaluation or individualized exercise advice.
Where can I find reliable anatomy information?
Good starting points include government and major medical resources such as MedlinePlus, the National Cancer Institute’s SEER Training anatomy materials, and established medical education resources. For more detailed anatomical study, specialized anatomy references can provide information about individual muscles, attachments and functions.
Final Takeaway
A muscle chart is most useful when you use it as a learning map rather than a giant memorization test. Begin with the major muscles, learn their locations, connect each one with a basic movement, and then gradually add deeper and smaller structures.
The biggest improvement comes from studying the body in sections: chest and back, shoulders and arms, abdomen, hips, thighs and lower legs. Once those landmarks become familiar, detailed anatomy charts stop looking like a wall of unfamiliar words and start making much more sense.
How to Use a Muscle Chart for Better Anatomy Study
Once you know the major muscles, the next step is learning how they relate to one another.
A muscle chart becomes much more useful when you stop treating each label as an isolated fact. Instead, connect three things:
Where is it? → What does it do? → What structures work with it?
For example, don’t simply memorize “triceps brachii.” Think:
Back of upper arm → helps extend the elbow → works in coordination with other muscles around the elbow and shoulder.
That simple pattern can turn a difficult anatomy list into something much easier to remember.
Learn Muscles by Region
Trying to memorize the entire muscular system at once is a poor study strategy for most beginners.
A regional approach works better.
Upper Body
Start with:
- Pectoralis major
- Deltoid
- Trapezius
- Latissimus dorsi
- Biceps brachii
- Triceps brachii
Then add smaller muscles as your confidence improves.
Core
Next study:
- Rectus abdominis
- External oblique
- Internal oblique
- Transversus abdominis
- Erector spinae
Lower Body
Finish with:
- Gluteus maximus
- Gluteus medius
- Quadriceps
- Hamstrings
- Gastrocnemius
- Soleus
- Tibialis anterior
This creates a useful mental map before you move into detailed anatomy.
Muscle Actions You Should Know
Muscle charts sometimes list actions using technical terminology.
Learning a few basic movement terms can make those labels much easier to understand.
| Term | Simple meaning |
|---|---|
| Flexion | Decreasing the angle at a joint |
| Extension | Increasing the angle at a joint |
| Abduction | Moving away from the body’s midline |
| Adduction | Moving toward the body’s midline |
| Rotation | Turning around an axis |
| Dorsiflexion | Moving the foot upward toward the lower leg |
| Plantar flexion | Pointing the foot downward |
These terms appear frequently in anatomy, physical therapy and exercise education.
Flexion and Extension
Think about your elbow.
When you bend it, you’re performing flexion.
When you straighten it, you’re performing extension.
This simple example helps explain why the biceps and triceps are often taught together.
Abduction and Adduction
Raise your arm out to your side.
Moving it away from your body’s centerline is abduction.
Bringing it back toward your body is adduction.
The same terminology can apply to movements of other body parts.
Understanding Muscle Pairs
Muscles don’t always work alone.
Many movements involve muscles that produce opposing actions.
A classic beginner example is the upper arm:
Biceps → elbow flexion
Triceps → elbow extension
This doesn’t mean only one muscle works during each movement. Human movement is coordinated and often involves several muscles, joints and stabilizing structures.
That distinction matters because simplified fitness diagrams can sometimes give the impression that one exercise equals one muscle.
Real movement is more complicated.
Agonists, Antagonists and Synergists
As you progress beyond a basic muscle chart, you’ll encounter terms describing how muscles cooperate.
Agonist
An agonist is generally the muscle or muscle group producing the main action in a particular movement.
Antagonist
An antagonist generally performs an opposing action.
Synergist
A synergist helps another muscle or group produce a movement or helps control unwanted movement.
These terms are context-dependent because a muscle can perform different roles during different movements.
You don’t need to memorize these definitions before learning the major muscles. They become much easier once you already understand basic anatomy.
Why Muscle Charts Show Different Shapes
If you’ve compared several anatomy diagrams, you may notice that muscles don’t always look exactly the same.
That’s normal.
Several factors affect how an illustration looks:
- The viewing angle
- Body position
- Muscle layer
- Degree of anatomical detail
- Artistic simplification
- Whether the muscle is shown individually or as part of a group
A scientific illustration isn’t necessarily designed to look like a photograph.
Its purpose is to communicate anatomy clearly.
Muscle Chart vs. Real Human Anatomy
A chart is a simplified representation of the body.
Real muscles aren’t flat colored shapes neatly separated by black outlines.
Muscles overlap. Tendons connect muscle to bone. Nerves and blood vessels pass through regions containing multiple structures. Fascia and connective tissues also surround and separate anatomical structures.
That’s why you shouldn’t expect every diagram to look identical.
When two reputable diagrams differ slightly in appearance, check the labels and the anatomical view before assuming one is wrong.
Understanding Muscle Origins and Insertions
If you’re moving beyond beginner anatomy, two important terms are origin and insertion.
They describe locations where a muscle attaches to the skeleton.
In simplified terms:
- The origin is traditionally described as the attachment that tends to remain more fixed during a particular movement.
- The insertion is traditionally described as the attachment that tends to move more during that movement.
However, this is a teaching convention rather than a rule that applies identically to every movement.
For example, changing which part of the body is fixed can change how a muscle functions.
This is one reason detailed anatomy is more complex than simply memorizing a list of muscle actions.
Why Muscle Attachments Matter
Knowing where a muscle attaches helps explain why it performs a particular movement.
Imagine a muscle crossing a joint.
When it contracts, it can pull on structures connected to its attachments. The direction of that pull helps determine the movement.
This is the basic mechanical idea behind many muscle actions.
Once you understand this concept, anatomy charts become less about memorizing arbitrary information and more about understanding relationships.
Muscle Chart and Exercise Terminology
If you’re interested in fitness, you’ll frequently encounter muscle names in workout descriptions.
For example:
- A chest exercise may involve the pectoral muscles.
- Pulling movements may involve muscles of the back and upper arm.
- Squatting movements involve multiple muscles around the hip and knee.
- Calf raises involve muscles that contribute to ankle movement.
But don’t assume an exercise “belongs” to only one muscle.
Most compound movements involve several muscles working together.
Isolation vs. Compound Movement
An isolation exercise is generally designed to place greater emphasis on movement at one joint and a particular muscle or muscle group.
A compound exercise involves movement at multiple joints and usually requires several muscle groups.
A muscle chart can help you understand the anatomy behind both, but it doesn’t tell you whether a particular exercise is appropriate for your body.
How to Make Your Own Muscle Chart
Creating your own study chart can be one of the best ways to learn.
You don’t need complicated software.
Start with a simple outline of the human body and divide it into regions.
Step 1: Draw the front view
Mark:
- Pectoralis major
- Deltoid
- Biceps
- Rectus abdominis
- Obliques
- Quadriceps
- Tibialis anterior
Step 2: Draw the back view
Add:
- Trapezius
- Latissimus dorsi
- Triceps
- Erector spinae
- Gluteus maximus
- Hamstrings
- Gastrocnemius
Step 3: Add basic actions
Write one simple movement beside each muscle.
Step 4: Test yourself
Cover the labels and identify each structure without looking at your notes.
Step 5: Add detail gradually
Once the major muscles are familiar, add smaller muscles and deeper layers.
This creates a personalized reference instead of forcing you to learn from a crowded chart immediately.
A 5-Minute Muscle Chart Review
You don’t need a long study session every time.
Try this quick routine:
Minute 1: Look at the front view.
Minute 2: Name the major muscles without reading labels.
Minute 3: Switch to the back view.
Minute 4: Recall one action for each major muscle.
Minute 5: Write down the three names you forgot.
The next review should focus on those three.
This approach makes your study sessions targeted instead of repetitive.
The Most Important Muscle-Chart Memory Tricks
Use Location Clues
Names often contain information about where a muscle is located.
For example, anatomical names may reference:
- A body region
- A bone
- A direction
- A shape
- Relative size
- Number of heads
- Muscle action
Learning these naming patterns gives you clues even when you’re seeing a term for the first time.
Use Opposites
Pair related movements:
Flexion ↔ Extension
Abduction ↔ Adduction
Then connect muscles to the movements they help produce.
Use Layers
Study superficial muscles first.
Then learn the deeper muscles underneath.
Trying to learn deep structures before understanding the surface landmarks can make the chart unnecessarily confusing.
A Simple Major-Muscle Cheat Sheet
| Region | Muscle | Easy memory cue |
| Chest | Pectoralis major | Large chest muscle |
| Shoulder | Deltoid | Shoulder cap |
| Upper back | Trapezius | Broad upper-back muscle |
| Back | Latissimus dorsi | Large back muscle |
| Upper arm | Biceps brachii | Front of arm |
| Upper arm | Triceps brachii | Back of arm |
| Abdomen | Rectus abdominis | Vertical abdominal muscle |
| Abdomen | External oblique | Side of abdomen |
| Hip | Gluteus maximus | Large buttock muscle |
| Front thigh | Quadriceps | Four-muscle group |
| Back thigh | Hamstrings | Posterior thigh group |
| Calf | Gastrocnemius | Prominent calf muscle |
| Calf | Soleus | Deep calf muscle |
| Lower leg | Tibialis anterior | Front of lower leg |
Use this as a starting point rather than a complete anatomy reference.
What a Detailed Muscle Chart Can Add
Once you’ve mastered the basics, a more advanced chart can introduce additional information.
Origin
Where the muscle begins according to traditional anatomical descriptions.
Insertion
Where the muscle attaches at the other end.
Action
The movement or movements the muscle can produce.
Innervation
The nerve supply to the muscle.
Blood Supply
The arteries and vessels associated with supplying the muscle.
Anatomical Layer
Whether the muscle is superficial or deep relative to nearby structures.
You don’t need all of these details for basic fitness knowledge.
They become more useful if you’re studying anatomy, physical therapy, medicine or another health-related subject.
How to Tell if a Muscle Chart Is Trustworthy
Not every anatomy image online is equally reliable.
Before using one for serious study, check:
- Who produced it?
- Is the source a recognized medical or educational organization?
- Are anatomical names spelled correctly?
- Does it distinguish front, back and side views?
- Does it explain whether muscles are superficial or deep?
- Does it provide references or supporting information?
A colorful graphic isn’t automatically an accurate one.
For dependable educational references, government and established medical sources are better starting points than anonymous social-media images.
Copyright Matters When Publishing Muscle Charts
If you’re creating content for a website, there’s another issue beginners sometimes overlook.
Anatomical facts themselves aren’t the same thing as an artist’s specific illustration.
You shouldn’t assume that an anatomy diagram found through Google Images is free to copy.
For website publishing, use:
- Your own original illustration
- A properly licensed image
- A public-domain resource when the specific work is genuinely public domain
- A source whose terms clearly permit your intended use
Keep records of licenses and attribution requirements.
If you’re unsure about an image’s copyright status, don’t publish it until you’ve confirmed that you have the necessary rights.
When a Muscle Chart Isn’t Enough
A chart is excellent for learning names and locations, but it has limits.
It can’t tell you exactly why you personally have pain.
It can’t diagnose a torn muscle.
It can’t determine whether an exercise is safe for an individual injury.
And it can’t replace a qualified healthcare professional’s assessment.
If you’re studying because of persistent pain, weakness, swelling, loss of movement or an injury, use appropriate professional medical guidance rather than trying to diagnose yourself from an anatomy poster.
Final Muscle Chart Study Checklist
Before moving to advanced anatomy, see whether you can do the following without looking at your notes:
- Identify the front and back views.
- Locate the pectoralis major.
- Locate the deltoid.
- Identify the trapezius.
- Identify the latissimus dorsi.
- Identify the biceps and triceps.
- Identify the major abdominal muscles.
- Identify the gluteal muscles.
- Identify the quadriceps.
- Identify the hamstrings.
- Identify the major calf muscles.
- Explain flexion and extension.
- Explain abduction and adduction.
- Understand that some muscles lie underneath superficial muscles.
- Recognize that most movements involve multiple muscles.
If you can do most of these, you’re ready to move beyond a basic chart and start studying individual muscles in greater detail.
Frequently Asked Questions
What is the best way to memorize a muscle chart?
Learn the body region first, then connect each muscle with its location and one basic action. After that, test yourself using a blank diagram. Active recall is more useful than simply looking at the same labeled image repeatedly.
Should I memorize muscle origins and insertions?
Not necessarily at the beginning. If you’re a general fitness learner, major muscle locations and basic actions are usually more useful first. Students in anatomy, medicine, physical therapy or related fields may eventually need much more detailed knowledge of origins, insertions and innervation.
Why are some muscles hidden on anatomy charts?
Some muscles are located underneath superficial muscles. A diagram showing the outer muscular layer can’t display every deeper structure simultaneously. Advanced anatomy illustrations may remove superficial muscles or use separate layers to reveal deeper anatomy.
Are muscle charts useful for personal trainers?
Yes, a muscle chart can be a helpful educational reference for understanding anatomy and exercise terminology. However, professional trainers need broader knowledge than muscle names alone, including movement mechanics, exercise technique, programming and appropriate safety considerations.
Can I use a muscle chart to diagnose an injury?
No. A chart can show where a muscle is located, but it can’t establish the cause of pain or injury. Similar symptoms can involve different tissues or conditions, so diagnosis should come from an appropriately qualified healthcare professional.
How many muscles should a beginner memorize?
There’s no required number. A practical starting point is around 15–20 major muscles or muscle groups, followed by gradual expansion. The goal is understanding, not reaching an arbitrary memorization target.
The Best Way to Keep Learning
A muscle chart is the starting point, not the finish line.
Once you can identify the major muscles, start asking better questions: What joints does this muscle cross? What movement can it produce? Which muscles assist it? Which structures lie underneath it? What happens when the body position changes?
Those questions turn a basic labeled diagram into a useful anatomy study tool.
Final Thoughts
A muscle chart is one of the simplest ways to build a clear understanding of human anatomy. Instead of trying to memorize hundreds of muscles at once, start with the major muscles and learn each one by location, basic function, and relationship to nearby muscles.
Focus first on the chest, back, shoulders, arms, abdomen, hips, thighs, and lower legs. Once those areas become familiar, you can gradually study deeper muscles, origins, insertions, actions, and nerve supply.
The most important thing is consistency. Spend a few minutes reviewing a chart, test yourself without looking at the labels, and return to the muscles you keep forgetting. Over time, an intimidating anatomy diagram becomes a useful map you can understand at a glance.