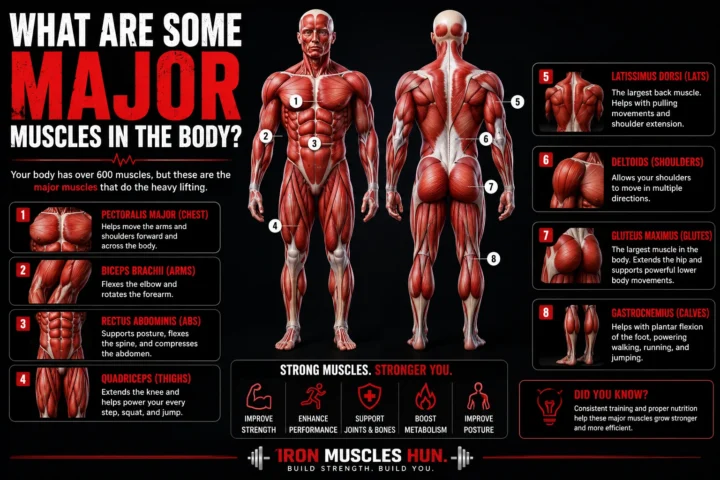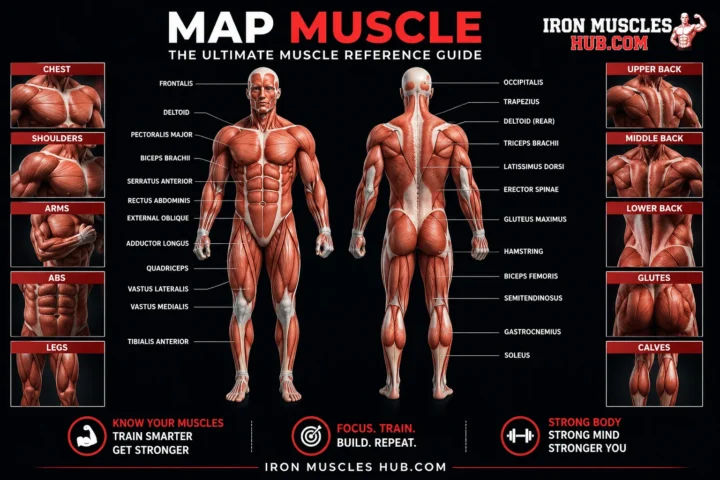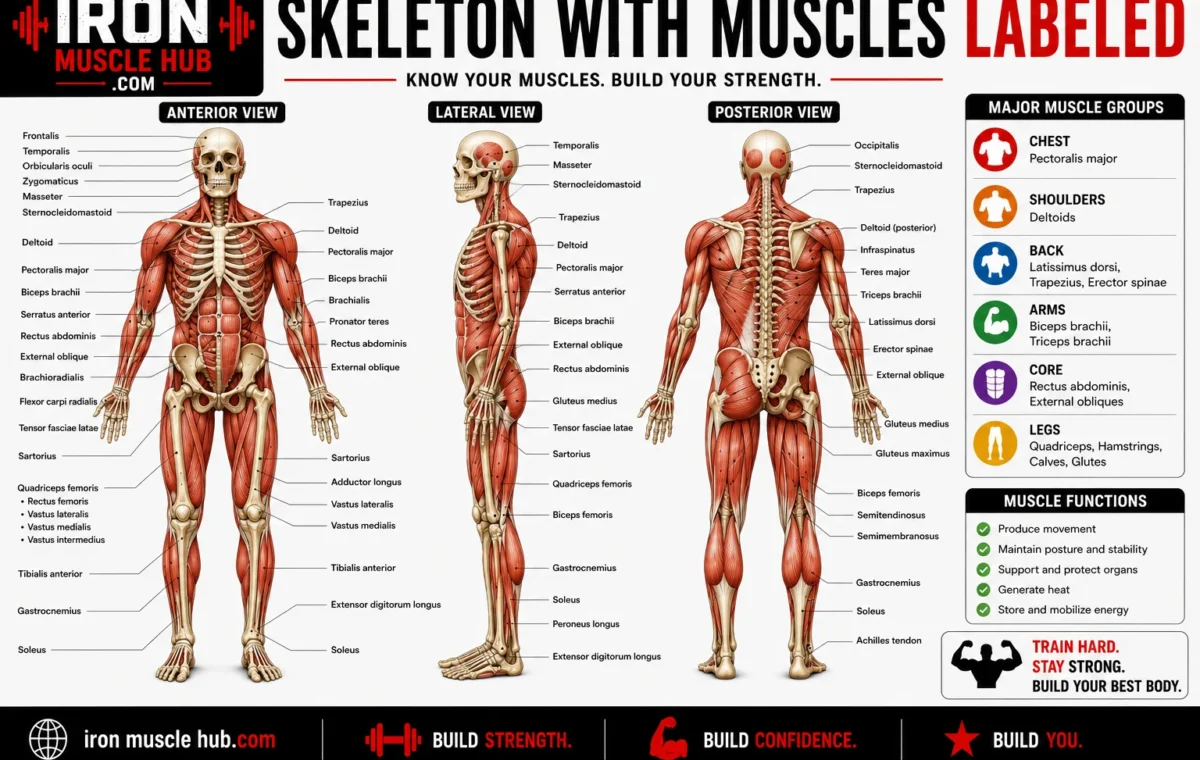
A skeleton with muscles labeled shows how the body’s major muscles sit over the bones that support movement. A useful diagram normally identifies major muscles such as the deltoids, pectoralis major, biceps, triceps, abdominal muscles, quadriceps, hamstrings, gluteus maximus, and gastrocnemius, while also showing the underlying bones.
- Skeleton With Muscles Labeled: Key Takeaways
- What Does a Skeleton With Muscles Labeled Show?
- Why Are Both Bones and Muscles Shown?
- Major Muscles on a Labeled Human Body
- Head and Neck
- Shoulders and Upper Back
- Chest
- Upper Arms
- Abdomen
- Back
- Hips and Legs
- Front vs. Back: Understanding Anterior and Posterior Views
- How Do Muscles and Bones Work Together?
- A Simple Way to Study a Muscle Diagram
- 1. Learn the body regions first
- 2. Learn the biggest muscles first
- 3. Use the skeleton as your map
- 4. Study both views
- 5. Learn function after location
- Common Mistakes When Reading a Muscle-and-Skeleton Diagram
- Mistake 1: Treating every diagram as a complete list
- Mistake 2: Confusing muscles with tendons
- Mistake 3: Confusing ligaments with tendons
- Mistake 4: Assuming the visible muscle is always the deepest structure
- The Best Way to Use a Labeled Anatomy Image
- Suggested Internal Links for Iron Muscle Hub
- Frequently Asked Questions
- What muscles are usually labeled on a human muscle diagram?
- How do muscles attach to bones?
- What is the difference between a skeleton and the muscular system?
- What does anterior mean on a muscle diagram?
- How many bones are in the adult human skeleton?
- How many muscles are in the human body?
- Understanding the Body Is Easier With the Right Diagram
- Major Muscle Groups on a Labeled Skeleton
- 1. Trapezius
- 2. Deltoid
- 3. Pectoralis Major
- 4. Latissimus Dorsi
- Upper-Arm Muscles
- Biceps Brachii
- Triceps Brachii
- Biceps vs. Triceps
- Core and Abdominal Muscles
- Rectus Abdominis
- External Oblique
- Transversus Abdominis
- Back Muscles
- Rhomboids
- Erector Spinae
- Quadratus Lumborum
- Gluteal Muscles
- Gluteus Maximus
- Gluteus Medius
- Quadriceps Muscles
- How to Recognize the Quadriceps
- Hamstrings
- Quadriceps vs. Hamstrings
- Lower-Leg Muscles
- Gastrocnemius
- Soleus
- Tibialis Anterior
- Major Bones to Identify Under the Muscles
- A Quick Muscle-Location Memory Chart
- Why Some Muscles Aren't Visible on a Basic Chart
- How to Read a Detailed Muscle Diagram
- The Most Important Idea to Remember
- Frequently Asked Questions
- What are the main muscles shown on a labeled skeleton?
- What is the easiest way to memorize muscle names?
- Why do different muscle charts have different labels?
- What is the difference between a muscle and a bone?
- Should I study the front or back of the body first?
- Final Takeaway
- How to Read a Skeleton With Muscles Labeled
- Step 1: Identify the View
- Step 2: Find the Bones
- Step 3: Divide the Body Into Regions
- Muscle Names Often Give You Clues
- Common Anatomical Naming Clues
- Superficial vs. Deep Muscles
- Muscles Usually Work in Groups
- Agonists and Antagonists
- Understanding Muscle Attachments
- Why Tendons Matter
- Bones Provide the Framework
- A Beginner's Muscle Study Routine
- Day 1: Upper Body
- Day 2: Core and Back
- Day 3: Hips and Thighs
- Day 4: Lower Leg
- Day 5: Review
- A Better Way to Test Yourself
- Common Anatomy Diagram Mistakes
- Mistake 1: Mixing Up Right and Left
- Mistake 2: Confusing Medial and Lateral
- Mistake 3: Assuming Bigger Means More Important
- Mistake 4: Memorizing Names Without Locations
- Front and Back Muscle Identification Cheat Sheet
- How a Muscle Diagram Can Help With Fitness Learning
- Why Anatomy Charts Shouldn't Be Used as Medical Diagnoses
- How to Choose a Good Skeleton and Muscle Diagram
- Clear Labels
- Front and Back Views
- Appropriate Detail
- Correct Terminology
- Clear Licensing
- A Simple Mental Map of the Human Muscular System
- Frequently Asked Questions
- What is the best way to learn a labeled skeleton and muscle chart?
- What are the four main types of muscle?
- What is the difference between skeletal muscle and smooth muscle?
- What muscles should I learn first?
- Why do anatomy diagrams use different colors?
- Can a muscle chart show every muscle in the body?
- Final Thoughts: Use the Diagram as a Map
These diagrams are helpful for beginners because they turn a complicated subject into something you can see. Instead of memorizing a long list of anatomical names, you can learn each muscle by its location, nearby bone, and basic job. For more insights read here :- lean muscle and how to get a compact body build .
Quick answer: A labeled skeleton-and-muscle diagram helps you understand the relationship between bones, joints, muscles, and tendons. Skeletal muscles attach to bones, usually through tendons, and their contractions pull on bones to create movement.
Skeleton With Muscles Labeled: Key Takeaways
| Body area | Major muscles commonly shown | Important nearby bones |
|---|---|---|
| Head and neck | Masseter, temporalis, sternocleidomastoid | Skull, mandible, cervical vertebrae |
| Shoulders | Deltoid, trapezius | Clavicle, scapula, humerus |
| Chest | Pectoralis major | Sternum, ribs |
| Upper arms | Biceps brachii, triceps brachii | Humerus |
| Abdomen | Rectus abdominis, external oblique | Ribs, vertebral column, pelvis |
| Back | Trapezius, latissimus dorsi | Scapula, vertebrae, ribs |
| Hips and buttocks | Gluteus maximus, gluteus medius | Pelvis, femur |
| Front thighs | Quadriceps group | Femur, patella |
| Back thighs | Hamstrings | Femur, tibia, fibula |
| Lower legs | Gastrocnemius, soleus, tibialis anterior | Tibia, fibula |
The exact labels vary between diagrams. Anatomy resources may show only major superficial muscles or include many smaller and deeper muscles.
What Does a Skeleton With Muscles Labeled Show?
A good diagram combines two closely related parts of the musculoskeletal system: the skeleton and the skeletal muscles.
The adult human skeleton has 206 bones, although the number can differ during development because some bones fuse as a person grows. The skeleton provides structural support and gives muscles a framework on which to act.
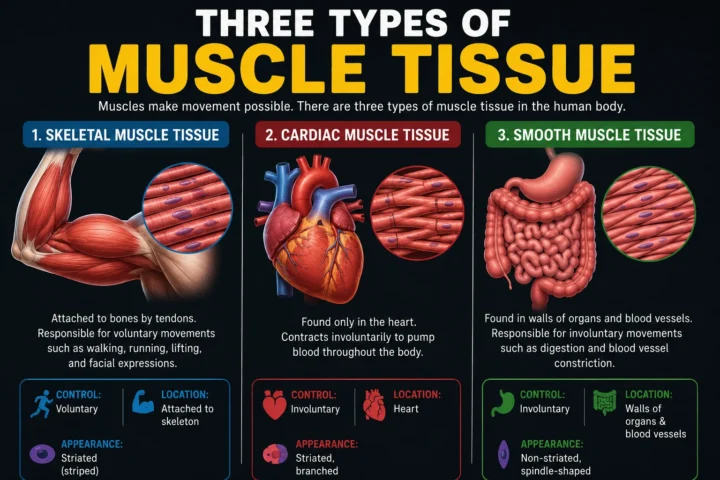
Skeletal muscles are different from the smooth muscle found in many organs and cardiac muscle in the heart. Skeletal muscles are the muscles primarily responsible for moving bones under conscious control.
Why Are Both Bones and Muscles Shown?
Looking at muscles alone can make their function difficult to understand.
For example, the biceps brachii sits over the upper arm and works around the elbow. Seeing the biceps together with the humerus, radius and ulna gives you a clearer picture of what the muscle is acting on.
The same idea applies throughout the body. Bones provide the rigid framework, joints provide places where bones meet and can move, and muscles generate force that is transmitted to bones through connective tissues such as tendons.
Major Muscles on a Labeled Human Body
You don’t need to learn every muscle at once. Start with the large, easily recognizable muscles that appear on most basic anatomy charts.
Head and Neck
Masseter: One of the main muscles used for chewing.
Temporalis: A broad muscle on the side of the skull that also contributes to chewing.
Sternocleidomastoid: A prominent neck muscle involved in movements of the head and neck.
A beginner’s diagram may label only one or two of these, while a more detailed anatomy chart can identify many smaller facial and neck muscles.
Shoulders and Upper Back
Deltoid: The rounded muscle covering much of the shoulder.
Trapezius: A large muscle extending across the upper back and neck region.
These muscles help control movements and positioning of the shoulder region.
Chest
Pectoralis major: The large superficial muscle across the front of the chest.
It works with other muscles around the shoulder to help move the upper limb.
Upper Arms
Biceps brachii: Located at the front of the upper arm.
Triceps brachii: Located at the back of the upper arm.
These are particularly useful muscles to study because their locations are easy to distinguish. They also demonstrate how different muscles can contribute to opposite movements around a joint.
Abdomen
Rectus abdominis: The long paired muscle running vertically along the front of the abdomen.
External oblique: A broad muscle positioned on the sides of the abdomen.
A detailed diagram may also label internal oblique and transversus abdominis, which lie deeper than the external oblique.
Back
Latissimus dorsi: A large muscle covering much of the lower and middle back.
Trapezius: Extends across the upper back.
Rhomboids: Located deeper in the upper back near the shoulder blades.
A posterior, or back-view, diagram makes these muscles much easier to identify.
Hips and Legs
Gluteus maximus: The large muscle of the buttock region.
Quadriceps: A group of muscles at the front of the thigh.
Hamstrings: A group of muscles at the back of the thigh.
Gastrocnemius: The prominent calf muscle.
Tibialis anterior: Located toward the front of the lower leg.
These muscle groups are particularly important for standing, walking, running and other lower-body movements. Skeletal muscles also contribute to posture and joint stability.
Front vs. Back: Understanding Anterior and Posterior Views
One common source of confusion is the difference between anterior and posterior.
- Anterior means toward the front of the body.
- Posterior means toward the back of the body.
A typical muscle chart may place an anterior view beside a posterior view. The front view makes muscles such as the pectoralis major, rectus abdominis, biceps and quadriceps easy to study.
The back view highlights muscles such as the trapezius, latissimus dorsi, triceps, gluteus maximus and hamstrings.
Some educational diagrams divide the body between the two views or use different sides to display additional muscles. OpenStax-based anatomy resources, for example, provide anterior and posterior muscle illustrations with numerous labeled structures.
How Do Muscles and Bones Work Together?
Think of the system as a simple chain:
Muscle contracts → tendon transmits force → bone moves at a joint.
Skeletal muscles attach to bones through tendons. When a muscle contracts, it produces force that is transmitted through the tendon to the bone. That force can create movement around a joint.
For example, when you bend your elbow, muscles around the upper arm generate force that is transmitted to the bones of the forearm. The joint provides the location where the bones move relative to each other.
This is why a skeleton with muscles labeled is more useful than a muscle-only picture: it shows where the muscle is and what skeletal structures are beneath it.
A Simple Way to Study a Muscle Diagram
If you’re learning anatomy for school, fitness education or general knowledge, don’t try to memorize every label in one sitting.
1. Learn the body regions first
Start with:
- Head and neck
- Shoulder
- Chest
- Arms
- Abdomen
- Back
- Hips
- Thighs
- Lower legs
Once you know the region, individual muscle names become easier to place.
2. Learn the biggest muscles first
Begin with familiar names such as deltoid, pectoralis major, biceps brachii, triceps brachii, rectus abdominis, latissimus dorsi, gluteus maximus, quadriceps, hamstrings and gastrocnemius.
Then add smaller muscles.
3. Use the skeleton as your map
Instead of asking only, “Where is the muscle?”
Ask:
“Which bone or joint is this muscle near?”
This gives you a second visual reference and helps explain why the muscle matters.
4. Study both views
Look at the anterior view first, then test yourself on the posterior view.
A useful trick is to cover the labels and try to name each muscle yourself. Then uncover the answers and correct your mistakes.
5. Learn function after location
Once you can identify a muscle, learn its broad role.
For example:
Biceps → front of upper arm → contributes to elbow flexion.
That approach is usually easier than memorizing isolated anatomical names.
Common Mistakes When Reading a Muscle-and-Skeleton Diagram
Mistake 1: Treating every diagram as a complete list
A labeled chart isn’t necessarily a map of every muscle in the body. Some diagrams are designed for beginners and show only major superficial muscles, while detailed anatomy resources identify many more structures.
Fix: Check the diagram’s intended level before assuming a missing label is an error.
Mistake 2: Confusing muscles with tendons
A tendon isn’t another type of muscle. It’s connective tissue that connects muscle to bone and helps transfer muscular force.
Mistake 3: Confusing ligaments with tendons
A simple rule helps:
Tendon = muscle to bone.
Ligament = bone to bone.
Both are connective tissues, but they have different roles in the musculoskeletal system.
Mistake 4: Assuming the visible muscle is always the deepest structure
Many muscles overlap. A basic chart often focuses on superficial muscles, while a more advanced anatomy diagram can show deeper muscles by removing or separating structures.
That means two accurate diagrams can look quite different.
The Best Way to Use a Labeled Anatomy Image
For beginners, the most useful image has:
- A clear front/anterior view
- A clear back/posterior view
- Major muscle names
- Major bones visible beneath or beside the muscles
- Large, readable labels
- Consistent anatomical terminology
- Minimal visual clutter
For a website article, an original diagram can be especially useful because you can choose exactly which muscles and bones your readers need to learn.
If you use an existing image, check its license carefully. Wikimedia Commons, for example, hosts a skeleton-and-muscles image identified as CC0, while other anatomy illustrations may use licenses that require attribution or restrict commercial use.
Suggested Internal Links for Iron Muscle Hub
To build a useful anatomy content cluster, consider linking this article to:
- Body Muscle Chart: Major Muscles Explained
- Muscle Anatomy Chart: A Beginner’s Guide
- Body Diagram of Muscles: Front and Back Views
These pages can naturally connect readers from a broad skeleton-and-muscle diagram to more detailed muscle identification guides.
Frequently Asked Questions
What muscles are usually labeled on a human muscle diagram?
Basic muscle diagrams commonly label major muscles such as the deltoid, pectoralis major, biceps brachii, triceps brachii, rectus abdominis, trapezius, latissimus dorsi, gluteus maximus, quadriceps, hamstrings and gastrocnemius. More detailed charts can include many smaller muscles and deeper structures.
How do muscles attach to bones?
Skeletal muscles usually attach to bones through tendons. When a skeletal muscle contracts, the tendon transfers the force generated by that contraction to the bone, helping produce movement around a joint. Tendons therefore form an important connection between the muscular and skeletal systems.
What is the difference between a skeleton and the muscular system?
The skeleton is the body’s internal framework made primarily of bones, along with associated connective tissues. The muscular system includes muscles that generate force and, in the case of skeletal muscles, work with tendons and bones to produce movement. Together, these structures form an integrated musculoskeletal system.
What does anterior mean on a muscle diagram?
Anterior means the front side of the body. On a typical anatomy chart, an anterior view lets you see structures such as the pectoralis major, biceps brachii, rectus abdominis and quadriceps. Posterior means the back side and is used for structures such as the trapezius, latissimus dorsi and hamstrings.
How many bones are in the adult human skeleton?
A commonly used anatomical reference counts 206 bones in the adult human skeleton. The number can be higher in younger people because certain bones that are separate during development later fuse together.
How many muscles are in the human body?
There isn’t one universally accepted number because researchers and anatomy references can classify and subdivide muscles differently. For that reason, it’s better to avoid treating one exact muscle count as definitive. A beginner’s diagram is more useful for learning the major muscle groups and their locations than for counting every individual muscle.
Understanding the Body Is Easier With the Right Diagram
A skeleton with muscles labeled gives you more than a list of anatomical names. It shows how the body’s framework and muscles fit together, helping you connect a muscle’s location with the bones and joints it influences.
Start with the large muscle groups, learn the difference between anterior and posterior views, and then add smaller structures as your knowledge improves. Most importantly, use the diagram as a map rather than trying to memorize everything at once. Once you can recognize the major muscles and understand the role of tendons, the rest of basic musculoskeletal anatomy becomes much easier to follow.
Skeleton With Muscles Labeled: Major Muscle Groups Explained
If you’re using a skeleton with muscles labeled to study anatomy, the easiest approach is to break the body into regions rather than memorize dozens of names at once. Each region contains several muscles that work together to create movement, maintain posture, and stabilize joints.
This second part focuses on the major muscle groups you’re most likely to see on a labeled human anatomy chart. It also explains where each muscle is located and what it generally does, so the labels have meaning instead of becoming a list of unfamiliar words.
Major Muscle Groups on a Labeled Skeleton
1. Trapezius
The trapezius is a large, roughly triangular muscle covering much of the upper back and extending toward the neck and shoulders.
On a posterior muscle diagram, it’s one of the easiest muscles to recognize.
Its broad fibers help with movements and positioning of the shoulder blades and contribute to movement of the neck and head.
Easy way to remember it:
Trapezius = upper back and neck area.
2. Deltoid
The deltoid forms the rounded shape over the shoulder.
It’s divided into different portions, but a beginner’s muscle chart usually labels the muscle as a whole.
The deltoid helps move the upper arm at the shoulder joint. Because it sits directly over the shoulder, it is usually very easy to locate on an anterior or posterior body diagram.
Easy way to remember it:
Deltoid = shoulder cap.
3. Pectoralis Major
The pectoralis major is the large muscle covering much of the front of the chest.
You’ll normally see it clearly on an anterior muscle diagram.
It contributes to movements of the upper limb, particularly movements involving the shoulder.
Easy way to remember it:
Pectoralis major = front of chest.
4. Latissimus Dorsi
The latissimus dorsi, often called the “lats,” is a broad muscle covering a substantial portion of the back.
It’s particularly noticeable on a posterior muscle illustration.
The muscle contributes to movements of the upper arm and connects the upper limb with the trunk through its attachments.
Easy way to remember it:
Latissimus dorsi = large muscle of the middle/lower back.
Upper-Arm Muscles
The upper arm is mainly associated with two familiar muscles on basic diagrams: the biceps and triceps.
Biceps Brachii
The biceps brachii sits on the front of the upper arm.
It crosses the shoulder and elbow and contributes to bending the elbow as well as movement of the forearm.
On an anterior skeleton-and-muscle diagram, look immediately below the deltoid and above the elbow.
Location: Front of upper arm.
Triceps Brachii
The triceps brachii occupies the back of the upper arm.
As its name suggests, it has three heads. Its major action at the elbow is extension of the forearm.
On a posterior diagram, it appears beneath and behind the deltoid.
Location: Back of upper arm.
Biceps vs. Triceps
| Muscle | Location | Main movement to remember |
|---|---|---|
| Biceps brachii | Front of upper arm | Helps flex the elbow |
| Triceps brachii | Back of upper arm | Helps extend the elbow |
This is a useful first comparison for anyone learning a skeleton with muscles labeled.
Core and Abdominal Muscles
A basic anatomy diagram often makes the abdominal region look simpler than it actually is.
Rectus Abdominis
The rectus abdominis runs vertically along the front of the abdomen.
It’s commonly associated with trunk flexion and is one of the most recognizable muscles on an anterior muscle chart.
The paired muscle is separated along the body’s midline, which contributes to the familiar appearance of the abdominal region.
External Oblique
The external oblique lies on the sides of the abdomen.
Its fibers run diagonally, and the muscle contributes to movements and stabilization of the trunk.
When looking at a front-facing anatomy chart, it sits to either side of the rectus abdominis.
Transversus Abdominis
The transversus abdominis is deeper than the external oblique and rectus abdominis.
Its fibers run generally horizontally around the trunk.
Because it’s deeper, it may not appear on a simple superficial muscle diagram.
Study tip: If a diagram doesn’t show a muscle you’re expecting, check whether the image is showing superficial muscles only.
Back Muscles
A posterior skeleton with muscles labeled can make the back easier to understand.
Several important muscles overlap in this area.
Rhomboids
The rhomboid muscles are positioned between the spine and shoulder blades.
They sit deeper than the trapezius, so they’re often easier to understand using a layered anatomy diagram.
They contribute to movement and stabilization of the scapula.
Erector Spinae
The erector spinae refers to a group of muscles running along the vertebral column.
These muscles play an important role in extending and stabilizing the spine.
On a posterior diagram, look for the long vertical muscle groups running alongside the spine.
Quadratus Lumborum
The quadratus lumborum is located in the posterior abdominal wall.
It’s deeper than several of the muscles that appear on a basic back diagram, so beginner charts may leave it out.
This is another reason two legitimate anatomy charts can contain different labels.
Gluteal Muscles
The gluteal region contains several muscles, but the most recognizable is the gluteus maximus.
Gluteus Maximus
The gluteus maximus is the large superficial muscle forming much of the buttock.
It contributes strongly to movement of the hip, including hip extension.
On a posterior muscle diagram, it’s located below the lower back and around the back of the hip.
Gluteus Medius
The gluteus medius lies partly underneath the gluteus maximus.
It is positioned toward the outer portion of the hip.
It contributes to movement and stabilization of the hip and pelvis.
Simple memory trick:
- Gluteus maximus = largest superficial buttock muscle
- Gluteus medius = positioned more toward the outer side of the hip
Quadriceps Muscles
The quadriceps femoris is a group of four muscles located at the front of the thigh.
The four muscles are:
- Rectus femoris
- Vastus lateralis
- Vastus medialis
- Vastus intermedius
The first three are relatively easy to identify on many diagrams. The vastus intermedius lies deeper and can be hidden by the rectus femoris in a superficial illustration.
The quadriceps group is strongly associated with extension of the knee.
How to Recognize the Quadriceps
On an anterior body diagram, find the femur first.
Then look at the large muscles surrounding the front of the thigh.
The muscle group between the hip and knee is the quadriceps region.
Hamstrings
The hamstrings are a group of muscles located toward the back of the thigh.
A basic anatomy lesson usually introduces three major muscles:
- Biceps femoris
- Semitendinosus
- Semimembranosus
They work across the hip and knee and are commonly associated with knee flexion and hip extension.
On a posterior skeleton with muscles labeled, they’re positioned between the gluteal region and the back of the knee.
Quadriceps vs. Hamstrings
| Feature | Quadriceps | Hamstrings |
| Position | Front of thigh | Back of thigh |
| Group size | Four muscles | Three primary muscles |
| Main joint association | Knee | Knee and hip |
| Diagram view | Mostly anterior | Mostly posterior |
Learning this pair together makes the thigh much easier to study.
Lower-Leg Muscles
Gastrocnemius
The gastrocnemius is the prominent superficial muscle at the back of the lower leg.
It’s commonly referred to as one of the main calf muscles.
Because of its visible shape, it is usually easy to identify on a posterior diagram.
Soleus
The soleus lies underneath the gastrocnemius.
It is another major calf muscle and contributes to movement at the ankle.
A superficial diagram may not display it clearly because the gastrocnemius covers much of it.
Tibialis Anterior
The tibialis anterior runs along the front portion of the lower leg.
It contributes to movement of the foot at the ankle.
On an anterior diagram, look alongside the tibia toward the front of the lower leg.
Major Bones to Identify Under the Muscles
A muscle diagram becomes much easier to understand when you can identify the major bones underneath it.
| Body region | Bone to recognize | What to look for |
| Head | Skull | Protective structure surrounding the brain |
| Shoulder | Scapula | Shoulder blade |
| Chest | Ribs | Curved bones forming the thoracic cage |
| Upper chest | Sternum | Central breastbone |
| Upper arm | Humerus | Long bone between shoulder and elbow |
| Forearm | Radius and ulna | Two bones between elbow and wrist |
| Spine | Vertebral column | Bones forming the central spinal column |
| Hip | Pelvis | Large bony structure supporting the trunk |
| Thigh | Femur | Long bone between hip and knee |
| Knee | Patella | Kneecap |
| Lower leg | Tibia and fibula | Two bones between knee and ankle |
| Foot | Tarsals, metatarsals and phalanges | Bones forming the foot |
The skeleton acts as a useful reference because many muscles can be located more accurately once you know the bones and joints nearby.
A Quick Muscle-Location Memory Chart
If you’re studying for the first time, use this simple location method:
| If you see… | Think… |
| Rounded shoulder | Deltoid |
| Front chest | Pectoralis major |
| Front upper arm | Biceps brachii |
| Back upper arm | Triceps brachii |
| Upper back | Trapezius |
| Broad back | Latissimus dorsi |
| Front abdomen | Rectus abdominis |
| Side abdomen | External oblique |
| Buttocks | Gluteus maximus |
| Front thigh | Quadriceps |
| Back thigh | Hamstrings |
| Back of lower leg | Gastrocnemius |
| Front lower leg | Tibialis anterior |
This isn’t a substitute for a detailed anatomy reference, but it’s a practical starting point.
Why Some Muscles Aren’t Visible on a Basic Chart
One of the biggest problems beginners encounter is comparing two muscle diagrams and wondering why the labels don’t match.
The reason is usually depth and purpose.
A chart designed to show major superficial muscles may display only structures that can be seen from the outside. A more advanced anatomy diagram might remove superficial muscles to reveal deeper layers.
For example, the soleus lies underneath the gastrocnemius, while the vastus intermedius is deep to the rectus femoris.
So a missing label doesn’t automatically mean the diagram is incorrect.
How to Read a Detailed Muscle Diagram
When you encounter a crowded anatomy chart, use this order:
Step 1: Identify whether you’re looking at the front or back.
Step 2: Find a major landmark such as the skull, spine, pelvis or femur.
Step 3: Locate the muscle group around that landmark.
Step 4: Read the label and compare it with the muscle’s position.
Step 5: Learn one basic function.
This approach turns an overwhelming chart into a series of smaller problems.
The Most Important Idea to Remember
You don’t have to memorize the entire muscular system before you understand a skeleton with muscles labeled.
Start with the relationship:
Bones provide the framework. Joints allow movement between bones. Skeletal muscles generate force. Tendons transfer that force to bones.
From there, learn muscles by region.
Once you know the shoulder, chest, arm, abdomen, back, hip, thigh and lower-leg areas, adding more detailed labels becomes much easier.
Frequently Asked Questions
What are the main muscles shown on a labeled skeleton?
A beginner-friendly diagram commonly identifies major muscles such as the deltoid, pectoralis major, biceps brachii, triceps brachii, trapezius, latissimus dorsi, rectus abdominis, gluteus maximus, quadriceps, hamstrings and gastrocnemius. More detailed diagrams may show additional superficial and deeper muscles.
What is the easiest way to memorize muscle names?
Start by learning muscles according to body region instead of trying to memorize them alphabetically. Associate each name with its location and one basic function. For example, think deltoid = shoulder, biceps = front upper arm, quadriceps = front thigh, and gastrocnemius = calf.
Why do different muscle charts have different labels?
Muscle charts are created for different purposes. A basic educational diagram may show only major superficial muscles, while a detailed anatomy reference can include smaller muscles, deeper layers, tendons and other structures. Two charts can therefore show different levels of detail without either necessarily being wrong.
What is the difference between a muscle and a bone?
A bone is a rigid connective structure that forms part of the skeleton. A skeletal muscle is contractile tissue that generates force and helps produce movement. Muscles and bones work together through structures such as tendons and joints to create movement and maintain body position.
Should I study the front or back of the body first?
For many beginners, starting with the anterior, or front, view is easier because several familiar muscles are clearly visible there. Once you’ve learned the major front muscles, move to the posterior view and study the back, gluteal region and hamstrings.
Final Takeaway
A skeleton with muscles labeled becomes much easier to understand once you stop treating it as a giant vocabulary test. Use the bones as landmarks, divide the body into regions, and learn the major muscles before moving on to smaller or deeper structures.
The most useful starting points are the deltoids, pectorals, biceps, triceps, abdominals, trapezius, latissimus dorsi, glutes, quadriceps, hamstrings and calf muscles. After those become familiar, a detailed muscular-system chart will feel far less confusing.
Skeleton With Muscles Labeled: How to Study, Read, and Use a Muscle Anatomy Chart
A skeleton with muscles labeled is much easier to understand when you use the bones, joints, muscle locations, and movement patterns together. Instead of memorizing every anatomical term, start with major landmarks and gradually add individual muscles.
This final part brings the earlier sections together. You’ll learn a practical way to read a detailed muscle chart, understand common anatomical terms, recognize muscle groups, and avoid mistakes that can make anatomy diagrams confusing.
How to Read a Skeleton With Muscles Labeled
A detailed anatomy illustration can look complicated at first because several muscles overlap one another.
The trick is to work from large structures toward smaller ones.
Step 1: Identify the View
First determine whether you’re looking at:
- Anterior: front of the body
- Posterior: back of the body
- Lateral: side of the body
This immediately narrows down which muscles you’re likely to see.
For example, the pectoralis major is easiest to identify from the front, while the trapezius, latissimus dorsi, gluteus maximus and hamstrings are prominent in a posterior view.
Step 2: Find the Bones
Before trying to identify individual muscles, locate obvious skeletal landmarks.
Start with:
- Skull
- Clavicle
- Scapula
- Sternum
- Ribs
- Humerus
- Radius
- Ulna
- Vertebral column
- Pelvis
- Femur
- Patella
- Tibia
- Fibula
Once these are familiar, muscles have a much clearer reference point.
Step 3: Divide the Body Into Regions
Don’t study the entire chart simultaneously.
Break it into:
- Head and neck
- Shoulder
- Chest
- Upper arm
- Forearm
- Abdomen
- Back
- Hip
- Thigh
- Lower leg
- Foot
This makes a large anatomy illustration feel much more manageable.
Muscle Names Often Give You Clues
Many anatomical names sound difficult, but they can contain useful information.
For example, biceps brachii identifies a muscle with two heads in the arm region, while triceps brachii identifies one with three heads.
Some names describe location, direction, shape, size or attachment.
Learning a few common naming patterns can therefore make unfamiliar labels easier to interpret.
Common Anatomical Naming Clues
| Term | General meaning |
|---|---|
| Major | Larger or more prominent |
| Minor | Smaller |
| Maximus | Largest |
| Medius | Middle |
| Minimus | Smallest |
| Anterior | Front |
| Posterior | Back |
| Medial | Toward the body’s midline |
| Lateral | Away from the body’s midline |
| Superficial | Closer to the surface |
| Deep | Farther beneath the surface |
These terms appear frequently on anatomy charts.
Superficial vs. Deep Muscles
One of the most important concepts for reading a muscle diagram is depth.
A superficial muscle sits closer to the body’s surface. A deep muscle lies underneath another structure.
Imagine looking at the calf.
The gastrocnemius is a prominent superficial muscle. The soleus lies underneath it.
If a beginner chart shows the gastrocnemius but doesn’t label the soleus, that doesn’t mean the soleus doesn’t exist. It may simply be hidden by the superficial layer.
The same principle applies throughout the body.
Muscles Usually Work in Groups
Another useful idea is that muscles don’t normally work as isolated pieces.
Several muscles can contribute to the same movement, while other muscles can produce an opposing movement.
The elbow is a simple example.
The biceps brachii contributes to elbow flexion, while the triceps brachii contributes to elbow extension. Looking at both muscles together helps you understand their relationship more clearly than memorizing either one separately.
Agonists and Antagonists
In basic anatomy, you may encounter the terms agonist and antagonist.
An agonist is a muscle that serves as a primary contributor to a particular movement, while an antagonist generally produces an opposing action.
The exact muscular contribution can depend on the movement and circumstances, so these terms are best treated as functional descriptions rather than permanent labels.
For beginners, remember:
One muscle group can help create a movement while another can help create the opposite movement.
Understanding Muscle Attachments
A muscle chart may include terms such as origin and insertion.
These describe attachment locations, although the terminology can become more complicated depending on the movement being discussed.
At a basic level:
- Origin: traditionally describes the attachment that is considered more fixed during a particular movement.
- Insertion: traditionally describes the attachment that moves toward the origin during that movement.
These terms are useful for detailed anatomy study, but you don’t need to memorize every attachment before learning the major muscle locations.
Why Tendons Matter
A skeleton-and-muscle diagram may also show tendons.
Tendons connect muscles to bones and transmit the force produced by muscle contraction. They aren’t muscles themselves.
This distinction matters because a labeled anatomy image may show a white or lighter connective structure extending from a muscle toward a bone.
Don’t automatically assume that structure is another muscle.
Bones Provide the Framework
Muscles are easier to locate when you understand the skeleton beneath them.
For example:
Deltoid → shoulder → humerus/scapular region
Biceps → upper arm → humerus
Quadriceps → front thigh → femur
Hamstrings → back thigh → femur
Gastrocnemius → calf → lower-leg bones
The exact anatomical attachments are more detailed than these simplified relationships, but the idea gives beginners a useful mental map.
A Beginner’s Muscle Study Routine
If you’re trying to learn the major muscles from a labeled skeleton, you can make your study sessions simple.
Day 1: Upper Body
Learn:
- Deltoid
- Pectoralis major
- Trapezius
- Latissimus dorsi
- Biceps brachii
- Triceps brachii
Day 2: Core and Back
Learn:
- Rectus abdominis
- External oblique
- Erector spinae
- Rhomboids
- Additional abdominal muscles as appropriate for your course
Day 3: Hips and Thighs
Learn:
- Gluteus maximus
- Gluteus medius
- Quadriceps
- Hamstrings
Day 4: Lower Leg
Learn:
- Gastrocnemius
- Soleus
- Tibialis anterior
Day 5: Review
Cover the labels on your diagram and identify each muscle from its location.
This method focuses on recall instead of simply rereading the labels.
A Better Way to Test Yourself
Looking at a labeled picture repeatedly can create the feeling that you know the material when you actually recognize the answer rather than recall it.
Try this instead:
- Look at an unlabeled diagram.
- Point to one muscle.
- Say its name aloud or write it down.
- State its approximate location.
- Give one broad function.
- Check the answer.
- Repeat the muscles you missed.
This is a simple form of active recall.
Common Anatomy Diagram Mistakes
Mistake 1: Mixing Up Right and Left
Anatomical diagrams are normally described from the subject’s perspective, not the viewer’s.
So the person’s right side is your left when you’re looking directly at a front-facing figure.
If your course uses anatomical terminology, learn to interpret right and left from the body’s perspective.
Mistake 2: Confusing Medial and Lateral
Medial means closer to the body’s midline.
Lateral means farther from the midline.
For example, when comparing structures on the thigh, these terms help describe whether something is closer to the center of the body or toward the outer side.
Mistake 3: Assuming Bigger Means More Important
A large muscle isn’t automatically the only muscle responsible for a movement.
Muscles can have different roles, attachment points and functions. A good anatomy chart should be used alongside reliable educational material when you need detailed functional information.
Mistake 4: Memorizing Names Without Locations
Knowing that a muscle is called “sternocleidomastoid” isn’t very useful if you can’t find it.
Always connect:
Name + location + nearby landmark + basic function.
That combination creates a much stronger mental picture.
Front and Back Muscle Identification Cheat Sheet
| Body area | Front view | Back view |
| Shoulder | Deltoid | Deltoid |
| Chest | Pectoralis major | Trapezius/latissimus region |
| Upper arm | Biceps | Triceps |
| Abdomen | Rectus abdominis/obliques | Erector spinae and other back muscles |
| Hip | Hip flexor region | Gluteal muscles |
| Thigh | Quadriceps | Hamstrings |
| Lower leg | Tibialis anterior region | Gastrocnemius/soleus region |
This isn’t a complete anatomy reference. It’s a visual starting point for identifying the major muscles on a basic chart.
How a Muscle Diagram Can Help With Fitness Learning
A muscle chart can also help beginners understand exercise terminology.
For example, if an exercise guide refers to the quadriceps, you can locate the muscles on the front of the thigh.
If it mentions the latissimus dorsi, you know the reference is to the large back muscle.
If it mentions the deltoids, you know you’re dealing with the shoulder region.
That makes exercise instructions easier to understand.
However, identifying a muscle on a diagram doesn’t tell you everything about how an exercise affects it. Exercise technique, range of motion, joint position and individual anatomy can all influence muscular involvement.
Why Anatomy Charts Shouldn’t Be Used as Medical Diagnoses
A labeled skeleton is an educational tool, not a diagnostic instrument.
Muscle diagrams are simplified representations of human anatomy. They generally don’t show every anatomical variation, tissue layer, nerve, blood vessel or pathological condition.
If you’re trying to understand persistent pain, an injury or another health concern, a general anatomy chart isn’t enough to determine what’s happening.
For medical questions, use qualified healthcare professionals and reputable medical information sources.
How to Choose a Good Skeleton and Muscle Diagram
If you’re looking for an anatomy image for studying, teaching or a website, check these features:
Clear Labels
Names should be readable without overlapping the illustration.
Front and Back Views
Having both views lets you compare muscles that aren’t easy to see from one direction.
Appropriate Detail
A beginner doesn’t necessarily need a diagram containing hundreds of labels.
Choose an image that matches your learning level.
Correct Terminology
Prefer recognized anatomical names instead of informal labels when you’re studying anatomy.
Clear Licensing
If you’re publishing the image online, confirm that you have permission to use it.
Public-domain and appropriately licensed Creative Commons resources can be useful, but the exact license should always be checked before publication.
A Simple Mental Map of the Human Muscular System
You can remember the major muscle locations with this sequence:
Head → neck → shoulders → chest → arms → abdomen → back → hips → thighs → calves.
Then attach a few names to each region:
- Shoulders: deltoids
- Chest: pectoralis major
- Front arm: biceps
- Back arm: triceps
- Upper back: trapezius
- Broad back: latissimus dorsi
- Abdomen: rectus abdominis and obliques
- Buttocks: gluteus maximus
- Front thigh: quadriceps
- Back thigh: hamstrings
- Calf: gastrocnemius
Once this mental map is familiar, more detailed anatomy becomes easier to add.
Frequently Asked Questions
What is the best way to learn a labeled skeleton and muscle chart?
Start with the major bones and divide the body into regions. Learn a few large muscles in each region, then add their basic functions. After that, practice with an unlabeled diagram rather than repeatedly looking at the answers. Active recall can help you identify which names you actually remember.
What are the four main types of muscle?
Human muscle tissue is commonly classified as skeletal, cardiac, and smooth muscle, rather than four basic types. Skeletal muscle is associated with movement of the skeleton, cardiac muscle makes up the heart, and smooth muscle is found in many internal organs and blood vessels. A skeleton-and-muscle chart usually focuses primarily on skeletal muscles.
What is the difference between skeletal muscle and smooth muscle?
Skeletal muscle is attached to bones and is responsible for much of the body’s voluntary movement. Smooth muscle is found in structures such as the digestive tract and blood vessels and performs involuntary functions. They also differ in microscopic structure and how their activity is controlled.
What muscles should I learn first?
For a basic human muscle diagram, start with the deltoids, pectoralis major, biceps, triceps, trapezius, latissimus dorsi, rectus abdominis, gluteus maximus, quadriceps, hamstrings and gastrocnemius. These provide a useful foundation before moving to smaller and deeper muscles.
Why do anatomy diagrams use different colors?
Colors are often used simply to distinguish neighboring structures or make labels easier to follow. The color itself doesn’t mean that a muscle has a particular function. Different publishers can use completely different color schemes for the same anatomical structures.
Can a muscle chart show every muscle in the body?
Not usually in a practical beginner-friendly image. The body contains many muscles and anatomical structures, and some lie beneath others. A chart designed for beginners will generally simplify the anatomy and emphasize major structures, while advanced anatomy resources can provide much more detail.
Final Thoughts: Use the Diagram as a Map
A skeleton with muscles labeled is most useful when you treat it as a map of the body rather than a page of vocabulary.
Start with the skeleton. Identify the major bones and joints. Then add the large muscles around them. Finally, connect each muscle with its location and a simple movement.
You don’t need to memorize everything in one sitting. Learn a small group, test yourself without the labels, and gradually add more detail. With regular practice, the names that initially seem complicated become easier to recognize because you can picture exactly where each structure belongs.