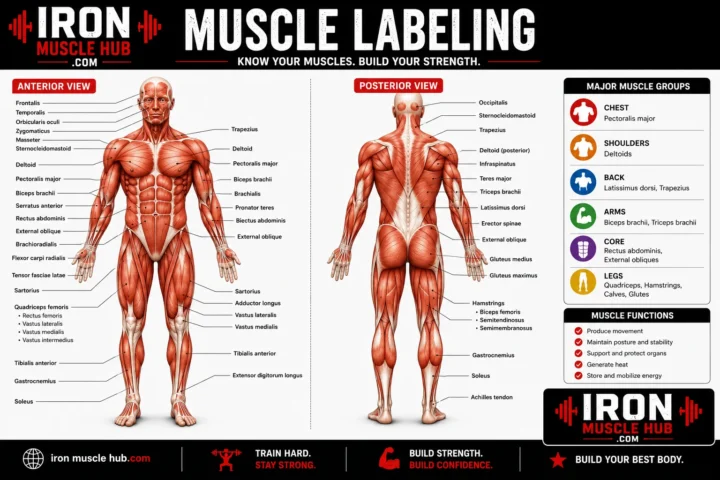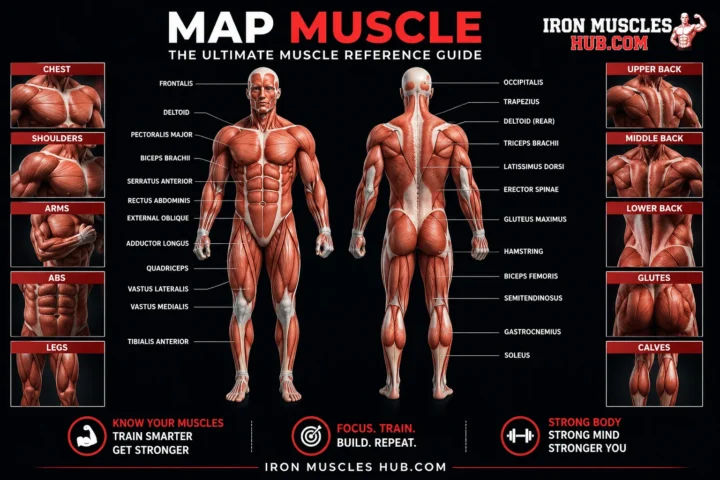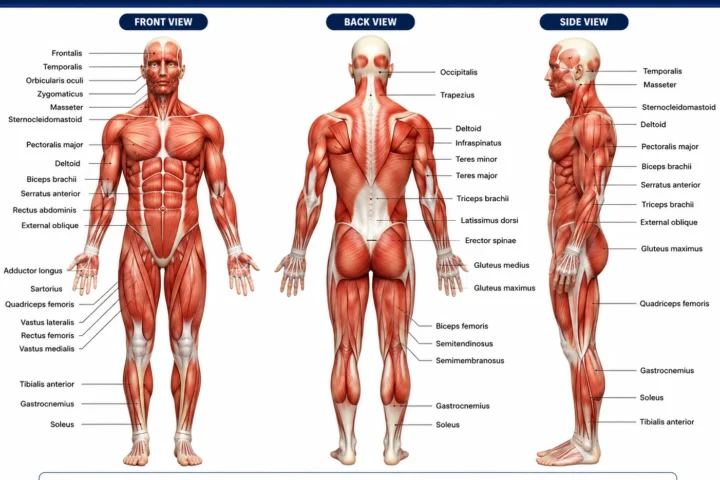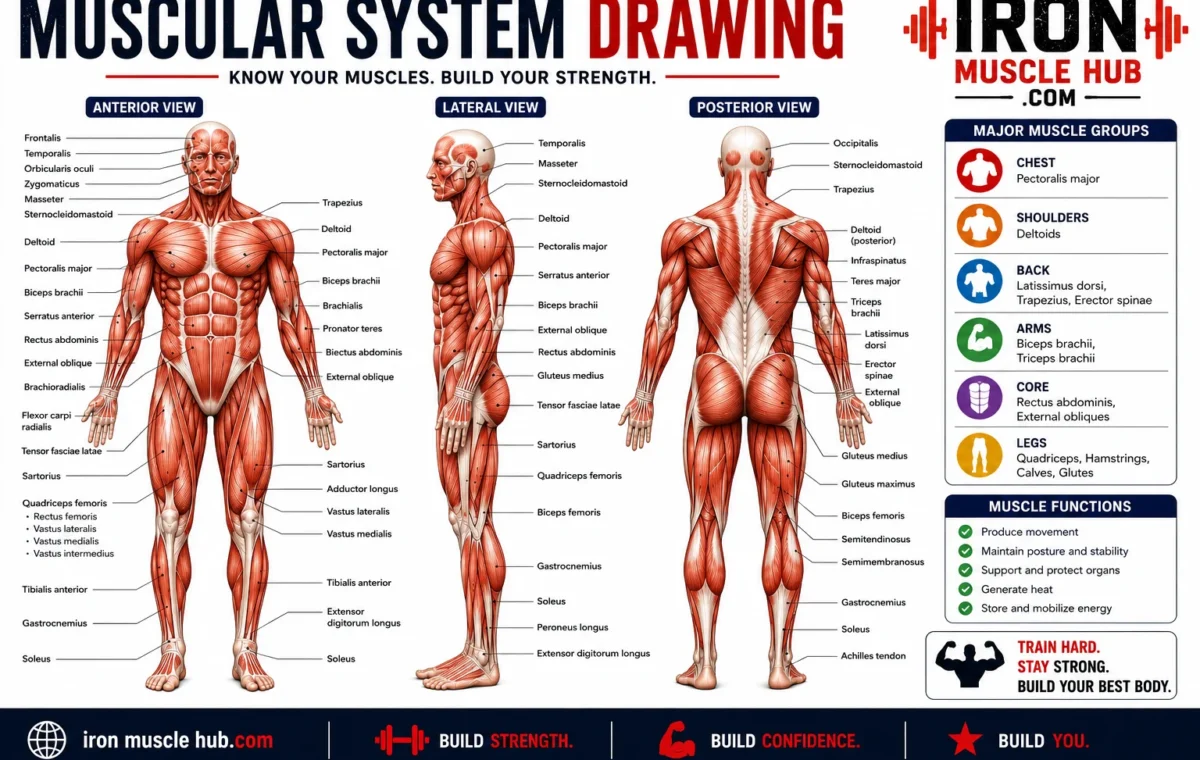
A muscular system drawing is a visual way to learn where the body’s major muscles are located and how they fit together. For beginners, the easiest approach is to start with a simple human-body framework, place the largest muscle groups first, and then add smaller muscles and labels. You don’t need to draw every muscle at once.
- Muscular System Drawing at a Glance
- What Is a Muscular System Drawing?
- How to Draw the Muscular System Step by Step
- 1. Start with the body's basic structure
- 2. Divide the body into major regions
- 3. Add the largest muscles first
- 4. Follow the shape of the bones
- 5. Show muscles as connected structures
- 6. Refine the muscle shapes
- 7. Add labels last
- Major Muscles to Include in a Beginner Drawing
- Front View vs. Back View
- Front view
- Back view
- The Three Types of Muscle You Should Know
- A Simple Way to Practice Muscle Anatomy Drawing
- Common Muscular System Drawing Mistakes
- Drawing muscles before the skeleton
- Making every muscle look symmetrical
- Using only the outside silhouette
- Adding too many labels
- Guessing from memory
- How to Make a Muscular System Drawing More Accurate
- Where to Find Copyright-Safe Muscular System Drawings
- Muscular System Drawing: A Better Study Workflow
- Frequently Asked Questions
- What is a muscular system drawing?
- How do you draw the muscular system step by step?
- What are the three types of muscle?
- Which muscles should beginners draw first?
- Is a muscular system diagram the same as a muscle anatomy drawing?
- Where can I find free muscular system reference images?
- Related Articles to Add on Iron Muscle Hub
- Build Your Muscular System Drawing One Layer at a Time
- Major Muscle Groups to Add to Your Drawing
- How to Draw the Front Muscular System
- Step 1: Sketch the skeleton
- Step 2: Add the neck
- Step 3: Build the shoulders
- Step 4: Add the chest
- Step 5: Draw the upper arms
- Step 6: Add the abdominal muscles
- How to Draw the Back Muscular System
- Trapezius
- Latissimus dorsi
- Triceps
- Gluteal muscles
- Hamstrings
- Calf muscles
- Muscular System Drawing: Front and Back Checklist
- Front view
- Back view
- How Muscles Overlap
- Use Muscle Attachments as Landmarks
- A Simple Muscle-Drawing Exercise
- Exercise 1: Shoulder
- Exercise 2: Arm
- Exercise 3: Leg
- How to Make Better Muscle Labels
- Should You Draw Every Muscle?
- A Useful Layering Method
- Layer 1: Skeleton
- Layer 2: Deep muscles
- Layer 3: Superficial muscles
- Layer 4: Tendons and attachments
- Layer 5: Labels
- Digital vs. Hand-Drawn Muscular System Drawings
- Hand drawing
- Digital drawing
- Common Mistake: Drawing Muscles as Bodybuilding Shapes
- Common Mistake: Forgetting Deeper Structures
- A Practical 30-Minute Drawing Routine
- What Makes a Good Muscular System Diagram?
- Final Study Tip
- Build a More Detailed Muscular System Drawing
- Upper body
- Core
- Lower body
- Learn the Difference Between Superficial and Deep Muscles
- Use a Skeleton as Your Permanent Reference
- Draw Muscles According to the Pose
- Practice With a Side View
- How to Draw a Muscle in Three Dimensions
- 1. Identify the attachment points
- 2. Establish the muscle's direction
- 3. Wrap the form around the body
- Muscular System Drawing Labels You Should Know
- Head and neck
- Shoulder and chest
- Back
- Arms
- Abdomen
- Hips and legs
- A Better Way to Memorize Muscle Names
- Create a Blank Muscular System Drawing
- Front-and-Back Study Template
- Front
- Back
- How to Check Your Drawing for Errors
- Check 1: Proportions
- Check 2: Joint positions
- Check 3: Muscle placement
- Check 4: Direction
- Check 5: Labels
- How to Use Anatomy References Without Copying Them
- Public-Domain Reference Example
- Muscular System Drawing for Students
- Muscular System Drawing for Artists
- Muscular System Drawing for Fitness Learners
- The Most Common Beginner Errors
- 1. Starting with details
- 2. Ignoring the skeleton
- 3. Making every muscle equally visible
- 4. Memorizing names without locations
- 5. Copying an image line-for-line
- A Simple Muscular Anatomy Study Plan
- Stage 1: Learn the landmarks
- Stage 2: Learn large muscle groups
- Stage 3: Add smaller structures
- Stage 4: Test yourself
- Final Muscular System Drawing Checklist
- Frequently Asked Questions
- What should I include in a muscular system drawing?
- How can I make my muscular system drawing look more realistic?
- Should a muscular system drawing show tendons?
- What is the easiest way to learn muscle anatomy?
- Is a front or back muscular system drawing better?
- Final Thoughts on Muscular System Drawing
A good muscular anatomy drawing is less about making a perfect artistic figure and more about understanding location, shape, attachment and movement. The guide below breaks the process into manageable stages so you can use it for studying, schoolwork, figure drawing or anatomy practice. For more insights read here :- how to get big and leaner physique.
Quick answer: Start with a basic skeleton or body shape, divide the figure into major regions, add the large superficial muscles, refine their shapes, and finish with clear labels. Use an accurate anatomy reference rather than guessing muscle locations.
Muscular System Drawing at a Glance
| What to draw | Beginner focus | Examples |
|---|---|---|
| Head and neck | Major visible muscles | Sternocleidomastoid, facial muscles |
| Chest and back | Large muscle masses | Pectoralis major, trapezius, latissimus dorsi |
| Shoulders and arms | Simple muscle groups | Deltoid, biceps, triceps |
| Abdomen | Main surface muscles | Rectus abdominis, external obliques |
| Hips and legs | Large supporting muscles | Gluteals, quadriceps, hamstrings |
| Lower legs | Major visible muscles | Gastrocnemius, tibialis anterior |
| Internal muscle types | Basic classification | Skeletal, smooth and cardiac |
The muscular system contains three major types of muscle tissue: skeletal, smooth and cardiac. Skeletal muscles are the muscles primarily responsible for voluntary body movement, while smooth muscle works inside many organs and cardiac muscle forms the heart.
What Is a Muscular System Drawing?
A muscular system drawing is an illustration that shows the muscles of the human body, either as a simplified study diagram or as a more detailed anatomical figure.
The level of detail can vary considerably. A school worksheet might show only major muscles with labels, while an anatomy student may need several layers showing superficial and deeper structures.
For drawing purposes, skeletal muscles are usually the main focus because they are attached to the skeleton and create the visible forms that change as the body moves. Skeletal muscles work with bones and joints to produce movement and help maintain posture and balance.
How to Draw the Muscular System Step by Step
1. Start with the body’s basic structure
Don’t begin by drawing individual muscles.
First, create a simple figure showing:
- Head
- Neck
- Rib cage
- Spine
- Pelvis
- Upper arms
- Forearms
- Hands
- Thighs
- Lower legs
- Feet
Think of this stage as your framework. The skeleton gives you useful landmarks for positioning muscles because many skeletal muscles attach to bones through tendons.
2. Divide the body into major regions
Break your drawing into manageable sections:
- Head and neck
- Shoulders
- Chest and back
- Abdomen
- Arms and hands
- Pelvis and hips
- Thighs
- Lower legs and feet
This makes the drawing much easier than trying to memorize the entire muscular system simultaneously.
3. Add the largest muscles first
Large muscle groups create most of the visible shape of the body.
For a front-view drawing, begin with structures such as:
- Deltoids around the shoulders
- Pectoralis major across the chest
- Biceps brachii on the front of the upper arm
- Rectus abdominis along the front of the abdomen
- External obliques along the sides of the abdomen
- Quadriceps across the front of the thighs
- Tibialis anterior along the front of the lower leg
For a back view, concentrate on structures such as the:
- Trapezius
- Latissimus dorsi
- Triceps brachii
- Gluteal muscles
- Hamstrings
- Gastrocnemius
These aren’t the only muscles present. They’re useful starting landmarks for a beginner’s diagram.
4. Follow the shape of the bones
One common beginner mistake is drawing muscles as random blobs placed on top of a body outline.
Instead, ask yourself:
Where does this muscle begin, where does it attach, and what direction does it run?
Muscles aren’t simply painted onto the skeleton. Their attachments and fiber arrangements influence their shape and the movement they produce. OpenStax, for example, teaches skeletal muscles by examining their organization, attachments and actions.
5. Show muscles as connected structures
A muscle should look connected to the surrounding anatomy.
Pay attention to:
- Muscle origin
- Muscle belly
- Tendon
- Insertion
- Direction of muscle fibers
Tendons connect skeletal muscles to bones, allowing muscle contraction to contribute to movement at joints.
You don’t need to label every tendon in a beginner drawing. Just understanding the basic connection will make your illustration more anatomically believable.
6. Refine the muscle shapes
Once the main forms are in position, replace your rough shapes with more accurate contours.
Look for:
- Changes in muscle thickness
- Overlapping muscles
- Natural transitions between muscle groups
- Attachment points
- Differences between left and right sides
Don’t make both sides perfectly identical if you’re drawing a figure in motion. Real bodies change shape as joints move and muscles contract.
7. Add labels last
Labels are easier to place after the drawing is finished.
Use short lines from the name to the appropriate structure. Keep the labels outside the body whenever possible so they don’t cover the anatomy.
For a beginner diagram, you might label:
Deltoid → Pectoralis major → Biceps brachii → Rectus abdominis → External oblique → Quadriceps → Tibialis anterior
A more advanced diagram can include considerably more structures.
Major Muscles to Include in a Beginner Drawing
The following table gives you a practical starting reference.
| Body area | Muscle to learn | General location |
| Shoulder | Deltoid | Covers the shoulder |
| Chest | Pectoralis major | Front of upper chest |
| Upper back | Trapezius | Upper back and neck region |
| Back | Latissimus dorsi | Broad muscle of the back |
| Upper arm | Biceps brachii | Front of upper arm |
| Upper arm | Triceps brachii | Back of upper arm |
| Abdomen | Rectus abdominis | Front of abdomen |
| Abdomen | External oblique | Sides of abdomen |
| Hip | Gluteal muscles | Buttock region |
| Thigh | Quadriceps | Front of thigh |
| Thigh | Hamstrings | Back of thigh |
| Lower leg | Gastrocnemius | Prominent calf muscle |
| Lower leg | Tibialis anterior | Front of lower leg |
These are skeletal muscles, the muscle group most relevant to a surface-level human muscular system drawing. The National Institutes of Health’s NIAMS explains that skeletal muscles work with bones and joints to produce movement and help with posture and balance.
Front View vs. Back View
If you’re creating a complete muscular system diagram, drawing both views is much more useful than relying on one.
Front view
The front view makes it easier to study:
- Pectoralis major
- Deltoids
- Biceps
- Rectus abdominis
- External obliques
- Quadriceps
- Tibialis anterior
Back view
The back view helps you understand:
- Trapezius
- Latissimus dorsi
- Posterior deltoids
- Triceps
- Gluteal muscles
- Hamstrings
- Gastrocnemius
A useful study technique is to draw the same body twice, side by side. Label the front figure first, then turn your attention to the posterior muscles.
The Three Types of Muscle You Should Know
A complete muscular-system lesson isn’t limited to the large muscles visible in an anatomy drawing.
| Muscle type | Main location | Voluntary? | Main role |
| Skeletal | Attached to bones | Yes | Body movement and posture |
| Smooth | Walls of organs and blood vessels | No | Moves and regulates substances inside the body |
| Cardiac | Heart | No | Contracts to pump blood |
NIAMS identifies these as the three major muscle types. Skeletal muscle is under conscious control, while smooth and cardiac muscle function involuntarily.
That distinction matters because a typical human muscular system drawing usually emphasizes skeletal muscle, even though the muscular system also includes smooth and cardiac muscle tissue.
A Simple Way to Practice Muscle Anatomy Drawing
If you’re struggling to remember muscle locations, try this five-stage practice method:
Day 1: Draw the basic skeleton.
Day 2: Add only the largest muscles.
Day 3: Add smaller muscles around the arms, legs, neck and trunk.
Day 4: Label the drawing without looking at your reference.
Day 5: Draw the same figure from memory, then compare it with your reference.
The goal isn’t to memorize hundreds of names immediately. Start by learning where major muscle groups sit and how they relate to bones and joints.
Common Muscular System Drawing Mistakes
Drawing muscles before the skeleton
This often causes muscles to appear too short, too long or incorrectly positioned.
Fix: Establish the skeleton and joint positions first.
Making every muscle look symmetrical
A relaxed anatomical study may be symmetrical, but a moving figure usually isn’t.
Fix: Study how muscles change with posture and joint position.
Using only the outside silhouette
The outer contour doesn’t tell you enough about what’s underneath.
Fix: Lightly sketch internal landmarks before adding final muscle shapes.
Adding too many labels
A crowded diagram can become difficult to study.
Fix: Label the muscles relevant to your learning goal first. Add more in a second version.
Guessing from memory
Even experienced artists can misplace anatomical structures.
Fix: Keep a reliable anatomy reference beside your drawing. Educational resources such as OpenStax and NIH anatomy materials provide structured information about muscle organization and function.
How to Make a Muscular System Drawing More Accurate
Accuracy improves when you stop treating muscles as isolated shapes.
Think about three questions for each major muscle:
- Where is it located?
- What does it attach to?
- What movement does it help produce?
This turns memorization into a connected system.
For example, if you understand that skeletal muscles interact with bones and joints to create movement, the position of an arm muscle becomes easier to reason through rather than simply memorizing a picture.
Where to Find Copyright-Safe Muscular System Drawings
If you need a reference image for a website, classroom resource or personal study, don’t simply copy an image from Google Images.
One useful option is Wikimedia Commons, which hosts anatomical illustrations with their individual licensing information. For example, its Muscular System.jpg is identified as a public-domain reproduction of an older anatomical work.
Wikimedia Commons also contains public-domain anatomical plates from the 1911 Encyclopaedia Britannica, including figures showing the muscular system and individual muscle regions.
Always check the individual file’s license and attribution requirements before publishing an image.
Muscular System Drawing: A Better Study Workflow
For a clean beginner diagram, use this order:
Skeleton → major muscle masses → smaller muscles → tendons/attachments → contours → labels → final review
This workflow solves two common problems at once: incorrect muscle placement and overcrowded labels.
For students, you can also create two versions:
- Reference version: fully labeled.
- Practice version: blank labels for testing your memory.
That turns one drawing into a reusable study tool.
Frequently Asked Questions
What is a muscular system drawing?
A muscular system drawing is an anatomical illustration showing some or all of the body’s muscles. A beginner version usually focuses on major skeletal muscles, their approximate positions and their names. More detailed anatomy drawings can show deeper muscle layers, tendons, attachments and fiber direction.
How do you draw the muscular system step by step?
Start with a simple skeleton or body framework. Divide the figure into regions, add the largest muscles first, refine their shapes around the bones, add smaller structures, and finish by labeling the important muscles. Using an anatomy reference throughout the process is more reliable than drawing entirely from memory.
What are the three types of muscle?
The three major types are skeletal, smooth and cardiac muscle. Skeletal muscle is mainly responsible for voluntary movement and posture. Smooth muscle works involuntarily in structures such as organs and blood vessels, while cardiac muscle makes up the heart and contracts automatically.
Which muscles should beginners draw first?
Start with large, recognizable structures such as the deltoids, pectoralis major, trapezius, latissimus dorsi, biceps, triceps, rectus abdominis, gluteals, quadriceps and hamstrings. Learning these landmarks first gives you a useful foundation before moving into smaller muscles.
Is a muscular system diagram the same as a muscle anatomy drawing?
They’re closely related but can have different purposes. A muscular system diagram usually emphasizes identification and location, often with labels. A muscle anatomy drawing may go deeper into structure, attachments, layers or fiber arrangement.
Where can I find free muscular system reference images?
Wikimedia Commons has many anatomical illustrations with licensing information shown on individual file pages. Some older anatomical works are in the public domain, but you should check the license for each specific image before using it commercially.
Related Articles to Add on Iron Muscle Hub
For a useful internal-link structure, consider adding:
- Body Muscle Chart: Major Muscles Explained
- Muscle Anatomy Chart: A Beginner’s Guide
- Body Diagram of Muscles: Names and Functions
These articles can link naturally between general anatomy, individual muscle groups and visual study resources.
Build Your Muscular System Drawing One Layer at a Time
A strong muscular system drawing doesn’t need to begin as a complicated medical illustration. Start with the skeleton, establish the major body regions, place the largest skeletal muscles, and gradually add detail. The more you understand how muscles relate to bones, joints and movement, the easier accurate drawing becomes.
For beginners, consistency matters more than producing one perfect diagram. Draw the same major muscle groups repeatedly, test yourself without labels, and compare your work with reliable anatomy references. That approach builds both drawing skill and anatomical understanding.
A good muscular system drawing becomes much easier once you understand the major muscle groups instead of trying to memorize every muscle at once. The key is to study the body region by region, beginning with the large muscles that create the body’s visible shape.
This section takes the basic drawing method further. You’ll learn what to include in a more detailed front and back view, how muscles overlap, and how to make your labels useful without turning the illustration into a confusing wall of text.
Major Muscle Groups to Add to Your Drawing
A detailed muscular system drawing can contain dozens of structures, but beginners don’t need to learn everything simultaneously.
Start with these major regions:
| Region | Important muscles to study | Where to look |
|---|---|---|
| Head and neck | Sternocleidomastoid, masseter | Neck and jaw |
| Shoulders | Deltoid | Shoulder cap |
| Chest | Pectoralis major | Front of chest |
| Upper back | Trapezius | Neck and upper back |
| Back | Latissimus dorsi | Broad middle/lower back |
| Arms | Biceps, triceps | Front/back of upper arm |
| Forearm | Flexor and extensor groups | Lower arm |
| Abdomen | Rectus abdominis, obliques | Front and sides |
| Hip | Gluteal muscles | Posterior hip |
| Thigh | Quadriceps, hamstrings | Front/back thigh |
| Calf | Gastrocnemius, soleus | Back of lower leg |
| Shin | Tibialis anterior | Front of lower leg |
These structures provide useful landmarks for a study drawing. You can add smaller muscles after you’ve become comfortable locating the larger groups.
How to Draw the Front Muscular System
The front view is usually the easiest place to begin because many major superficial muscles are clearly visible.
Step 1: Sketch the skeleton
Draw the head, rib cage, pelvis and limbs using simple geometric shapes.
Don’t worry about detail. Your goal is to establish:
- Body proportions
- Shoulder width
- Hip position
- Elbow and knee locations
- Spine alignment
- Overall pose
Step 2: Add the neck
The sternocleidomastoid is an important landmark on the front and side of the neck.
Rather than drawing it as a thick tube, think of it as a long band running diagonally from the region behind the ear toward the sternum and clavicle.
This immediately gives the neck a more anatomical appearance.
Step 3: Build the shoulders
The deltoid forms much of the rounded outer shoulder.
A useful beginner trick is to imagine it as a rounded cap surrounding the shoulder joint. Its shape changes depending on whether the arm is relaxed, raised or rotated.
Step 4: Add the chest
The pectoralis major occupies a large portion of the upper front chest.
Pay attention to its relationship with:
- The sternum
- The clavicle
- The shoulder
- The upper arm
Don’t draw a simple rectangle across the chest. The muscle has a curved, layered appearance that changes with arm position.
Step 5: Draw the upper arms
The biceps brachii is located on the front of the upper arm, while the triceps brachii occupies much of the back.
For a front-view drawing, the biceps is the more visible of the two.
A common mistake is making the biceps extremely large while ignoring the surrounding structures. Instead, consider the whole upper arm as a collection of overlapping forms.
Step 6: Add the abdominal muscles
The rectus abdominis runs vertically along the front of the abdomen.
The external obliques sit toward the sides.
If you’re drawing an athletic figure, don’t automatically add exaggerated abdominal blocks. Anatomical accuracy should come from muscle placement rather than simply making every muscle larger.
How to Draw the Back Muscular System
The back view introduces several large muscles that aren’t obvious from the front.
Trapezius
The trapezius extends across the upper back and neck region.
In a muscular system drawing, it provides an important connection between the neck, shoulders and upper back.
Latissimus dorsi
The latissimus dorsi is a broad muscle covering much of the middle and lower back.
Its size and position help create the familiar widening of the upper torso toward the shoulders.
Triceps
From behind, the triceps brachii becomes a major upper-arm landmark.
Remember that the muscle wraps around the arm rather than appearing as a completely separate strip on the back.
Gluteal muscles
The gluteal region contains several muscles, with the gluteus maximus being the large superficial muscle that contributes significantly to the shape of the buttocks.
When drawing the pelvis, establish the pelvic structure first. Then build the gluteal forms around it.
Hamstrings
The hamstrings occupy the back of the thigh.
For a simplified diagram, treat them as a major posterior thigh group rather than trying to draw every individual fiber.
Calf muscles
The gastrocnemius is a prominent muscle at the back of the lower leg.
Its two major visible portions contribute to the familiar rounded shape of the calf.
Muscular System Drawing: Front and Back Checklist
Use this checklist when completing a two-view anatomy illustration:
Front view
- Head and neck
- Sternocleidomastoid
- Deltoids
- Pectoralis major
- Biceps
- Forearm muscle groups
- Rectus abdominis
- External obliques
- Quadriceps
- Tibialis anterior
Back view
- Trapezius
- Posterior deltoids
- Triceps
- Latissimus dorsi
- Lower-back region
- Gluteus maximus
- Hamstrings
- Gastrocnemius
This creates a strong beginner-to-intermediate reference without requiring hundreds of labels.
How Muscles Overlap
One of the biggest differences between a simple body drawing and an anatomy drawing is overlap.
Muscles don’t sit beside one another like pieces of a flat puzzle. They can partially cover, cross around or sit underneath other muscles.
For example, the shoulder region involves several structures around the joint. The arm muscles also change their visible proportions depending on whether the arm is straight, bent or rotated.
When drawing, use lighter construction lines first. Once you’re confident about the position of each structure, strengthen the important contours.
Use Muscle Attachments as Landmarks
If you want your drawing to become more accurate, study where muscles attach.
A simplified way to think about skeletal muscle is:
Origin → muscle belly → tendon → insertion
The exact anatomy can be more complicated, but this framework is useful for beginners.
Muscles attach to bones through connective structures, and their contractions can create movement around joints. Understanding these relationships helps explain why a muscle runs in a particular direction instead of treating its shape as something to memorize visually.
A Simple Muscle-Drawing Exercise
Try this exercise with one muscle group at a time.
Exercise 1: Shoulder
Draw the upper arm and shoulder joint.
Add the deltoid as a rounded structure around the joint.
Then redraw the same shoulder with the arm raised.
Compare how the shape changes.
Exercise 2: Arm
Draw a straight arm.
Add the biceps and triceps.
Then bend the elbow.
Notice how the muscle shapes and surrounding contours change.
Exercise 3: Leg
Draw the femur and lower-leg bones as a simplified framework.
Add the quadriceps to the front and hamstrings to the back.
Finally, add the calf and shin muscles.
This approach teaches you anatomy through movement rather than memorization alone.
How to Make Better Muscle Labels
Labels should help someone understand your diagram, not compete with it.
Use a consistent system:
Muscle name → short leader line → exact structure
Avoid drawing a line through several muscles before reaching the intended label.
If two labels are close together, move the text farther away and use separate leader lines.
For educational diagrams, clarity is usually more useful than trying to fit every anatomical name onto one page.
Should You Draw Every Muscle?
No.
The appropriate level of detail depends on the purpose of your drawing.
| Goal | Recommended detail |
| Basic school diagram | Major muscle groups |
| Beginner anatomy study | Major muscles + selected smaller muscles |
| Figure drawing | Major forms and muscle landmarks |
| Advanced anatomy | Individual muscles, attachments and layers |
| Medical/academic study | Use a detailed anatomical reference and required terminology |
A common beginner mistake is assuming that a more crowded diagram is automatically a better one.
It isn’t.
A clean drawing with 20 useful labels can teach more than a page containing 100 labels that are difficult to identify.
A Useful Layering Method
For a more advanced human muscular system drawing, create separate layers.
Layer 1: Skeleton
Show the major bones and joints.
Layer 2: Deep muscles
Add muscles that sit beneath the more visible superficial muscles.
Layer 3: Superficial muscles
Add the structures most visible from the outside.
Layer 4: Tendons and attachments
Show important connections where required.
Layer 5: Labels
Add names only after the anatomical drawing is complete.
This method is especially helpful if you’re creating a digital illustration because you can hide and reveal layers while studying.
Digital vs. Hand-Drawn Muscular System Drawings
Both approaches can work well.
Hand drawing
Advantages:
- Helps develop observational skills
- Easy to practice anywhere
- Makes you slow down and study shapes
- Useful for anatomy students
Disadvantages:
- Corrections can be messy
- Accurate proportions take practice
- Labels can become crowded
Digital drawing
Advantages:
- Easy to erase and reposition
- Layers make anatomy studies easier
- Labels can be moved without redrawing
- Multiple versions can be saved
Disadvantages:
- Software can take time to learn
- Digital tools don’t automatically make anatomy accurate
- It’s still necessary to use a reliable reference
The important part isn’t the medium. It’s whether you’re checking your work against accurate anatomy.
Common Mistake: Drawing Muscles as Bodybuilding Shapes
A muscular anatomy diagram shouldn’t simply look like an exaggerated bodybuilding illustration.
Large muscles can be visually impressive, but anatomy depends on position, attachment and structure, not just size.
If you’re studying the muscular system, prioritize correct relationships between muscles, bones and joints.
A smaller but accurately placed muscle is more useful for learning than an oversized muscle placed incorrectly.
Common Mistake: Forgetting Deeper Structures
A superficial drawing can make it seem as though the body contains only the muscles you can see from the outside.
That’s not the case.
Many muscles are located underneath other muscles. This is why advanced anatomy resources often use separate illustrations to show superficial and deeper layers.
For your own study, create a second drawing showing deeper structures instead of trying to force everything into one image.
A Practical 30-Minute Drawing Routine
If you want to improve quickly, try a short repeatable session.
Minutes 1–5: Draw the skeleton framework.
Minutes 6–10: Add the torso muscles.
Minutes 11–15: Add arms and shoulders.
Minutes 16–20: Add hips and legs.
Minutes 21–25: Add important smaller structures.
Minutes 26–30: Label and compare the drawing with your reference.
Repeat the process using a different pose or viewing angle.
The purpose isn’t to produce a perfect illustration in 30 minutes. It’s to train yourself to identify anatomical landmarks efficiently.
What Makes a Good Muscular System Diagram?
A useful diagram should have four qualities:
- Accurate placement
- Readable labels
- Appropriate detail
- A clear purpose
If it’s for beginners, don’t overload it with specialist terminology.
If it’s for advanced anatomy study, don’t remove important attachment information simply to make the image look cleaner.
The best drawing is the one that matches the learner’s needs.
Final Study Tip
Don’t treat a muscular system drawing as something you look at once and memorize.
Use it actively.
Cover the labels and identify the muscles yourself. Draw the same region from memory. Then compare your version with a trusted reference and mark the mistakes.
That cycle — study, draw, test, correct, repeat — is far more useful than repeatedly staring at the same anatomy chart.
A detailed muscular system drawing is most useful when it does more than show muscle names. It should help you understand where muscles sit, how they relate to the skeleton, and how their shapes change with movement.
This final section focuses on turning a basic anatomy sketch into a stronger study diagram. You’ll also find practical labeling strategies, pose-based exercises, a printable-style study checklist, and guidance for choosing references.
Build a More Detailed Muscular System Drawing
Once you’ve learned the major muscles, you can gradually add smaller structures.
Don’t add them randomly. Work from large structures toward smaller ones.
Upper body
Start with:
- Trapezius
- Deltoid
- Pectoralis major
- Latissimus dorsi
- Biceps brachii
- Triceps brachii
Then study smaller muscles around the shoulder, chest, upper back and forearm.
Core
Begin with:
- Rectus abdominis
- External oblique
- Internal oblique
- Transversus abdominis
For a surface anatomy drawing, some deeper abdominal muscles may not be visible in the same way as superficial structures. This is a good reason to create separate anatomical layers rather than trying to show everything in one figure.
Lower body
Start with:
- Gluteal muscles
- Quadriceps
- Hamstrings
- Gastrocnemius
- Soleus
- Tibialis anterior
Once these are familiar, you can work toward more detailed diagrams of the thigh, lower leg and foot.
Learn the Difference Between Superficial and Deep Muscles
This is an important step in advancing your anatomy drawing.
Superficial muscles are closer to the body’s surface. They often contribute directly to the external shape you see in a figure.
Deep muscles are positioned underneath other structures.
A detailed anatomy illustration may therefore show multiple versions of the same body region:
Surface layer → first muscle layer → deeper layer → skeletal framework
Trying to display every layer simultaneously can make a diagram difficult to understand.
For study purposes, separate drawings are often clearer.
Use a Skeleton as Your Permanent Reference
If your muscle placement keeps looking wrong, return to the skeleton.
The skeleton gives you fixed landmarks for:
- Shoulder position
- Elbow position
- Wrist position
- Rib cage
- Pelvis
- Knee
- Ankle
Skeletal muscles attach to bones and produce movement through their interaction with joints. That relationship is one of the foundations of understanding muscular anatomy.
A simple skeleton underneath your drawing can therefore prevent many positioning errors.
Draw Muscles According to the Pose
A standing figure and a seated figure shouldn’t have exactly the same muscle contours.
Movement changes the visible relationship between muscles, skin and joints.
Try drawing the same anatomy in three positions:
- Standing with arms relaxed
- Arms raised overhead
- One arm bent at the elbow
Don’t worry about making the figures artistic. Concentrate on how the major anatomical landmarks move.
This is especially useful for people learning figure drawing.
Practice With a Side View
Front and back views are useful, but a side-view muscular system drawing adds another layer of understanding.
A side view can help you study:
- Neck muscles
- Shoulder position
- Chest thickness
- Abdominal profile
- Gluteal shape
- Quadriceps
- Hamstrings
- Calf structure
It also makes it easier to understand that muscles occupy three-dimensional space.
Instead of thinking of the body as a flat picture, imagine each muscle wrapping around a solid form.
How to Draw a Muscle in Three Dimensions
Use a simple three-step approach:
1. Identify the attachment points
Find the bones or landmarks where the muscle begins and ends.
2. Establish the muscle’s direction
Sketch the general direction of the muscle fibers.
3. Wrap the form around the body
Instead of drawing a flat shape, follow the curve of the underlying body.
This technique is particularly helpful for the deltoid, chest, shoulder and calf.
Muscular System Drawing Labels You Should Know
If you’re preparing a basic labeled diagram, these names make a strong starting vocabulary:
Head and neck
- Sternocleidomastoid
- Masseter
Shoulder and chest
- Deltoid
- Pectoralis major
Back
- Trapezius
- Latissimus dorsi
Arms
- Biceps brachii
- Triceps brachii
Abdomen
- Rectus abdominis
- External oblique
Hips and legs
- Gluteus maximus
- Quadriceps
- Hamstrings
- Gastrocnemius
- Tibialis anterior
Don’t feel pressured to memorize every Latin-derived anatomical term immediately. Learn the location first, then gradually add terminology.
A Better Way to Memorize Muscle Names
Instead of memorizing a long list, connect each name with three pieces of information:
Name + location + action
For example:
Biceps brachii → front of upper arm → helps flex the elbow
This creates a stronger mental connection than memorizing the name alone.
OpenStax explains skeletal muscle anatomy in relation to muscle structure, attachments and actions, making it a useful educational reference for this kind of study.
Create a Blank Muscular System Drawing
One of the most useful study tools you can make is a blank version of your own diagram.
Start with a fully labeled illustration.
Then create a second copy without the labels.
Test yourself by filling in:
- Muscle names
- Body regions
- Front/back position
- Major muscle groups
Finally, compare your answers with the original.
This transforms a passive drawing into an active recall exercise.
Front-and-Back Study Template
For a beginner-friendly anatomy worksheet, divide the page into two large sections.
Front
Label:
- Deltoid
- Pectoralis major
- Biceps brachii
- Rectus abdominis
- External oblique
- Quadriceps
- Tibialis anterior
Back
Label:
- Trapezius
- Deltoid
- Triceps brachii
- Latissimus dorsi
- Gluteus maximus
- Hamstrings
- Gastrocnemius
Leave enough blank space around the figures for leader lines.
How to Check Your Drawing for Errors
Before considering your diagram finished, run through this five-point check.
Check 1: Proportions
Are the head, torso, arms and legs reasonably proportioned?
Check 2: Joint positions
Do the elbows, wrists, knees and ankles line up with the skeleton?
Check 3: Muscle placement
Does each muscle sit in the correct body region?
Check 4: Direction
Do the muscle forms generally follow their anatomical orientation?
Check 5: Labels
Does every label point clearly to the intended structure?
This final review catches many mistakes before they become part of your study notes.
How to Use Anatomy References Without Copying Them
A reference image is a learning tool.
You can study it, understand it and then create your own diagram using your own structure and labeling system.
If you’re publishing an image online, however, don’t assume that finding it through an image search makes it free to reuse.
Check the specific image’s copyright and license information.
Wikimedia Commons provides licensing information on individual files, and some older anatomical works are available under public-domain status. The license for each file should still be checked before publication or commercial use.
Public-Domain Reference Example
Older anatomy illustrations can be particularly useful for reference because many historical works are now in the public domain.
Wikimedia Commons contains historical muscular-system illustrations, including figures from the 1911 Encyclopaedia Britannica. The individual file page provides information about its public-domain status.
Another Wikimedia Commons muscular-system illustration is also identified as a public-domain work.
Using a clearly licensed reference is safer than downloading a random modern anatomy illustration from a search engine.
Muscular System Drawing for Students
If you’re creating a school project, keep the final illustration simple and readable.
A good student diagram can include:
- A front view
- A back view
- Major muscle labels
- A short explanation of skeletal muscle
- A small key explaining the diagram
Avoid filling the page with tiny labels that can’t be read.
The purpose of the drawing should determine its complexity.
Muscular System Drawing for Artists
Artists can approach the subject differently.
Instead of memorizing every anatomical name, concentrate on:
- Muscle masses
- Bony landmarks
- Surface contours
- Joint movement
- Compression and stretching
- Overlapping forms
For figure drawing, the most important lesson is that muscles are attached to a moving skeleton. Their visible forms change as the body changes position.
A useful exercise is to sketch a pose quickly, add the skeleton, then place only the largest muscle groups.
Muscular System Drawing for Fitness Learners
If you’re studying anatomy because you’re interested in exercise, don’t assume that a visible muscle drawing tells you everything about how training works.
A diagram shows where structures are located. It doesn’t automatically explain how a particular exercise loads them.
For basic learning, separate these questions:
Anatomy: Where is the muscle?
Function: What movement does it help produce?
Exercise: Which movements can train it?
Keeping these concepts separate makes anatomy easier to understand.
The Most Common Beginner Errors
1. Starting with details
Tiny muscles can’t be placed accurately if the overall body structure is wrong.
Better approach: Start large and work smaller.
2. Ignoring the skeleton
Muscles don’t float independently.
Better approach: Keep the skeleton underneath your construction drawing.
3. Making every muscle equally visible
Some structures are superficial while others lie underneath.
Better approach: Use separate layers or separate drawings.
4. Memorizing names without locations
Knowing that a muscle exists isn’t enough.
Better approach: Always connect the name to its location and basic function.
5. Copying an image line-for-line
This can produce a drawing without giving you much anatomical understanding.
Better approach: Study the reference, close it, reconstruct the main forms, then compare your work.
A Simple Muscular Anatomy Study Plan
You can divide your learning into four stages.
Stage 1: Learn the landmarks
Study the skeleton, major joints and body proportions.
Stage 2: Learn large muscle groups
Focus on the shoulders, chest, back, arms, abdomen, hips and legs.
Stage 3: Add smaller structures
Once the large forms make sense, gradually introduce additional muscles.
Stage 4: Test yourself
Draw from memory and label the structures without looking at your reference.
This progression prevents information overload.
Final Muscular System Drawing Checklist
Before finishing your anatomy drawing, ask:
- Is the skeleton proportionally believable?
- Are the major joints in the right places?
- Are the largest muscle groups positioned correctly?
- Do the muscles follow the body’s three-dimensional form?
- Are deeper structures separated from superficial ones?
- Are the labels readable?
- Does every label point to the right structure?
- Did I use a reliable anatomy reference?
- If I plan to publish the image, have I checked its license?
If the answer is yes, your drawing is ready to use as a study reference.
Frequently Asked Questions
What should I include in a muscular system drawing?
For a beginner diagram, include the major superficial skeletal muscles of the head, neck, shoulders, chest, back, arms, abdomen, hips and legs. A front-and-back view gives a much more useful overview than a single view. Add smaller muscles only after you’re comfortable with the major landmarks.
How can I make my muscular system drawing look more realistic?
Start with accurate body proportions and a skeletal framework. Then place the major muscles according to their anatomical location and attachments. Avoid simply making muscles larger. Realistic anatomy comes from correct relationships between bones, joints and muscle forms.
Should a muscular system drawing show tendons?
It can, but it doesn’t have to. A beginner diagram can focus on major muscles alone. If your purpose is more advanced anatomy study, adding important tendons and attachment points can help explain how muscles connect to the skeleton and contribute to movement.
What is the easiest way to learn muscle anatomy?
Study one body region at a time. Learn each muscle’s name, location and basic action, then draw it from memory. Afterward, compare your drawing with a reliable reference and correct your mistakes. Repeated recall is generally more useful than simply rereading a labeled diagram.
Is a front or back muscular system drawing better?
Neither is enough by itself. The front view clearly shows structures such as the pectorals, biceps, abdominal muscles and quadriceps, while the back view reveals structures such as the trapezius, latissimus dorsi, triceps, gluteals and hamstrings. Studying both gives you a fuller picture.
Final Thoughts on Muscular System Drawing
The best muscular system drawing isn’t necessarily the most complicated one. A clear diagram that correctly shows the major muscle groups, follows the underlying skeleton and uses readable labels can be far more useful than an overcrowded illustration.
Start with the skeleton. Add the large muscle groups. Learn their locations and basic actions. Then gradually introduce smaller muscles and deeper layers.
Most importantly, keep practicing from memory. Draw, compare, correct and redraw. With that routine, a complicated muscular anatomy chart becomes a collection of smaller, manageable structures.