Muscle anatomy models are physical or digital representations of the body’s muscles that help you see where muscles sit, how they connect with bones, and how different structures relate to movement. They can be useful for students, teachers, fitness professionals, artists, and anyone learning basic human anatomy.
- Quick Guide to Muscle Anatomy Models
- What Are Muscle Anatomy Models?
- Why Use a 3D Muscle Anatomy Model?
- 1. You can see layers
- 2. You can understand muscle attachments
- 3. You can study movement
- 4. You can approach difficult anatomy from different angles
- Physical vs. Digital Muscle Anatomy Models
- How to Choose Muscle Anatomy Models
- Step 1: Decide what you're studying
- Step 2: Check the level of detail
- Step 3: Look for removable or isolatable structures
- Step 4: Check whether bones are included
- Step 5: Check the source and licensing
- A Simple Beginner Study Method
- A Worked Example: Studying the Arm
- Common Mistakes to Avoid
- Buying the biggest model first
- Studying names without relationships
- Relying on one view
- Treating a model as a medical diagnosis tool
- Are Digital 3D Models a Good Low-Cost Starting Point?
- Internal Link Ideas
- Frequently Asked Questions
- What are muscle anatomy models used for?
- Are 3D muscle anatomy models good for beginners?
- What is the difference between a muscle model and a skeleton model?
- Can I use free 3D muscle anatomy models?
- Should I buy a physical anatomy model or use a digital one?
- What features should a good muscle anatomy model have?
- Choosing the Right Model Without Overspending
- How Muscle Anatomy Models Help You Understand the Human Body
- Understanding Superficial and Deep Muscles
- Muscle Anatomy Models by Body Region
- What to Look for in a High-Quality Model
- Clear labels
- Anatomical relationships
- Removable components
- Multiple viewing angles
- Reliable anatomical information
- Physical Muscle Models vs. Anatomy Posters
- Physical Muscle Models vs. Digital Models
- A Simple Decision Rule
- How to Study Muscles With a 3D Model
- Start with the name
- Find it without the label
- Follow its attachments
- Think about movement
- Hide the answer
- A 15-Minute Muscle Model Study Routine
- Don't Try to Memorize Everything at Once
- Muscle Anatomy Models for Students
- Muscle Anatomy Models for Fitness Learners
- A Common-Mistake Fix: Don't Confuse Appearance With Function
- Are Expensive Muscle Anatomy Models Better?
- What About 3D-Printed Muscle Models?
- Best Overall Approach for Beginners
- Final Takeaway
- How to Get More Value From Muscle Anatomy Models
- Use a Layer-by-Layer Learning Strategy
- Layer 1: Major landmarks
- Layer 2: Major muscle groups
- Layer 3: Individual muscles
- Layer 4: Attachments and actions
- Use Muscle Anatomy Models With Active Recall
- Try the "Explain It Out Loud" Method
- Combine 2D and 3D Resources
- How Teachers Can Use Muscle Anatomy Models
- How to Care for a Physical Anatomy Model
- How to Use Digital Anatomy Models More Effectively
- How to Choose a Muscle Model for Different Goals
- For general anatomy beginners
- For medical or anatomy students
- For fitness students
- For teachers
- For artists
- Questions to Ask Before Buying
- Don't Buy Based on Appearance Alone
- Muscle Anatomy Models and Long-Term Learning
- A Practical Beginner's Buying Strategy
- Low-commitment approach
- Focused physical approach
- Advanced approach
- Final Thoughts: Choosing the Right Muscle Anatomy Model
- Quick Final Checklist
For a beginner, the best model isn’t necessarily the largest or most detailed one. A useful model should make the structures you’re studying easier to identify and understand. Physical models can give you a hands-on view, while interactive 3D models let you rotate, isolate, and explore structures from different angles. Research published in 2026 also found promising results for an interactive 3D musculoskeletal model used with first-time learners. For more insights read here :- main muscle groups and label skeletal muscle.
Quick answer: If you’re starting anatomy study, choose a model that clearly shows the muscles you actually need to learn, includes useful labels or attachment information, and lets you view deeper structures without unnecessary visual clutter.
Quick Guide to Muscle Anatomy Models
| Model type | Best for | Main advantage | Possible drawback |
|---|---|---|---|
| Full-body muscle model | Broad anatomy study | Shows the body as a complete system | Can be expensive and visually busy |
| Muscle arm model | Beginners studying upper limbs | Easy to focus on major and deeper arm muscles | Covers only one region |
| Muscle torso model | Core and trunk anatomy | Shows layers and relationships between structures | Larger and less portable |
| Skeleton with muscle origins/insertion markings | Understanding muscle attachments | Connects muscles directly with bones | Doesn’t replace a detailed muscle model |
| Digital 3D model | Students learning interactively | Rotate, zoom and isolate structures | Requires a suitable device |
| 3D-printable model | Teachers, makers and visual learners | Can be customized or printed | Requires access to a 3D printer |
What Are Muscle Anatomy Models?
A muscle anatomy model is a visual representation of human musculature. Depending on the model, it may show superficial muscles, deeper muscles, bones, tendons, nerves, blood vessels, or the points where muscles attach to bones.
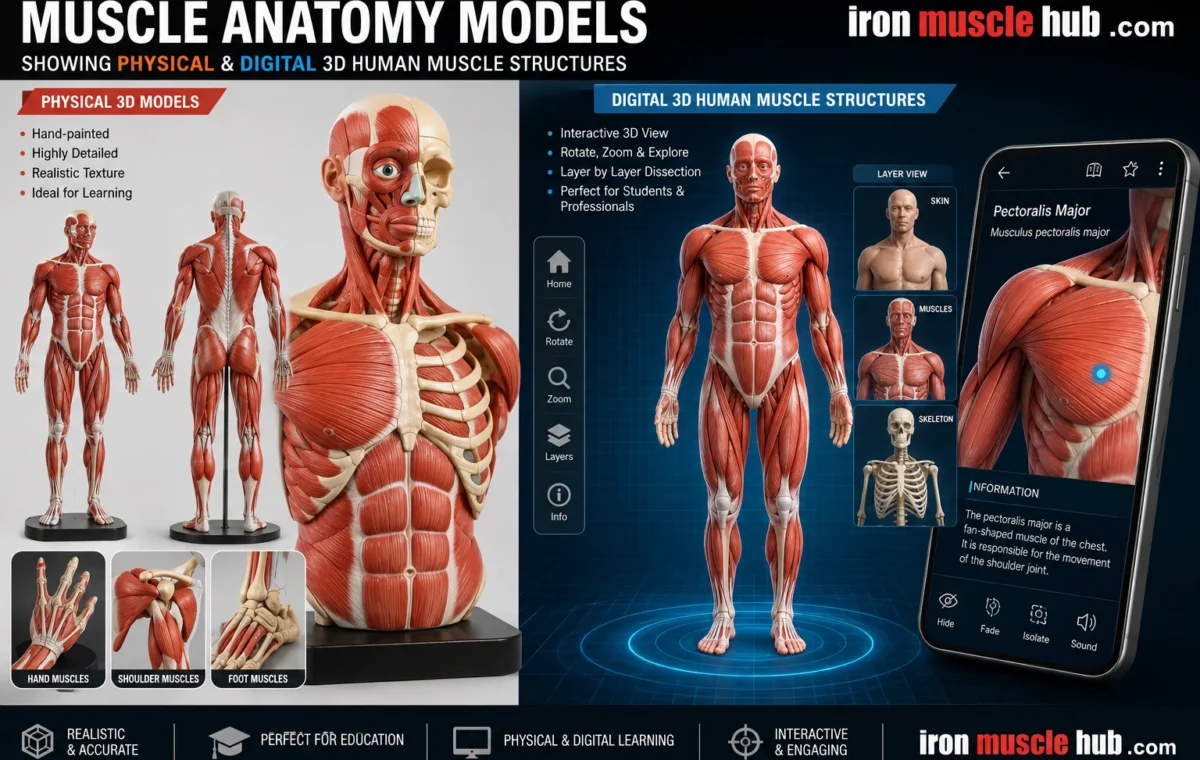
Physical models are often designed so that certain pieces can be removed. For example, 3B Scientific’s current catalog includes a life-size muscle arm with removable muscle components and a muscle torso designed to reveal deeper structures.
Digital models work differently. Instead of physically removing a part, you can often hide or isolate structures on screen. NIH 3D, for example, provides downloadable biomedical models for interactive visualization and 3D printing, including models based on the NIH Visible Human datasets.
That distinction matters because the right format depends on how you learn.
Why Use a 3D Muscle Anatomy Model?
Two-dimensional diagrams are useful, but muscles don’t exist on a flat page. They overlap, wrap around bones and sit at different depths.
A 3D model gives you another way to understand those relationships.
1. You can see layers
A detailed physical model can show superficial muscles while allowing selected structures to be removed to reveal deeper anatomy.
That can be especially helpful for learning why a muscle may be difficult to see from the outside.
2. You can understand muscle attachments
Learning a muscle’s name is only part of anatomy.
You also need to understand where it attaches and how its position relates to movement. Models that show origins and insertions can make that relationship easier to visualize.
Some skeleton models are specifically designed for this purpose. 3B Scientific’s Max skeleton, for example, marks muscle origins and insertions with different colors and includes more than 600 anatomical structures.
3. You can study movement
Interactive digital anatomy platforms can go beyond static pictures.
Visible Body’s anatomy tools include interactive muscle models and moving models that demonstrate muscle actions, along with information about attachments, innervation and blood supply.
This can help you connect three things:
muscle → attachment → movement
That connection is much more useful than memorizing a long list of muscle names.
4. You can approach difficult anatomy from different angles
A digital 3D model can be rotated and zoomed. Some platforms also allow individual structures to be selected or hidden.
A 2026 study involving first-time musculoskeletal anatomy learners found that students using an interactive 3D model showed greater improvement from baseline and reported better visualization and confidence than students who used textbook images during the study. The authors described the findings as preliminary, so they shouldn’t be treated as proof that 3D models are always superior.
Physical vs. Digital Muscle Anatomy Models
The choice doesn’t have to be complicated.
| If you prefer… | Consider… |
| Touching and moving structures | Physical model |
| Studying at a desk or on a laptop | Digital 3D model |
| Learning muscle layers | Removable physical model |
| Studying from many angles | Interactive digital model |
| Understanding origins and insertions | Muscle-marked skeleton |
| Teaching a group | Large physical model or projected 3D model |
| Keeping costs and storage low | Digital or printable model |
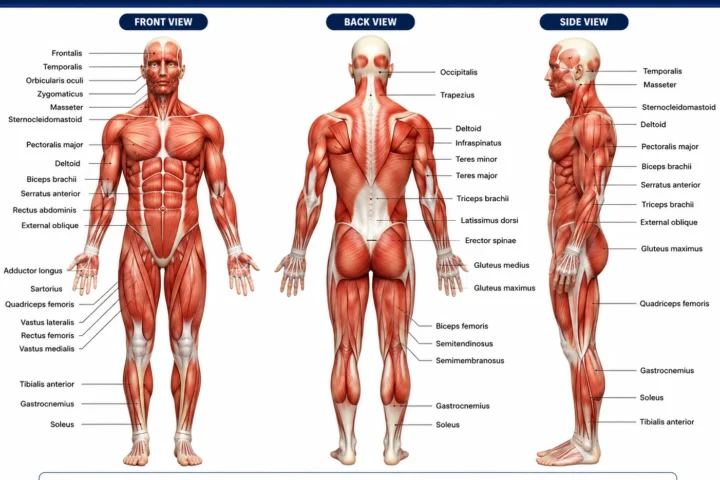
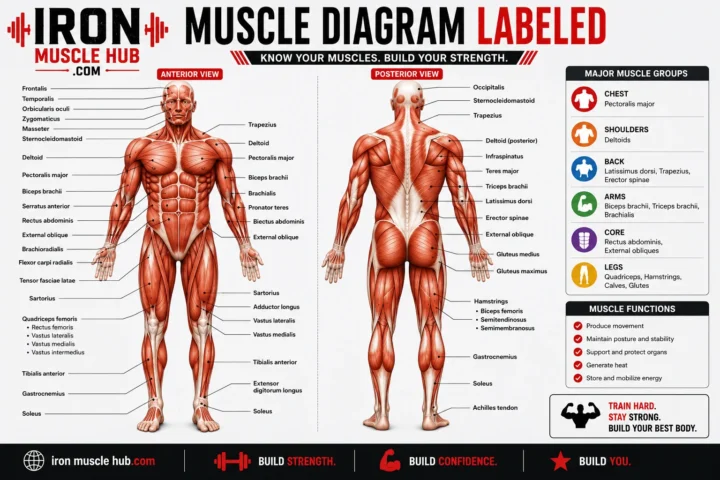
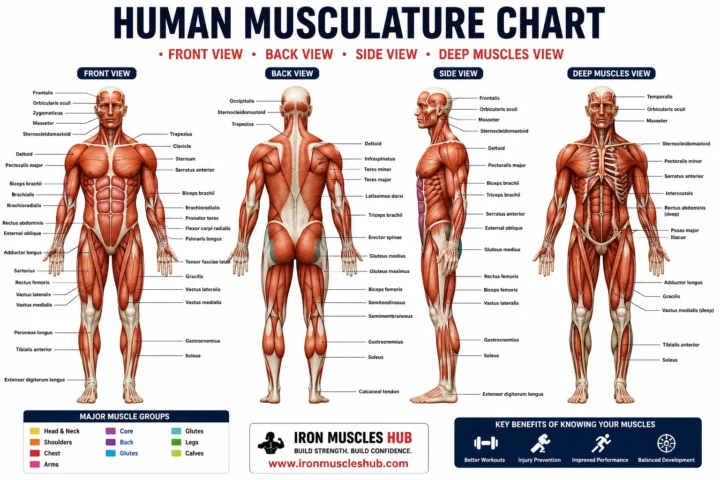
For many beginners, a digital model plus a good labeled anatomy reference may be enough to get started. You don’t automatically need a large physical figure.
How to Choose Muscle Anatomy Models
Before buying or downloading anything, use this simple process.
Step 1: Decide what you’re studying
Don’t start with the most complicated model you can find.
Ask yourself:
- Do I need the entire muscular system?
- Am I studying the arm or leg?
- Do I need the back and torso?
- Am I learning muscle origins and insertions?
- Do I need to understand movement?
- Am I studying basic anatomy or detailed medical anatomy?
A beginner studying the upper limb could benefit more from a focused arm model than from an enormous full-body model.
Step 2: Check the level of detail
More detail isn’t always better.
A model covered with tiny structures can make it harder for a beginner to identify the major muscles.
Look for clear separation between structures and labels that are easy to follow.
Step 3: Look for removable or isolatable structures
This is one of the most useful features.
On a physical model, removable parts can expose deeper muscles. In a digital model, the equivalent is being able to hide or isolate individual structures.
The goal is simple: see one structure without having everything else compete for your attention.
Step 4: Check whether bones are included
Muscles make more sense when you understand their relationship with the skeleton.
For some learners, a skeleton with muscle attachment markings may therefore be more useful than a standalone muscular figure.
TeachMeAnatomy’s interactive resources, for example, organize models around muscle attachment sites and allow users to visualize origins and insertions on the skeleton.
Step 5: Check the source and licensing
This step is easy to skip.
If you’re downloading a digital model for school, teaching, content creation or 3D printing, don’t assume that something available online is automatically free for every use.
NIH 3D provides model-specific information, including downloadable files and licensing or attribution information where applicable.
If you’re using a model commercially, read its license before publishing, modifying or selling anything based on it.
A Simple Beginner Study Method
You don’t need to stare at a model for hours.
Try this five-step routine:
- Choose one body region. Start with the arm, leg, back or torso.
- Identify the major muscles. Learn the names and approximate locations.
- Reveal deeper layers. Use a removable or digital model to see what’s underneath.
- Trace attachments. Follow where the muscle connects to the skeleton.
- Test yourself without labels. Hide the names and try to identify the structures from memory.
The final step is important. Recognition can feel easy when the answer is written directly beside a muscle. Testing yourself without labels tells you whether you’ve actually learned it.
A Worked Example: Studying the Arm
Imagine you’re learning the major muscles of the upper arm.
Instead of trying to memorize every structure at once, begin with a model that lets you see the major muscles clearly. Identify the biceps and triceps first, then look at how they sit relative to the humerus.
Next, use the model to explore deeper structures. If you’re using a physical model, this might mean removing a superficial muscle. With a digital model, you might hide the outer layer.
Finally, quiz yourself:
- Can I identify the muscle without its label?
- Can I locate it from the front and back?
- Do I understand which bones it relates to?
- Can I explain its basic role in movement?
That approach turns the model into a study tool instead of a decorative object.
Common Mistakes to Avoid
Buying the biggest model first
A full-size model may look impressive, but beginners can become overwhelmed by the amount of information.
Start with the anatomy you actually need.
Studying names without relationships
Knowing that a structure is called a particular muscle doesn’t tell you much by itself.
Learn its location, attachments and basic action together.
Relying on one view
A muscle can look very different from the front, side and back.
Rotate digital models or physically examine a model from multiple directions.
Treating a model as a medical diagnosis tool
An educational model is a simplified representation. It isn’t a substitute for professional medical assessment, imaging or clinical instruction.
If you’re trying to understand an injury, pain or medical condition, use qualified healthcare guidance rather than attempting to diagnose yourself from an anatomy model.
Are Digital 3D Models a Good Low-Cost Starting Point?
They can be.
NIH 3D is one option worth exploring because its platform provides a large searchable collection of biomedical and scientific 3D assets, including anatomy models. Some entries can be downloaded for visualization or 3D printing, subject to the individual model’s terms.
There are also commercial interactive platforms. Visible Body offers 3D anatomy resources with models that can be manipulated on computers and mobile devices, while Elsevier’s Complete Anatomy provides interactive 3D anatomy content for education.
If you’re trying to keep spending under control, explore suitable digital resources before purchasing an expensive physical model.
Internal Link Ideas
For [SITE NAME], consider linking this article to:
- How to Read a Muscle Anatomy Chart
- Muscular System Explained for Beginners
- How to Study Anatomy More Effectively
These links can help readers move from choosing a model to actually using one.
Frequently Asked Questions
What are muscle anatomy models used for?
Muscle anatomy models are used to study the location, shape and relationships of muscles. More detailed models can also show bones, tendons, nerves, blood vessels and muscle attachment sites. They’re commonly useful for anatomy education, demonstrations and visual learning. Physical and digital versions can serve different learning needs.
Are 3D muscle anatomy models good for beginners?
Yes, provided the model isn’t unnecessarily complicated. A beginner-friendly model should let you focus on individual muscles and gradually examine deeper structures. Research published in 2026 found encouraging preliminary results for an interactive 3D musculoskeletal model among first-time learners, although the study does not establish that 3D models are always better than other resources.
What is the difference between a muscle model and a skeleton model?
A muscle model primarily emphasizes muscular structures, while a skeleton model focuses on bones. Some skeleton models also mark muscle origins and insertions, making them useful for understanding how muscles connect to the skeleton. For learning attachments, a model that combines muscles and bones can be particularly helpful.
Can I use free 3D muscle anatomy models?
Some free models are available, including anatomy resources through NIH 3D. However, “free to download” doesn’t necessarily mean “free for every use.” Check the licensing and attribution requirements for the specific model before using it in commercial work, publications or other projects.
Should I buy a physical anatomy model or use a digital one?
It depends on your study habits and budget. A physical model is useful if you learn by handling objects and want to examine removable structures. A digital model is easier to store, rotate and explore from different angles. Beginners can reasonably start with digital resources before deciding whether a physical model is worth the expense.
What features should a good muscle anatomy model have?
Look for clear labeling, useful anatomical detail and the ability to examine relationships between muscles and bones. Removable parts are valuable on physical models, while digital models benefit from features such as rotation, zooming, isolation and labeling. The best model is the one that matches the anatomy you’re actually trying to learn.
Choosing the Right Model Without Overspending
Muscle anatomy models can be valuable learning tools, but you don’t need the most expensive or elaborate option to learn effectively. Start by identifying the body region and level of detail you need. Then compare physical, digital and printable models based on how you learn and how often you’ll use the resource.
For a beginner, a focused model that clearly shows muscle layers and their relationship with bones may be more useful than a huge full-body display. If you’re unsure, try a reputable digital anatomy resource first. Once you know which features help you learn, you’ll have a much clearer idea of whether buying a physical model makes sense.
How Muscle Anatomy Models Help You Understand the Human Body
A good muscle anatomy model does more than show muscle names. It helps you understand how muscles are positioned in relation to bones, joints, tendons, and other tissues.
This is especially useful because many muscles overlap. Looking at a flat illustration can make it difficult to understand which structure is superficial and which one lies underneath.
A 3D model lets you build that understanding gradually.
Understanding Superficial and Deep Muscles
One of the biggest advantages of a detailed anatomical model is the ability to study muscle layers.
Think about the upper back. The muscles you can see from the outside aren’t necessarily the muscles directly attached to the structures you’re trying to study. A layered model can help you move from the visible structures toward deeper anatomy.
For beginners, study each layer separately:
- Identify the superficial muscles.
- Learn where each muscle begins and ends.
- Examine what lies underneath.
- Compare the muscle’s position with nearby bones.
- Test yourself without looking at the labels.
This method is usually easier than trying to memorize dozens of names at once.
Muscle Anatomy Models by Body Region
You don’t always need a full-body model. A region-specific model can make learning much easier.
| Body region | Useful model | What you can study |
|---|---|---|
| Head and neck | Head/neck anatomy model | Facial and neck muscles |
| Shoulder | Shoulder muscle model | Rotator cuff and surrounding muscles |
| Arm | Upper-limb model | Biceps, triceps and forearm structures |
| Chest | Torso model | Chest and upper trunk muscles |
| Back | Torso/back model | Superficial and deeper back muscles |
| Abdomen | Torso model | Abdominal wall muscles |
| Hip | Pelvis/hip model | Hip and surrounding muscles |
| Leg | Lower-limb model | Thigh and leg muscles |
| Foot | Foot anatomy model | Small muscles and structural relationships |
Choosing one region at a time can make anatomy study feel much more manageable.
What to Look for in a High-Quality Model
Not every anatomical model is equally useful.
Before buying or using one, check these features.
Clear labels
Labels should be easy to read and positioned so you can identify the correct structure without guessing.
If a model has hundreds of labels packed into a tiny area, it may be difficult for a beginner to use.
Anatomical relationships
A strong model should help you understand how muscles relate to nearby bones and joints.
A muscle shown completely by itself may be useful for identification, but it doesn’t always explain its position within the body.
Removable components
For physical models, removable parts are particularly helpful.
You can study the outside layer first, remove selected structures, and then examine the deeper anatomy.
Multiple viewing angles
A muscle isn’t a flat object.
Look for models that let you examine the anatomy from the front, back, side, and other useful perspectives.
Interactive digital models can be especially convenient here because you can rotate and zoom without physically moving the model.
Reliable anatomical information
The source matters.
For serious study, use models produced or reviewed by established anatomy, medical-education, university, or scientific resources. A visually impressive model isn’t automatically anatomically accurate.
Physical Muscle Models vs. Anatomy Posters
A poster can be useful, particularly for quick revision.
However, a poster generally shows anatomy from one or a few fixed perspectives. A physical model gives you depth and lets you examine spatial relationships.
That doesn’t mean posters are useless.
A simple combination can work well:
Poster for quick recall + 3D model for spatial understanding + textbook or reputable digital reference for detail.
This three-resource approach can prevent you from relying too heavily on one format.
Physical Muscle Models vs. Digital Models
Digital anatomy has another major advantage: you don’t need shelf space.
An interactive model can often be rotated, enlarged, labeled, or filtered on a computer or mobile device. Depending on the software, you may also be able to hide selected structures and examine anatomy layer by layer.
Physical models have their own strengths.
You can hold them, move around them, remove pieces, and study them without a screen. For classrooms and demonstrations, that hands-on experience can be valuable.
A Simple Decision Rule
Choose a physical model if:
- You learn best by touching and manipulating objects.
- You’re teaching anatomy in person.
- You want a permanent study display.
- You need removable muscle layers.
Choose a digital model if:
- You want to study from different locations.
- You prefer rotating and zooming structures.
- Storage space is limited.
- You want to isolate individual muscles quickly.
If both options are available, using both can provide complementary ways to learn.
How to Study Muscles With a 3D Model
Simply looking at a model isn’t enough.
Use active recall.
Start with the name
Pick one muscle and learn its name.
Don’t move to ten more muscles immediately.
Find it without the label
Look at the model and try to locate the muscle yourself.
If you can’t find it, reveal the label and try again.
Follow its attachments
Trace the muscle toward its attachment points.
You don’t have to memorize every anatomical detail immediately. First understand the general relationship between the muscle and skeleton.
Think about movement
Ask yourself what would happen when the muscle contracts.
This creates a connection between anatomy and function rather than treating each muscle as an isolated vocabulary word.
Hide the answer
This is the most important step.
Remove the labels or turn the digital labels off and quiz yourself.
If you can identify the muscle without help, you’re making progress.
A 15-Minute Muscle Model Study Routine
You don’t need a two-hour study session every time.
Try this short routine:
| Time | Activity |
| 0–3 minutes | Review previously learned muscles |
| 3–7 minutes | Learn 2–3 new structures |
| 7–10 minutes | Examine their attachments and relationships |
| 10–13 minutes | Hide labels and test yourself |
| 13–15 minutes | Write down what you still confuse |
The final two minutes are important.
Your mistakes tell you what to study next.
Don’t Try to Memorize Everything at Once
Human anatomy contains a huge amount of information.
A common beginner mistake is trying to memorize every labeled structure on a detailed model during the first few sessions.
Instead, build from broad to specific.
Start with:
body region → major muscles → location → attachments → action → deeper structures
Once the major landmarks make sense, smaller structures become easier to place.
Muscle Anatomy Models for Students
Students often benefit from models that match the material they’re currently studying.
For example, if your course is covering the upper limb, purchasing a highly detailed full-body model may not be the most practical first step.
Check your course material and identify:
- Which body regions are included
- Whether muscle attachments are tested
- Whether practical identification is required
- Whether deeper muscles are included
- Whether the course uses specific anatomical terminology
Then choose a model that supports those requirements.
This prevents you from paying for features you’ll rarely use.
Muscle Anatomy Models for Fitness Learners
People studying exercise and fitness may have different priorities from medical students.
A fitness learner may benefit most from understanding:
- Major muscle locations
- Muscle groups
- Joint relationships
- Basic muscle actions
- How muscles relate to common movements
A highly detailed clinical model may contain far more information than necessary.
For basic exercise education, focus first on understanding the body’s major muscle groups and their relationships rather than trying to memorize every small structure.
A Common-Mistake Fix: Don’t Confuse Appearance With Function
One muscle may appear large and obvious on a model, but size alone doesn’t tell you everything about its role.
Muscles work as part of systems around joints.
So instead of asking only:
“What is this muscle called?”
also ask:
“Where is it attached, what joint does it cross, and what movement is associated with it?”
That simple change can make anatomy study much more meaningful.
Are Expensive Muscle Anatomy Models Better?
Not necessarily.
Price can reflect materials, size, construction, number of removable parts, brand, educational features, and other factors.
But a more expensive model isn’t automatically the best learning tool for you.
Before spending money, compare:
- Number of structures shown
- Label quality
- Removable parts
- Muscle-layer detail
- Included skeleton
- Size
- Durability
- Intended education level
- Warranty or return policy
- Whether digital resources are included
A simpler model that you actually use can provide more value than an elaborate model that sits on a shelf.
What About 3D-Printed Muscle Models?
3D printing has made it possible to create anatomical models from digital files.
This can be useful for educators, students, makers, and people who want a particular anatomical structure rather than an entire commercial model.
However, check the license before downloading or modifying a model.
Some files may permit personal educational use but restrict commercial redistribution or selling printed versions.
NIH 3D provides model information and licensing details for individual entries, so the specific file’s terms should be checked before use. (NIH 3D)
Best Overall Approach for Beginners
If you’re completely new to anatomy, don’t feel pressured to buy an expensive full-body model immediately.
A practical learning sequence is:
- Start with a reliable labeled anatomy reference.
- Choose one body region.
- Use a simple 3D model to understand depth.
- Learn major muscles before smaller ones.
- Connect each muscle to nearby bones and joints.
- Test yourself without labels.
- Add more detail as your knowledge improves.
This approach keeps the learning process manageable.
Final Takeaway
The best muscle anatomy models aren’t necessarily the biggest, most expensive, or most detailed. They’re the models that help you understand anatomy clearly and actively.
For beginners, prioritize clear labels, useful 3D relationships, appropriate detail, and easy ways to examine individual muscles. A physical model can provide hands-on learning, while a digital model can make rotation, zooming, and structure isolation convenient.
Most importantly, use the model as part of an active study routine. Look, identify, trace, explain, and test yourself. That’s far more useful than simply memorizing labels.
How to Get More Value From Muscle Anatomy Models
Buying or downloading a model is only the first step. The real value comes from how you use it.
A muscle anatomy model becomes much more useful when you turn it into an active learning tool instead of simply looking at it.
Try explaining each structure in your own words. If you can point to a muscle and describe where it is, what structures surround it, and what general movement it contributes to, you’re building a much stronger understanding than you would from memorizing its name alone.
Use a Layer-by-Layer Learning Strategy
Detailed anatomical models can look intimidating because they contain so much information.
You don’t need to learn everything at once.
Use four layers of study:
Layer 1: Major landmarks
Begin with the skeleton and major body regions.
Learn where the:
- Skull
- Spine
- Rib cage
- Pelvis
- Shoulder girdle
- Upper limbs
- Lower limbs
are located.
These landmarks give you a framework for placing muscles.
Layer 2: Major muscle groups
Next, identify the large and commonly discussed muscle groups.
For example, you might study the:
- Chest
- Back
- Shoulders
- Upper arms
- Forearms
- Abdominal region
- Gluteal region
- Thighs
- Lower legs
Don’t worry about every small muscle yet.
Layer 3: Individual muscles
Once the major groups make sense, begin learning individual structures.
At this stage, use the model to compare neighboring muscles and understand their relative positions.
Layer 4: Attachments and actions
Finally, connect anatomy with function.
Ask:
Where does the muscle attach?
Which joint or joints does it cross?
What movement is associated with its contraction?
This creates a mental map instead of a simple list of vocabulary.
Use Muscle Anatomy Models With Active Recall
One of the easiest ways to make anatomy practice more effective is to remove the labels.
Look at an unlabeled structure and try to identify it.
If you’re using a digital model, hide the labels. If you’re using a physical model, cover the reference diagram and identify the structures yourself.
Then check your answer.
Keep a short list of muscles you repeatedly confuse. Those are the structures that deserve more attention during your next study session.
Try the “Explain It Out Loud” Method
Pick one muscle and explain it as though you’re teaching someone else.
For example:
“This muscle is located on the front of the upper arm. It crosses the elbow and is involved in movement at that joint.”
You don’t need to use complicated language.
If you can explain the basic idea clearly without looking at your notes, you probably understand it better than if you can only recognize the name on a labeled diagram.
For formal anatomy courses, always use the terminology required by your instructor or textbook.
Combine 2D and 3D Resources
A common question is whether a 3D model can replace an anatomy textbook or chart.
Usually, there’s no reason to make it an either-or decision.
Each format has a different strength.
| Resource | Particularly useful for |
|---|---|
| Anatomy textbook | Detailed explanations |
| Labeled chart | Quick review |
| Physical model | Depth and hands-on learning |
| Digital 3D model | Rotation and structure isolation |
| Quiz or flashcards | Memory testing |
| Skeleton model | Muscle-to-bone relationships |
Using several complementary resources can give you a more complete picture.
The important thing is to avoid creating unnecessary work. You don’t need five different anatomy apps if one reliable reference and one good model already meet your needs.
How Teachers Can Use Muscle Anatomy Models
Muscle models can also work well in classrooms.
Instead of simply pointing to a structure, a teacher can ask students to identify it without labels.
A simple classroom exercise might look like this:
- Display the model.
- Select one muscle.
- Ask students to name it.
- Ask where it is located.
- Ask what structures are nearby.
- Ask students to identify it from another viewing angle.
- Repeat with another muscle.
The exercise can be adapted for different levels of anatomy education.
A removable model can also make layered anatomy easier to demonstrate because students can see what lies beneath the superficial structures.
How to Care for a Physical Anatomy Model
If you’ve invested in a physical model, basic care can help keep it useful.
Follow the manufacturer’s cleaning and storage instructions rather than applying random cleaning products.
Also:
- Keep removable parts organized.
- Avoid forcing pieces into position.
- Store the model somewhere stable.
- Protect delicate labels and connectors.
- Keep it away from unnecessary heat or moisture.
- Check small components periodically for damage.
For classroom models, keeping an inventory of removable pieces can save a lot of frustration.
How to Use Digital Anatomy Models More Effectively
Digital models can become overwhelming if every structure is visible at the same time.
Start simple.
Hide structures you aren’t studying and display only the region you’re learning.
Then rotate the model slowly.
Try viewing the same muscle from:
- Front
- Back
- Side
- Above or below when useful
After that, switch the labels off and test yourself.
This creates a useful cycle:
Explore → identify → hide labels → recall → check
How to Choose a Muscle Model for Different Goals
The “best” model depends on what you’re trying to accomplish.
For general anatomy beginners
Choose a model with clear major muscles and straightforward labels.
You don’t need hundreds of tiny structures immediately.
For medical or anatomy students
Look for greater anatomical detail, deeper structures, muscle attachments, and relationships with bones and other tissues.
For fitness students
Prioritize major muscle groups, joint relationships, and basic muscle actions.
For teachers
Durability, visibility, removable parts, and classroom-friendly size may matter more than having every possible anatomical structure.
For artists
A model that can be viewed from multiple angles can help with understanding muscle placement and surface form.
The goal is to match the model to the job.
Questions to Ask Before Buying
Before spending money on a physical or digital model, run through this checklist:
- What exactly do I need to learn?
- Which body region matters most?
- Do I need superficial muscles, deep muscles, or both?
- Are labels clear?
- Can I examine the model from different angles?
- Does it show bones as well as muscles?
- Are parts removable or structures isolatable?
- Is the model designed for my level?
- Does the seller provide enough information about what is included?
- If it’s a digital or downloadable model, what license applies?
This takes only a few minutes and can prevent an unsuitable purchase.
Don’t Buy Based on Appearance Alone
An anatomy model can look impressive in a product photograph while still being difficult to study.
Pay attention to educational usefulness rather than appearance.
A model with clear structure separation and good labeling may be much more useful than one packed with tiny details.
Likewise, a digital model with excellent graphics isn’t automatically a good educational resource if its controls make it difficult to isolate the anatomy you’re studying.
Muscle Anatomy Models and Long-Term Learning
Anatomy is easier to retain when you revisit it.
Instead of trying to finish an entire muscle system in one weekend, return to the same structures periodically.
For example:
Day 1: Learn major muscles.
Day 3: Test identification.
Day 7: Review attachments and actions.
Later: Test yourself without labels.
This type of repeated recall gives you multiple opportunities to strengthen your knowledge.
A Practical Beginner’s Buying Strategy
If you’re unsure how much to spend, don’t start by looking at the most expensive models.
Start by defining your requirements.
Low-commitment approach
Use a reputable digital or online 3D anatomy resource first.
This lets you discover whether interactive models actually fit your learning style.
Focused physical approach
If you learn better through hands-on study, consider a smaller region-specific physical model rather than immediately purchasing a complete full-body display.
Advanced approach
If you’re studying anatomy at a higher level, look for models with deeper structures, muscle attachments, removable components, and detailed anatomical references.
The smartest choice is the one you’ll actually use consistently.
Final Thoughts: Choosing the Right Muscle Anatomy Model
Muscle anatomy models can make human anatomy easier to understand because they add depth and spatial relationships that aren’t always obvious in a flat picture.
The best choice depends on your purpose. A beginner may need a simple model with clearly labeled major muscles, while an advanced student may benefit from deeper structures, muscle attachments, and detailed skeletal relationships.
Don’t judge a model by its size or price alone. Look at its labels, level of detail, viewing options, removable or isolatable structures, and suitability for the anatomy you’re studying.
Most importantly, use your model actively. Identify muscles without labels, compare different views, follow their relationships with bones and joints, and explain what you’ve learned in your own words.
A good model isn’t there just to show you anatomy. It’s there to help you understand it.
Quick Final Checklist
Before choosing your model, remember:
- Choose the body region you actually need to study.
- Prioritize clear labels over unnecessary detail.
- Look for depth and muscle-layer information.
- Consider whether bones and attachment points are important for your goal.
- Choose physical or digital based on how you learn.
- Check licensing for downloadable or 3D-printable models.
- Use active recall rather than simply looking at the model.
- Don’t spend more than necessary for your level of study.
If you’re just starting, a simple and reliable model is enough. You can always add more detailed resources as your anatomy knowledge grows.