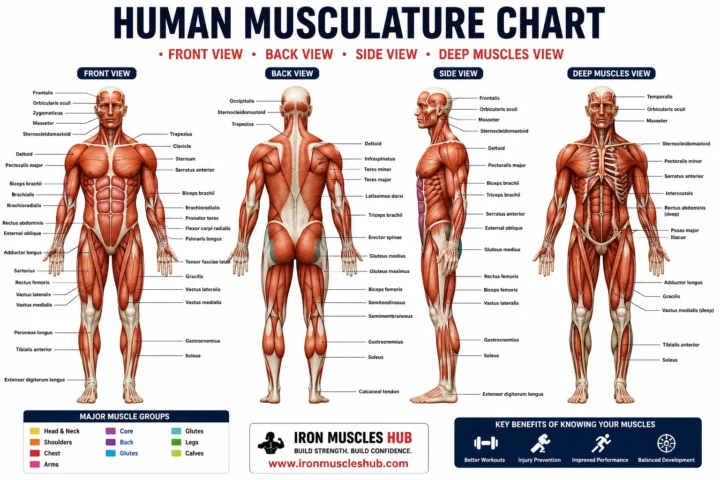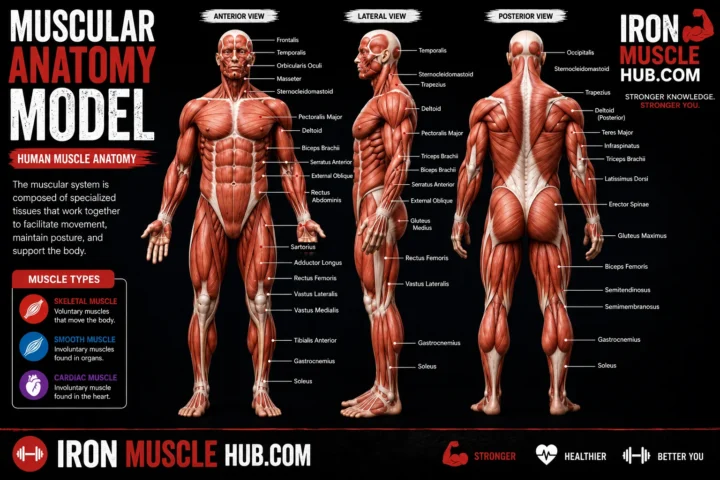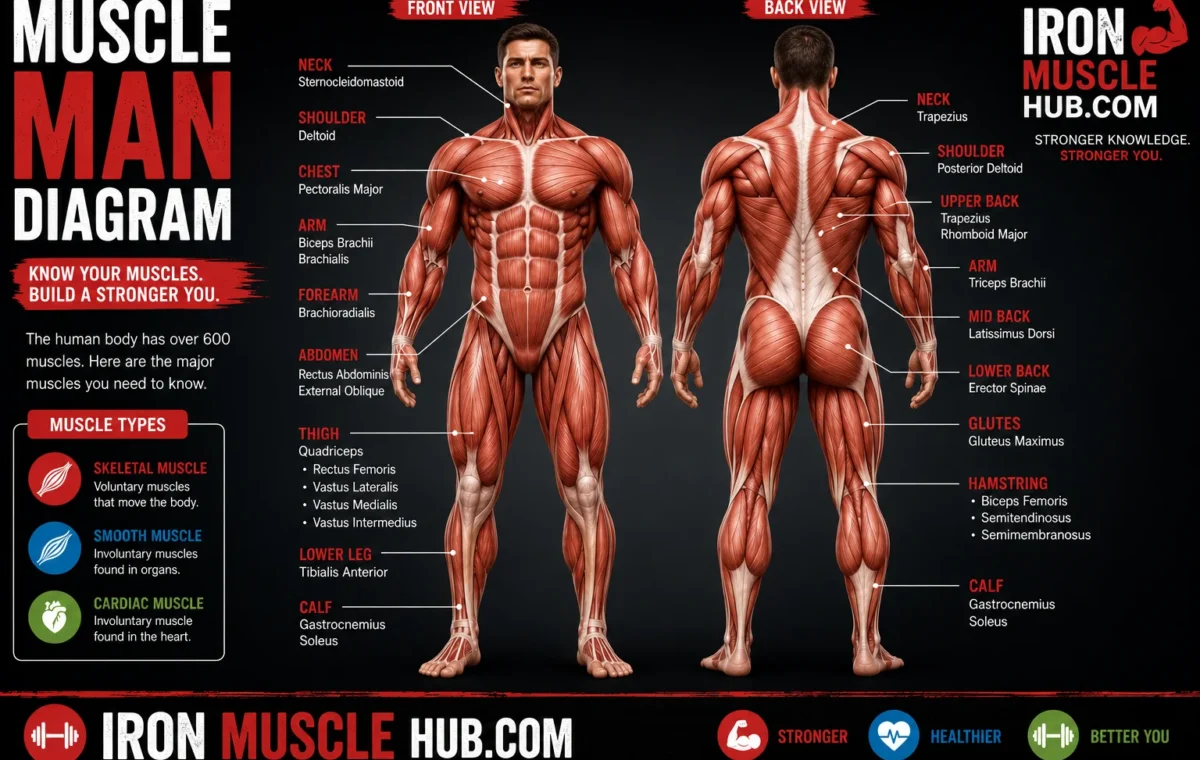
A muscle man diagram is a visual guide that labels the major muscles of the human body, usually showing a front view, a back view, or both. It can help beginners identify muscles such as the biceps, triceps, pectorals, abdominals, quadriceps, hamstrings, glutes, and calf muscles without having to memorize an entire anatomy textbook.
- Muscle Man Diagram at a Glance
- How to Read a Muscle Man Diagram
- 1. Start with the front view
- 2. Move to the back view
- Major Muscles on a Muscle Man Diagram
- Head and neck
- Shoulders
- Chest
- Back
- Arms
- Abdomen
- Hips and glutes
- Thighs
- Lower legs
- Why Muscle Names Can Help You Memorize a Diagram
- A Simple Way to Study a Muscle Man Diagram
- Common Mistakes Beginners Make
- Mistake 1: Treating every diagram as a complete map
- Mistake 2: Confusing a muscle group with one muscle
- Mistake 3: Memorizing names without location
- Mistake 4: Assuming a fitness chart is a medical reference
- Where to Find a Reliable Labeled Muscle Diagram
- Internal Link Ideas for Iron Muscle Hub
- Frequently Asked Questions
- What is a muscle man diagram?
- What are the major muscles shown on a muscle diagram?
- How many muscles are in the human body?
- What is the difference between the front and back muscle views?
- How can I memorize the muscles on a diagram?
- Are muscle groups the same as individual muscles?
- A Muscle Diagram Is Easier Once You See the Pattern
- Upper Body Muscles
- Deltoids
- Pectoralis Major
- Biceps Brachii
- Triceps Brachii
- Core and Abdominal Muscles
- Rectus Abdominis
- External Obliques
- A Useful Study Shortcut
- Back Muscles
- Trapezius
- Latissimus Dorsi
- Lower Body Muscles
- Gluteal Muscles
- Quadriceps
- Hamstrings
- Calf Muscles
- Front vs. Back Muscle Diagram
- How to Test Yourself
- The Most Important Muscles to Learn First
- A Simple Memory Map
- Why a Labeled Diagram Is Better Than Memorizing a List
- Using a Muscle Diagram for Exercise
- Muscle Groups vs. Individual Muscles
- Why This Matters
- How to Memorize a Muscle Man Diagram Faster
- Day 1: Front View
- Day 2: Back View
- Day 3: Mix the Views
- Use Location Clues
- A Beginner's Muscle Identification Test
- Don't Confuse Muscles With Bones
- How Muscle Diagrams Are Simplified
- What to Look for in a Good Muscle Diagram
- Copyright Matters When Publishing a Diagram
- When a Muscle Diagram Isn't Enough
- A Better Way to Use a Muscle Chart
- Try the "Look, Cover, Recall" method
- Quick Muscle Man Diagram Study Sheet
- Final Takeaway
- Final Thoughts
A good diagram is more than a picture to copy for homework. Once you understand where each major muscle sits and what it generally does, you’ll have a much easier time studying anatomy, understanding exercise movements, or following a basic fitness program. For more insights read here :- lean muscle and leaner physique .
Quick answer: Use a labeled front-and-back muscle diagram to learn muscles by body region. Start with the largest, easiest-to-see muscles, then add smaller muscles as you become comfortable with the basics.
Muscle Man Diagram at a Glance
| Body area | Major muscles to learn first | Simple job |
|---|---|---|
| Head and neck | Masseter, sternocleidomastoid | Chewing and moving/stabilizing the head |
| Shoulders | Deltoid | Helps move the arm |
| Chest | Pectoralis major | Helps move the upper arm |
| Upper back | Trapezius, latissimus dorsi | Moves and stabilizes the shoulder and arm |
| Upper arm | Biceps brachii, triceps brachii | Bends and straightens the elbow |
| Abdomen | Rectus abdominis, external oblique | Trunk movement and stability |
| Buttocks | Gluteus maximus, gluteus medius | Hip movement and stability |
| Thigh | Quadriceps, hamstrings | Straighten and bend the knee |
| Lower leg | Gastrocnemius, soleus, tibialis anterior | Ankle and foot movement |
This is a simplified learning guide rather than a complete anatomical inventory. The human body contains more than 600 muscles, and anatomy references divide them into different regional and functional groups.
How to Read a Muscle Man Diagram
A labeled muscle diagram can look complicated at first because many muscles overlap. The easiest approach is to learn the body in sections rather than trying to memorize every label at once.
1. Start with the front view
The front, or anterior, view makes several familiar muscles easy to recognize.
Look first for:
- Deltoids: The rounded muscles covering the shoulders.
- Pectoralis major: The large muscle across the upper chest.
- Biceps brachii: Located on the front of the upper arm.
- Rectus abdominis: The long abdominal muscle running vertically down the front of the torso.
- External obliques: Muscles along the sides of the abdomen.
- Quadriceps: The major muscle group at the front of the thigh.
- Tibialis anterior: Located along the front of the lower leg.
OpenStax’s labeled anatomy illustration uses anterior and posterior views to show major superficial muscles and some deeper structures.
2. Move to the back view
The posterior, or back, view reveals a different set of prominent muscles.
Focus on:
- Trapezius: A large upper-back muscle extending across the neck and shoulders.
- Latissimus dorsi: Broad muscles covering much of the middle and lower back.
- Triceps brachii: Located on the back of the upper arm.
- Gluteus maximus: The large muscle forming much of the buttock.
- Hamstrings: A group of muscles along the back of the thigh.
- Gastrocnemius: One of the most prominent muscles of the calf.
Learning the front and back separately makes a crowded muscle chart much easier to understand.
Major Muscles on a Muscle Man Diagram
Head and neck
You don’t need to learn every facial and neck muscle immediately.
Two useful starting points are the masseter and sternocleidomastoid. The masseter is associated with chewing, while the sternocleidomastoid is a prominent muscle of the neck involved in head and neck movement.
Muscles are often named according to their location, shape, size, direction, or action. Understanding these naming clues can make unfamiliar anatomy terms less intimidating.
Shoulders
The deltoid is the rounded muscle covering the shoulder joint.
It is one of the easiest muscles to spot on a basic muscle man diagram. Its position also makes it useful as a landmark when you’re learning the relationship between the shoulder, upper arm, and chest.
Chest
The pectoralis major is the large, superficial chest muscle.
You’ll commonly see it labeled on the front view of an anatomy chart. Underneath it are deeper structures, so a simplified diagram won’t necessarily show every layer.
Back
Two important muscles to recognize are the trapezius and latissimus dorsi.
The trapezius occupies a broad area across the upper back and neck. The latissimus dorsi is a large back muscle extending toward the upper arm.
A diagram may show only part of each muscle because anatomy illustrations often simplify the body to make individual structures easier to identify.
Arms
The two names beginners usually learn first are biceps brachii and triceps brachii.
The biceps brachii sits on the front of the upper arm. The triceps brachii is on the back of the upper arm.
The names themselves provide a memory clue: “bi” relates to two heads, while “tri” relates to three heads. Muscle names frequently contain information about their structure or characteristics.
Abdomen
The rectus abdominis is the vertically oriented muscle at the front of the abdomen.
The external obliques sit more toward the sides of the trunk. Together with other abdominal and trunk muscles, these structures contribute to movement and stabilization.
Don’t assume that a simple six-pack drawing represents every abdominal muscle. A basic muscle man diagram is designed for recognition, not to display every anatomical layer.
Hips and glutes
The gluteus maximus is the largest of the three gluteal muscles. The gluteus medius is positioned higher and more toward the side of the hip.
These muscles are particularly easy to identify on a posterior muscle diagram.
Thighs
The front of the thigh contains the quadriceps femoris, commonly called the quadriceps or quads.
The back of the thigh contains the hamstring group. A detailed anatomy chart may label individual muscles within these groups, while a beginner diagram may simply use the group name.
Lower legs
The gastrocnemius is the prominent calf muscle you’ll usually notice first on a posterior diagram.
The soleus lies deeper in the calf region. On the front of the lower leg, the tibialis anterior is an important muscle to recognize.
Why Muscle Names Can Help You Memorize a Diagram
One useful trick is to stop treating anatomical names as random vocabulary.
Many muscle names contain clues about the structure or location. For example:
| Naming clue | What it tells you | Example |
| Maximus | Larger | Gluteus maximus |
| Minimus | Smaller | Gluteus minimus |
| Longus | Long | Some long muscles |
| Brevis | Short | Some short muscles |
| Biceps | Two heads | Biceps brachii |
| Triceps | Three heads | Triceps brachii |
| Rectus | Straight | Rectus abdominis |
| Oblique | Angled | External oblique |
| Flexor | Produces flexion | Various flexor muscles |
| Extensor | Produces extension | Various extensor muscles |
These naming conventions are recognized in anatomy education and can make new muscle names easier to decode.
A Simple Way to Study a Muscle Man Diagram
Trying to memorize dozens of labels in one sitting usually isn’t the most useful approach.
Instead, try this five-step method:
- Learn the body regions first. Think head, trunk, upper limb, and lower limb.
- Identify five to ten large muscles. Start with muscles that are easy to see.
- Study the front view. Cover the labels and test yourself.
- Study the back view separately. Repeat the same exercise.
- Add smaller muscles gradually. Only move on after the major landmarks feel familiar.
For example, you could first memorize deltoid, pectoralis major, biceps brachii, rectus abdominis, quadriceps, trapezius, latissimus dorsi, triceps brachii, gluteus maximus, hamstrings, and gastrocnemius.
Once those names are familiar, a more detailed anatomy chart becomes much easier to read.
Common Mistakes Beginners Make
Mistake 1: Treating every diagram as a complete map
A simplified chart doesn’t necessarily show every muscle or anatomical layer.
Some diagrams focus on superficial muscles, while others include deeper structures. OpenStax’s overview, for example, deliberately presents superficial and deeper muscles in different portions of the illustration.
Mistake 2: Confusing a muscle group with one muscle
“Quadriceps” refers to a group of muscles rather than one individual muscle. The hamstrings are also a group.
That distinction matters if you’re studying anatomy in more detail.
Mistake 3: Memorizing names without location
Knowing that a muscle is called the biceps isn’t enough. You should also know that the biceps brachii is on the anterior upper arm.
Pair each name with its location and basic function. That creates three memory anchors instead of one.
Mistake 4: Assuming a fitness chart is a medical reference
A gym poster or simplified workout graphic can be useful for orientation, but it isn’t a substitute for a detailed anatomy textbook or professional medical resource.
For formal study, compare your diagram with a reputable anatomy reference.
Where to Find a Reliable Labeled Muscle Diagram
For an educational reference, OpenStax Anatomy and Physiology provides labeled anterior and posterior muscle illustrations and explanations of how skeletal muscles are named.
The OpenStax illustration is also available through Wikimedia Commons under a Creative Commons Attribution 4.0 license, making it a practical option for publishers who follow the required attribution terms.
For another basic educational overview, the U.S. National Cancer Institute’s SEER Training materials explain the major muscle groups and the principles used to name skeletal muscles.
Internal Link Ideas for Iron Muscle Hub
If this article is part of a broader site, useful related articles could include:
- Muscle Chart: A Beginner’s Guide to the Major Muscles
- Muscular System Explained: Types, Functions and Major Muscle Groups
- Skeleton With Muscles Labeled: How Bones and Muscles Work Together
These topics naturally support the reader’s next question without forcing unrelated links into the article.
Frequently Asked Questions
What is a muscle man diagram?
A muscle man diagram is a simplified illustration of the human body showing the locations and names of muscles. Most educational versions use front and back views so readers can identify major superficial muscles. They are commonly used for basic anatomy study, exercise education, and learning anatomical vocabulary.
What are the major muscles shown on a muscle diagram?
Commonly labeled muscles include the deltoids, pectoralis major, biceps brachii, triceps brachii, rectus abdominis, external obliques, trapezius, latissimus dorsi, gluteus maximus, quadriceps, hamstrings, and gastrocnemius. A detailed diagram may include many additional muscles.
How many muscles are in the human body?
There are more than 600 muscles in the human body, although the exact way muscles are counted can vary depending on how anatomical structures are classified. For beginners, it’s more practical to learn the major muscle groups first rather than trying to memorize every muscle.
What is the difference between the front and back muscle views?
The front view is called the anterior view, while the back is called the posterior view. The anterior view makes muscles such as the pectoralis major, biceps, abdominals, and quadriceps easier to see. The posterior view highlights structures such as the trapezius, latissimus dorsi, triceps, gluteus maximus, hamstrings, and calf muscles.
How can I memorize the muscles on a diagram?
Learn the muscles by region rather than all at once. Start with large landmarks, learn their location, then connect each muscle to a simple function. After studying a labeled diagram, hide the labels and try to name the muscles yourself. Repeating this process with both front and back views is more useful than simply rereading the chart.
Are muscle groups the same as individual muscles?
No. A muscle group can contain several individual muscles that work together or occupy the same general region. The quadriceps, for example, is a group of muscles in the front of the thigh. A basic diagram may label the group, while a more detailed anatomy chart can identify its individual muscles.
A Muscle Diagram Is Easier Once You See the Pattern
A muscle man diagram can seem overwhelming because the human muscular system contains hundreds of muscles. You don’t need to learn them all at once. Start with the major muscles, divide the body into regions, and use front and back views to build a mental map.
The most useful habit is to connect each muscle’s name, location, and basic function. Once those three pieces fit together, unfamiliar anatomy terms become much easier to understand. Use a reputable labeled diagram for reference, test yourself without the labels, and add detail gradually. That approach turns a complicated chart into a practical study tool.
A muscle man diagram becomes much easier to study once you stop trying to memorize every label at the same time. The best approach is to group muscles by body region and learn the most recognizable structures first.
Upper Body Muscles
The upper body contains many muscles, but beginners can start with a small group of major landmarks.
| Muscle | Location | Main role |
|---|---|---|
| Deltoid | Shoulder | Helps move the arm |
| Pectoralis major | Chest | Helps move the upper arm |
| Biceps brachii | Front of upper arm | Helps bend the elbow |
| Triceps brachii | Back of upper arm | Helps straighten the elbow |
| Trapezius | Upper back and neck | Helps move and stabilize the shoulder region |
| Latissimus dorsi | Broad middle/lower back | Helps move the upper arm |
Deltoids
The deltoid is the rounded muscle covering the shoulder. On a front-and-back diagram, it looks like a cap over the upper arm.
It’s a useful landmark because it sits between the upper torso and arm. Once you can identify the deltoid, you can use it to orient yourself when studying other nearby structures.
Pectoralis Major
The pectoralis major is the large superficial muscle across the front of the chest.
On a basic muscle diagram, it’s usually one of the easiest muscles to identify. More detailed anatomy diagrams may show structures underneath it, but beginner charts generally emphasize its broad external shape.
Biceps Brachii
The biceps brachii is located on the front of the upper arm.
The word “biceps” is also a useful memory clue because it refers to the muscle’s two-headed structure. Learning the name together with its position makes it easier to distinguish from the triceps.
Triceps Brachii
The triceps brachii is positioned on the back of the upper arm.
A simple memory trick is:
Biceps = front of upper arm
Triceps = back of upper arm
This isn’t a complete description of arm anatomy, but it’s a useful starting point for reading a beginner’s diagram.
Core and Abdominal Muscles
The middle section of a muscle man diagram usually includes several muscles associated with the trunk.
Rectus Abdominis
The rectus abdominis runs vertically along the front of the abdomen.
It’s the muscle most people associate with the visible “six-pack” area, although the appearance of abdominal definition also depends on the structure of the muscle and the tissues covering it.
External Obliques
The external obliques sit on the sides of the abdomen.
They help with movements of the trunk and contribute to stability. On an anatomy chart, they’re positioned outside and to either side of the rectus abdominis.
A Useful Study Shortcut
Instead of memorizing isolated names, picture the abdomen as three broad areas:
- Center: rectus abdominis
- Sides: external obliques
- Deeper layers: additional abdominal muscles
This makes a crowded anatomy illustration easier to interpret.
Back Muscles
The back can look particularly complicated because several large muscles overlap.
Trapezius
The trapezius extends across the upper back and into the neck and shoulder region.
On a posterior muscle diagram, it is often one of the most noticeable structures. Its broad shape makes it a useful landmark for locating other muscles around the upper back.
Latissimus Dorsi
The latissimus dorsi, often shortened to “lats,” is a large muscle of the back.
It extends toward the upper arm and contributes to movements involving the arm and shoulder.
When studying a back diagram, look for the broad muscle below and to the side of the trapezius.
Lower Body Muscles
The lower body contains some of the largest muscle groups in the body.
Gluteal Muscles
The gluteus maximus is the largest of the three gluteal muscles.
A basic posterior diagram generally makes it easy to identify because of its position and size. The gluteus medius sits higher and more toward the outside of the hip.
Quadriceps
The quadriceps femoris is a group of muscles located at the front of the thigh.
A common beginner mistake is to treat “quadriceps” as the name of one muscle. It’s actually a group containing four muscles.
Hamstrings
The hamstrings are a group of muscles at the back of the thigh.
On a front-and-back muscle man diagram, this creates an easy comparison:
Front thigh → quadriceps
Back thigh → hamstrings
Calf Muscles
The gastrocnemius is the prominent muscle visible at the back of the lower leg.
The soleus lies deeper in the calf region. A simplified chart may show one or both, depending on how detailed the illustration is.
Front vs. Back Muscle Diagram
One of the easiest ways to study anatomy is to divide the diagram into two separate lessons.
| Front view | Back view |
|---|---|
| Deltoid | Trapezius |
| Pectoralis major | Latissimus dorsi |
| Biceps brachii | Triceps brachii |
| Rectus abdominis | Gluteus maximus |
| External obliques | Hamstrings |
| Quadriceps | Gastrocnemius |
| Tibialis anterior | Soleus |
Don’t worry if your particular diagram uses slightly different labels. Anatomy illustrations vary in how much detail they include.
How to Test Yourself
Once you’ve looked at a labeled diagram several times, stop looking at the labels.
Use this simple exercise:
Step 1: Look at the front view.
Step 2: Cover the muscle names.
Step 3: Point to each major muscle.
Step 4: Say its name aloud.
Step 5: Give yourself one basic description of its location or function.
Then repeat the exercise using the back view.
This active recall method is more useful for studying than simply staring at the same labeled image repeatedly.
The Most Important Muscles to Learn First
If you’re completely new to anatomy, start with these:
- Deltoid
- Pectoralis major
- Biceps brachii
- Triceps brachii
- Rectus abdominis
- External obliques
- Trapezius
- Latissimus dorsi
- Gluteus maximus
- Quadriceps
- Hamstrings
- Gastrocnemius
Once these become familiar, you can move on to smaller and deeper muscles.
A Simple Memory Map
Think of the body from top to bottom:
Shoulders → chest → arms → abdomen → back → hips → thighs → calves
Then attach the major muscle names to each region. This creates a mental map instead of a random vocabulary list.
Why a Labeled Diagram Is Better Than Memorizing a List
A list tells you a muscle’s name. A diagram shows you where it is.
That difference matters because anatomy is spatial. You need to understand how muscles relate to neighboring muscles, bones, and joints.
For example, knowing that the biceps brachii is an upper-arm muscle is useful. Seeing its position between the shoulder and elbow gives you additional context that a vocabulary list can’t provide.
A muscle man diagram can be useful for more than memorizing anatomy labels. Once you understand the major muscle groups, you can use the diagram to make sense of basic movement, exercise terminology, and common anatomy questions.
Using a Muscle Diagram for Exercise
A muscle chart can help you understand which broad muscle groups are involved in an exercise.
For example:
| Exercise | Major muscle areas commonly involved |
|---|---|
| Push-up | Chest, triceps, shoulders |
| Squat | Quadriceps, gluteal muscles, hamstrings |
| Pull-up | Latissimus dorsi, biceps, upper back |
| Calf raise | Calf muscles |
| Plank | Abdominal and trunk muscles |
| Biceps curl | Biceps brachii |
These descriptions are intentionally broad. Most movements involve multiple muscles rather than isolating a single muscle completely.
A diagram is therefore best used as a learning aid, not as proof that an exercise works only one particular muscle.
Muscle Groups vs. Individual Muscles
One of the most important things to understand is the difference between an individual muscle and a muscle group.
For example, the quadriceps are a group of four muscles located at the front of the thigh. The hamstrings are also a group rather than one single muscle.
This distinction becomes increasingly important as you move from beginner anatomy into more detailed study.
Why This Matters
Imagine a diagram labels an area simply as “quadriceps.”
That doesn’t mean there’s one muscle called “quadriceps.” It means the illustration is grouping several related muscles together for easier identification.
A more detailed anatomy reference may label the individual muscles separately.
How to Memorize a Muscle Man Diagram Faster
You don’t need to memorize the entire chart in one session.
Try this approach instead.
Day 1: Front View
Learn:
- Deltoid
- Pectoralis major
- Biceps brachii
- Rectus abdominis
- External obliques
- Quadriceps
- Tibialis anterior
Day 2: Back View
Learn:
- Trapezius
- Latissimus dorsi
- Triceps brachii
- Gluteus maximus
- Hamstrings
- Gastrocnemius
Day 3: Mix the Views
Now test yourself randomly.
Don’t study the muscles in the same order every time. Random recall helps you determine whether you actually recognize the muscle rather than simply remembering its position on the list.
Use Location Clues
Anatomical names often contain useful clues.
For example:
- Anterior means toward the front.
- Posterior means toward the back.
- Medial means closer to the body’s midline.
- Lateral means farther from the midline.
- Superior means above.
- Inferior means below.
These terms aren’t muscle names themselves, but learning them makes anatomy diagrams much easier to understand.
A Beginner’s Muscle Identification Test
Cover the labels on your diagram and try these questions:
1. What muscle is on the front of the upper arm?
Biceps brachii.
2. What muscle is on the back of the upper arm?
Triceps brachii.
3. What major muscle group is at the front of the thigh?
Quadriceps.
4. What major muscle group is at the back of the thigh?
Hamstrings.
5. What large muscle is prominent on the buttocks?
Gluteus maximus.
6. What large muscle spans much of the upper back?
Trapezius.
If you can answer these without looking, you’re already building a useful foundation.
Don’t Confuse Muscles With Bones
Another common beginner problem is mixing up muscle names and bone names.
A muscle is contractile tissue that helps produce movement and maintain posture. A bone provides the rigid framework of the skeleton and serves as an attachment point for many muscles.
That’s why anatomy diagrams often show muscles positioned around bones.
For example, the biceps brachii crosses the elbow region and attaches to bones of the upper limb. The muscle’s relationship with the joint helps explain its role in movement.
How Muscle Diagrams Are Simplified
A real human body has several layers of muscle.
A basic diagram can’t display every layer clearly at once. If it did, the image would become difficult for a beginner to read.
That’s why many educational diagrams choose to show:
- Major superficial muscles
- Selected deeper muscles
- Simplified muscle shapes
- Clear labels
- Front and back views
A detailed medical anatomy atlas will look very different from a simple fitness poster.
Neither is necessarily “wrong.” They’re designed for different purposes.
What to Look for in a Good Muscle Diagram
If you’re choosing a diagram for studying, check whether it:
- Clearly identifies the body orientation.
- Uses readable labels.
- Separates front and back views.
- Uses accepted anatomical terminology.
- Shows enough detail for your learning level.
- Comes from a reputable educational source.
- Provides licensing information if you plan to republish the image.
OpenStax provides openly licensed educational anatomy material, including illustrations of skeletal muscles. Its content can be particularly useful when you need a source that is designed for education rather than a random image found online.
Copyright Matters When Publishing a Diagram
If you’re creating a blog post, worksheet, presentation, or educational page, don’t assume that an image is free to reuse simply because you found it through an image search.
Check the original source and its license.
An image marked CC BY 4.0, for example, can generally be reused under the conditions of that license, including appropriate attribution. Always check the specific license and follow its requirements before publishing.
For this article, the OpenStax muscle illustration is a useful example because its licensing information is publicly documented.
When a Muscle Diagram Isn’t Enough
A diagram is excellent for identifying structures, but it has limits.
If you’re trying to understand:
- An injury
- Persistent pain
- A suspected muscle tear
- A neurological problem
- A serious movement limitation
- A medical diagnosis
you shouldn’t rely on a diagram alone.
A qualified healthcare professional can assess symptoms and provide information appropriate to your situation.
A basic anatomy chart can explain where a muscle is, but it can’t tell you why you have pain in that area.
A Better Way to Use a Muscle Chart
The biggest mistake is using a muscle man diagram as a passive reference.
Instead, turn it into a quiz.
Try the “Look, Cover, Recall” method
Look: Study the labeled diagram for a few minutes.
Cover: Hide the labels.
Recall: Name each muscle yourself.
Check: Compare your answers with the original.
Repeat: Focus your next study session on the muscles you missed.
This simple routine turns a picture into an active learning tool.
Quick Muscle Man Diagram Study Sheet
Keep this basic map nearby while you’re learning:
Front
- Shoulder → Deltoid
- Chest → Pectoralis major
- Front upper arm → Biceps brachii
- Abdomen → Rectus abdominis
- Side abdomen → External obliques
- Front thigh → Quadriceps
- Front lower leg → Tibialis anterior
Back
- Upper back → Trapezius
- Broad middle back → Latissimus dorsi
- Back upper arm → Triceps brachii
- Buttocks → Gluteus maximus
- Back thigh → Hamstrings
- Calf → Gastrocnemius
This isn’t a complete anatomy reference, but it’s a strong starting point for beginners.
Final Takeaway
The easiest way to learn a muscle man diagram is to treat it as a map rather than a vocabulary test. Start with the large, recognizable muscles, separate the front and back views, and connect each name with its location and basic function.
Once you’ve mastered the major landmarks, add smaller muscles gradually. Use active recall instead of repeatedly reading labels, and compare simplified diagrams with reputable anatomy resources when you need more detail.
With a little repetition, a chart that initially looks like a wall of unfamiliar names becomes a much more understandable picture of how the muscular system is organized.
Final Thoughts
A muscle man diagram is one of the simplest ways to build a foundation in human anatomy. You don’t need to memorize hundreds of muscles immediately. Start with the major landmarks, such as the deltoids, pectorals, biceps, triceps, abdominals, trapezius, latissimus dorsi, glutes, quadriceps, hamstrings, and calves.
The key is repetition. Study the front view, learn the back view, cover the labels, and test yourself until you can identify the major muscles without help. As your knowledge improves, move from broad muscle groups to individual muscles and deeper anatomical structures.
A reliable diagram can also help you understand exercise terminology and how different parts of the body work together. Just remember that a simplified chart is an educational tool, not a substitute for professional medical guidance.