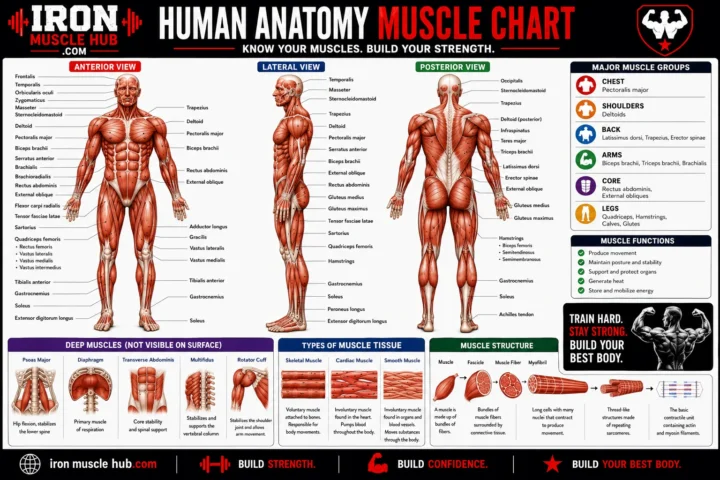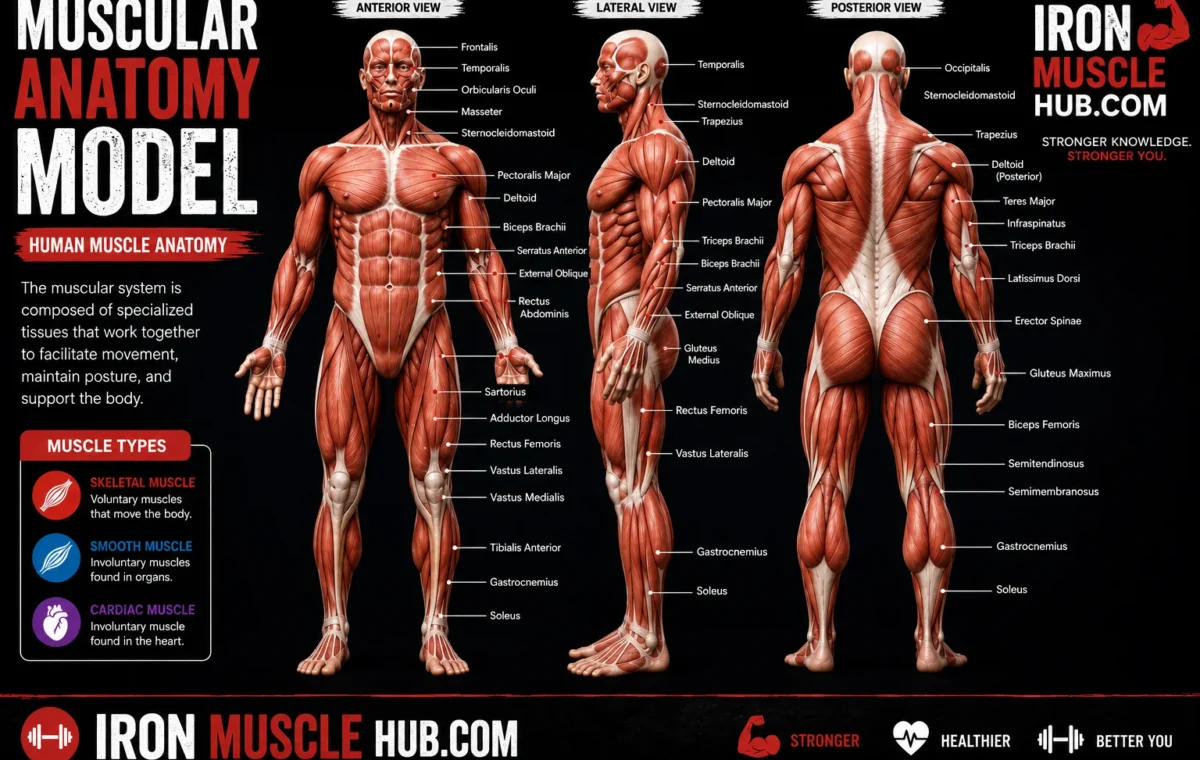
A muscular anatomy model is a physical or digital representation of the human muscles that helps you see where muscles are located, how they connect to bones, and how different structures fit together. Unlike a flat muscle chart, a 3D model lets you study anatomy from different angles and, in some cases, remove layers or individual parts.
- Muscular Anatomy Model at a Glance
- What Is a Muscular Anatomy Model?
- How Does a 3D Muscle Anatomy Model Work?
- The Main Parts You Should Be Able to Identify
- 1. Chest
- 2. Shoulders
- 3. Upper Back
- 4. Arms
- 5. Abdomen
- 6. Legs
- Physical vs. Digital Muscular Anatomy Models
- How to Use a Muscular Anatomy Model for Studying
- Step 1: Start with the skeleton
- Step 2: Learn large muscle groups first
- Step 3: Add individual muscle names
- Step 4: Study connections
- Step 5: Connect the muscle to movement
- What Makes a Good Muscular Anatomy Model?
- Clear labeling
- Realistic muscle placement
- Layered construction
- Multiple viewing angles
- Appropriate complexity
- A Simple Study Example
- Common Mistakes Beginners Make
- Mistake 1: Treating every muscle as a separate island
- Mistake 2: Memorizing names without locations
- Mistake 3: Ignoring deeper muscles
- Mistake 4: Assuming every model is a medical reference
- Can a Muscular Anatomy Model Help With Fitness?
- Where to Find Free 3D Anatomy Resources
- Internal-Link Ideas for Iron Muscle Hub
- Frequently Asked Questions
- What is a muscular anatomy model?
- What is the best way to study muscles with a 3D model?
- Are 3D anatomy models accurate?
- Can I use a muscular anatomy model at home?
- What is the difference between a muscle chart and a muscular anatomy model?
- Choose the Model That Matches Your Learning Goal
- How to Choose and Use a Muscular Anatomy Model
- What Should a Good Muscular Anatomy Model Show?
- Physical or Digital: Which Is Better?
- How to Study With a Muscular Anatomy Model
- Common Mistakes to Avoid
- Buying the Most Detailed Model
- Studying Only the Front of the Body
- Memorizing Names Without Location
- Ignoring Muscle Layers
- A Simple Beginner Study Routine
- The 3-Question Test
- Why 3D Models Can Be Easier to Understand
- Final Takeaway
- Practical Buying Guide, Study Tips, FAQs & Final Takeaways
- How Much Detail Do You Actually Need?
- Questions to Ask Before Buying
- Don't Forget Free Digital Resources
- Muscular Anatomy Model vs. Muscle Chart
- Which Should You Choose?
- A Better Way to Memorize Muscle Names
- Use Active Recall
- Add Movement to Your Study
- Who Can Benefit From a Muscular Anatomy Model?
- Students
- Fitness Enthusiasts
- Teachers
- Home Learners
- Trainers and Coaches
- When a Model Isn't Enough
- Frequently Asked Questions
- What is a muscular anatomy model used for?
- Is a 3D muscular anatomy model better than a chart?
- What should beginners learn first?
- Are expensive anatomy models worth it?
- Can I study anatomy without buying a model?
- Final Thoughts: Make Anatomy Easier to See
That makes these models useful for anatomy students, teachers, fitness professionals and anyone trying to understand the muscular system. A good model can turn a confusing list of muscle names into something much easier to visualize. For more insights read here :- how do you get lean and lean exercises.
Quick answer: A muscular anatomy model is a visual learning tool that represents human muscles in three dimensions. The most useful models show muscle locations, major structures, connections to bones and, ideally, labeled or removable components.
Muscular Anatomy Model at a Glance
| Feature | What it helps you understand |
|---|---|
| 3D muscle placement | Where muscles sit on the body |
| Labeled parts | Names and locations of muscles |
| Removable components | Superficial and deeper structures |
| Bones and joints | How muscles interact with the skeleton |
| Muscle layers | How muscles are arranged from surface to depth |
| Digital rotation | Anatomy from front, back and side views |
| Functional demonstrations | How muscles contribute to movement |
The goal isn’t simply to memorize muscle names. A useful model helps you connect location, structure and movement.
What Is a Muscular Anatomy Model?
A muscular anatomy model is a teaching representation of the human muscular system.
It may be a physical model made from plastic or another material, a 3D-printable file, or an interactive digital model. Some show the entire body, while others focus on a particular area such as the arm, leg, torso or head.
The human body contains more than 600 muscles, and muscles have different roles and structures. Cleveland Clinic groups muscle tissue into three major types: skeletal, cardiac and smooth muscle. Skeletal muscles are the muscles most people are referring to when they study the visible muscular system.
A model therefore gives learners a practical way to organize a large amount of information.
How Does a 3D Muscle Anatomy Model Work?
A three-dimensional model represents anatomical structures spatially rather than only showing them on a flat page.
For example, a physical model might show muscles attached around a skeleton. A more advanced model can allow you to remove a muscle and examine structures underneath it.
Digital models can go further. Depending on the software, you may be able to rotate the body, isolate structures, change views or examine how muscles relate to joints.
The National Institutes of Health provides 3D anatomical models through NIH 3D, including models created from the Visible Human datasets. One example is a 3D model of the muscles of the human arm.
That type of resource can be especially useful if buying a physical model isn’t practical.
The Main Parts You Should Be Able to Identify
A beginner doesn’t need to memorize every anatomical structure at once. Start with the major muscle groups and then work toward smaller structures.
1. Chest
The pectoralis major is one of the major muscles of the chest. A good model lets you see its position relative to the shoulder and upper arm.
2. Shoulders
The deltoid covers much of the shoulder and is an important landmark when studying the upper limb.
3. Upper Back
The trapezius and other back muscles help make the relationship between the shoulders, spine and upper limbs easier to understand.
4. Arms
The biceps brachii and triceps brachii are useful starting points because they’re easy to locate on a basic model.
5. Abdomen
Models can help distinguish the abdominal muscle layers rather than treating the stomach area as one single muscle.
6. Legs
The thigh and lower-leg regions contain several important muscle groups. A three-dimensional model helps you see that muscles can overlap and occupy different depths.
The important point is that muscles don’t exist as isolated shapes. Skeletal muscles connect with the rest of the musculoskeletal system, with tendons attaching muscle to bone. Muscle contraction can then contribute to movement at joints.
Physical vs. Digital Muscular Anatomy Models
Both formats can work well. The better choice depends on how you learn.
| Model type | Best for | Main advantage | Possible limitation |
| Physical model | Classroom or hands-on study | You can examine it from different angles | Takes up space |
| Removable model | Detailed anatomy study | Shows layers and deeper structures | Can be more expensive |
| Digital 3D model | Self-study | Easy to rotate and inspect | Requires a suitable device |
| 3D-printable model | Educators and hobbyists | Can be printed at different scales | Requires access to a 3D printer |
| Flat chart | Quick revision | Simple and inexpensive | Less useful for depth and layering |
For example, NIH’s 3D collection includes printable anatomical models derived from medical imaging datasets.
Commercial physical models can also be highly detailed. Eisco Labs, for example, lists a life-size muscular anatomy model with removable components and numbered structures for educational use.
How to Use a Muscular Anatomy Model for Studying
Simply looking at a model isn’t enough. Use it actively.
Step 1: Start with the skeleton
Before memorizing individual muscles, identify the major bones and joints.
This gives you landmarks. Once you know where the shoulder, elbow, hip and knee are, muscle locations become easier to remember.
Step 2: Learn large muscle groups first
Don’t begin with dozens of small structures.
Start with recognizable areas such as the chest, shoulder, upper arm, back, abdomen, thigh and lower leg.
Step 3: Add individual muscle names
Once you understand the regions, begin identifying individual muscles.
Cover the labels and try to name each structure yourself. Then check your answer.
Step 4: Study connections
Look at where a muscle begins and ends rather than memorizing its name alone.
Understanding the relationship between a muscle, tendon, bone and joint can make the anatomy much easier to recall. Skeletal muscle structure includes connective-tissue layers surrounding the muscle, muscle bundles and individual fibers.
Step 5: Connect the muscle to movement
Ask a simple question:
“What happens at the joint when this muscle contracts?”
This turns memorization into functional learning.
What Makes a Good Muscular Anatomy Model?
Not every model is equally useful. If you’re choosing one for study, check these features first.
Clear labeling
Labels should be readable and anatomically accurate. A model with fewer clearly identified structures can be more useful to a beginner than one overloaded with tiny labels.
Realistic muscle placement
Look for a model that shows muscles in appropriate relationships to bones, joints and neighboring structures.
Layered construction
If you want to study deeper anatomy, removable parts can be particularly helpful. They let you compare superficial muscles with structures underneath.
Multiple viewing angles
A model should help you understand anatomy from the front, back and side. Digital models are particularly convenient for this.
Appropriate complexity
Medical students and experienced anatomy learners may want considerably more detail than someone taking a basic introductory course.
Choose the level that matches your purpose.
A Simple Study Example
Suppose you’re learning the upper arm.
Instead of trying to memorize several muscle names in one sitting, use this sequence:
- Locate the shoulder joint.
- Find the upper-arm bone.
- Identify the muscles surrounding the upper arm.
- Separate the major muscles into front and back groups.
- Learn the names of the most prominent muscles.
- Look at their relationships with the elbow.
- Ask what movement each muscle contributes to.
- Hide the labels and test yourself.
After that, repeat the process from another viewing angle.
This approach gives you location + structure + function, rather than relying on name memorization alone.
Common Mistakes Beginners Make
Mistake 1: Treating every muscle as a separate island
Muscles work as part of a larger musculoskeletal system. Bones, joints, tendons and muscles interact during movement.
Better approach: Study neighboring structures together.
Mistake 2: Memorizing names without locations
Knowing that a muscle is called the biceps doesn’t tell you much if you can’t identify it on the body.
Better approach: Learn the name and physical location at the same time.
Mistake 3: Ignoring deeper muscles
A surface model can make anatomy look simpler than it really is.
Better approach: Use a layered model or digital tool when you’re ready to study deeper structures.
Mistake 4: Assuming every model is a medical reference
Some models are designed primarily for basic education or visual demonstration.
Better approach: For formal medical or clinical study, compare the model with a reputable anatomy textbook or educational resource.
Can a Muscular Anatomy Model Help With Fitness?
Yes, but it should be treated as an educational aid rather than a substitute for professional instruction.
A model can help you understand which muscles are located around a joint and how different muscle groups relate to movement. That’s useful background for learning exercise terminology and basic anatomy.
However, seeing a muscle on a model doesn’t automatically tell you that a particular exercise is appropriate for an individual. Exercise technique, injuries, medical conditions and training goals can require professional assessment.
Where to Find Free 3D Anatomy Resources
You don’t necessarily need to purchase a physical model.
The NIH 3D collection includes publicly accessible anatomical models, including Visible Human-derived models. Individual entries provide information about the model and its source data.
Another option is a dedicated anatomy app. For example, the Muscle & Motion Anatomy app describes interactive 3D models, muscle animations and movement demonstrations as part of its educational features.
Before using any digital resource for academic or commercial work, check its current license and usage terms.
Internal-Link Ideas for Iron Muscle Hub
Consider linking this article to related beginner-friendly pages such as:
- Muscle Chart: A Beginner’s Guide to the Major Muscles
- Skeletal Muscle Anatomy Explained Simply
- How to Read a Labeled Muscle Diagram
These links can help readers move from a three-dimensional model to charts, terminology and more detailed anatomy lessons.
Frequently Asked Questions
What is a muscular anatomy model?
A muscular anatomy model is a physical or digital representation of the body’s muscles. It can show muscle locations, relationships with bones and joints, and sometimes deeper anatomical layers. Models range from simple classroom displays to detailed interactive 3D systems used for advanced anatomy education.
What is the best way to study muscles with a 3D model?
Start with major muscle groups, then learn individual muscles and their locations. After that, study how muscles relate to bones and joints. Finally, test yourself by hiding labels and identifying structures without looking at the answers. Active recall is generally more useful than simply staring at a model.
Are 3D anatomy models accurate?
Quality varies. Educational and professional models are designed for anatomical learning, but they can differ in detail and purpose. For important academic or clinical work, compare a model with reputable medical references. NCBI’s anatomy resources and NIH’s 3D collection are useful starting points for cross-checking information.
Can I use a muscular anatomy model at home?
Yes. A small physical model, digital anatomy application or online 3D resource can all work for home study. Your choice mainly depends on available space, budget, device access and how much anatomical detail you need.
What is the difference between a muscle chart and a muscular anatomy model?
A muscle chart is usually a two-dimensional image, while a muscular anatomy model represents structures in three dimensions. A chart can be faster for revision, but a 3D model can make depth, layering and relationships between muscles easier to understand.
Choose the Model That Matches Your Learning Goal
A muscular anatomy model is most useful when you treat it as a hands-on learning tool rather than simply a decorative figure. Start with the major muscle groups, identify their locations, connect them to bones and joints, and gradually work toward deeper structures.
You also don’t have to buy an expensive model to begin. A reputable digital resource can provide useful three-dimensional views, while a physical model may be preferable if you learn best by handling and examining objects from different angles.
For beginners, the best model isn’t necessarily the most complicated one. It’s the one that makes anatomy easier to see, understand and remember.
How to Choose and Use a Muscular Anatomy Model
A muscular anatomy model becomes much more useful when you choose one based on your actual learning goal. A beginner who wants to identify major muscles doesn’t need the same level of detail as a medical student or anatomy instructor.
What Should a Good Muscular Anatomy Model Show?
Before buying or using a model, check whether it clearly represents the structures you want to study.
| Feature | Why it matters |
|---|---|
| Major muscle groups | Makes beginner study easier |
| Clear labels | Helps you connect names with locations |
| 3D construction | Shows depth and muscle relationships |
| Removable muscles | Useful for studying deeper layers |
| Bones and joints | Shows how muscles relate to movement |
| Multiple views | Helps you recognize muscles from different angles |
| Accurate proportions | Reduces confusion during study |
A model doesn’t need every possible anatomical structure to be useful. Too much detail can actually make early learning harder.
Physical or Digital: Which Is Better?
There’s no single winner.
A physical muscular anatomy model is useful if you learn by touching, rotating and examining objects. You can hold it, turn it around and compare superficial structures with deeper ones.
A digital 3D model can be more convenient for studying at home. You can often rotate the body, zoom in and isolate individual structures without needing physical storage space.
For beginners, either option can work well. The important thing is whether the model helps you answer three questions:
- Where is the muscle?
- What structures does it connect to?
- What movement is it involved in?
How to Study With a Muscular Anatomy Model
Don’t just look at the model and hope the information sticks. Turn it into an active study exercise.
1. Pick one body region.
Start with the shoulder, arm, chest, back, abdomen or leg.
2. Identify the major muscles.
Learn a few important structures before moving to smaller ones.
3. Hide the labels.
Try to name each muscle yourself.
4. Check your answers.
Look at the labels only after you’ve made your guess.
5. Change the viewing angle.
A muscle that looks obvious from the front may be harder to identify from the side or back.
6. Connect anatomy to movement.
Ask what happens at the nearby joint when the muscle contracts.
This method gives you more than a list of names. You’re building a mental map of the body.
Common Mistakes to Avoid
Buying the Most Detailed Model
More detail doesn’t automatically mean better learning.
A model covered with dozens of tiny labels may overwhelm someone who is still learning basic anatomy.
Better choice: Start with a model that clearly identifies the major structures you need.
Studying Only the Front of the Body
Many beginners become familiar with chest and arm muscles but struggle to identify muscles on the back.
Use front, back and side views as you study.
Memorizing Names Without Location
Knowing that a structure is called the deltoid isn’t very helpful if you can’t point to it.
Try saying the name while physically locating the structure on the model.
Ignoring Muscle Layers
Some muscles sit closer to the surface, while others are deeper.
If your goal is detailed anatomy study, a removable or layered model can help you understand this relationship much better than a single flat diagram.
A Simple Beginner Study Routine
You can turn a muscular anatomy model into a short daily study tool.
Day 1: Learn the major muscles of the chest and shoulder.
Day 2: Study the upper arm and elbow region.
Day 3: Study the upper and lower back.
Day 4: Learn the major abdominal and hip muscles.
Day 5: Study the major thigh muscles.
Day 6: Review the lower leg and foot.
Day 7: Test yourself without labels.
The exact schedule isn’t important. Consistent recall is.
The 3-Question Test
Whenever you learn a new muscle, ask:
Where is it?
What does it connect to?
What does it help do?
If you can answer those three questions, you’ve moved beyond simple memorization.
Why 3D Models Can Be Easier to Understand
A traditional muscle chart is useful because it gives you a quick reference. But a flat image can make the body appear simpler than it really is.
A 3D muscular anatomy model gives you a better sense of depth and positioning. You can see how one structure sits next to or underneath another instead of trying to imagine that relationship from a two-dimensional picture.
That can be particularly helpful when studying areas where several muscles overlap.
Final Takeaway
The best muscular anatomy model isn’t necessarily the biggest, most expensive or most detailed option. Look for something that matches your learning level and makes muscle locations easy to understand.
For beginners, clear labels and major muscle groups should come first. Once those become familiar, move into deeper layers, muscle attachments and movement.
Used this way, a model becomes more than a display piece. It becomes a practical study aid that helps turn complicated anatomy into something you can actually visualize.
Practical Buying Guide, Study Tips, FAQs & Final Takeaways
How Much Detail Do You Actually Need?
Before choosing a muscular anatomy model, think about what you’re trying to learn.
If you’re a beginner, a full-body model with clearly labeled major muscles is usually easier to work with than an extremely detailed professional model. If you’re studying anatomy at a higher level, you may benefit from removable muscles, deeper structures and detailed attachment points.
| Your goal | Look for |
|---|---|
| Basic anatomy | Major muscles + clear labels |
| Fitness education | Muscles + bones + joints |
| School study | Labeled, easy-to-read structures |
| Advanced anatomy | Removable layers + deeper muscles |
| Teaching | Durable construction + visible labels |
| Self-study | Rotatable physical or digital model |
The right level of detail should make studying easier, not create another problem to solve.
Questions to Ask Before Buying
Before spending money on a model, check:
- Does it show the muscles I actually need to learn?
- Are the labels easy to read?
- Can I see the front, back and side?
- Does it show muscle depth or only surface muscles?
- Are individual parts removable?
- Is the model designed for beginners or advanced students?
- Does the seller provide enough information about the anatomical structures shown?
If you’re buying online, pay close attention to the product description rather than choosing solely from photographs.
Don’t Forget Free Digital Resources
You don’t necessarily need to purchase a physical model.
The NIH 3D collection provides publicly accessible three-dimensional anatomical resources. Some models are based on the Visible Human datasets and can be explored as digital anatomy resources.
This can be a useful starting point if you’re not sure whether 3D anatomy is the right study method for you.
For more advanced study, compare information from your model with reputable anatomy references rather than assuming every educational model contains the same level of detail.
Muscular Anatomy Model vs. Muscle Chart
A muscle chart and a muscular anatomy model serve similar educational purposes, but they present information differently.
A chart is quick to reference. You can look at a labeled image and immediately find a muscle.
A 3D model gives you something a chart can’t fully reproduce: a sense of physical depth.
Which Should You Choose?
Choose a muscle chart if:
- You want a quick reference.
- You have limited space.
- You prefer studying from images.
- You need something inexpensive or easy to print.
Choose a 3D model if:
- You want to understand muscle layers.
- You learn better visually and spatially.
- You want to examine anatomy from several angles.
- You’re studying how muscles relate to bones and joints.
Best option for many learners: use both.
A chart can help you memorize names quickly, while a 3D model can help you understand where those structures actually sit.
A Better Way to Memorize Muscle Names
One of the easiest mistakes is trying to memorize a huge list of anatomical terms in one sitting.
Instead, use location-based learning.
For example, when studying the arm, divide the area into smaller sections:
- Shoulder
- Upper arm
- Elbow
- Forearm
- Wrist and hand
Then learn a few structures within each area.
Once you can identify them without looking at the labels, move to the next region.
Use Active Recall
Active recall means trying to remember information before checking the answer.
With a muscular anatomy model, this is simple:
Look → cover labels → identify → check → repeat.
This is generally more useful than repeatedly reading the same labels because you’re forcing yourself to retrieve the information.
Add Movement to Your Study
Anatomy becomes easier to remember when you connect structures with movement.
For example, rather than learning a muscle name by itself, think about:
- Where is the muscle?
- Which joint is nearby?
- What movement is associated with it?
- What other structures are around it?
This gives the information context.
Who Can Benefit From a Muscular Anatomy Model?
A 3D model can be useful for several types of learners.
Students
Students can use models to supplement textbooks, diagrams and classroom instruction.
Fitness Enthusiasts
People interested in exercise can use basic anatomy models to understand muscle locations and common anatomical terminology.
Teachers
A physical model can provide a useful visual aid when explaining muscle groups to a class.
Home Learners
If you’re learning anatomy independently, a digital model can provide an interactive alternative to traditional diagrams.
Trainers and Coaches
A model can help explain basic muscle locations and movement concepts, although it shouldn’t replace professional education or clinical guidance.
When a Model Isn’t Enough
A muscular anatomy model is an educational tool. It isn’t a substitute for professional medical education, diagnosis or treatment.
If you’re studying anatomy for a formal course, use the model alongside your required textbooks and academic resources.
If you’re trying to understand pain, an injury or a medical condition, don’t attempt to diagnose yourself based solely on an anatomy model.
The model can show where structures are located. It can’t tell you what is causing a particular symptom.
Frequently Asked Questions
What is a muscular anatomy model used for?
A muscular anatomy model is mainly used to study the location, shape and relationships of human muscles. Depending on its design, it may also show bones, joints, tendons and deeper muscle layers. Physical and digital models are commonly used as visual learning aids.
Is a 3D muscular anatomy model better than a chart?
Not necessarily. A chart is often faster for memorizing muscle names, while a 3D model can make depth and spatial relationships easier to understand. Using both can provide a stronger learning experience because each format solves a different problem.
What should beginners learn first?
Start with major muscle groups and obvious anatomical landmarks. Learn where the muscles are located before trying to memorize smaller structures. Once you understand the basic layout, add muscle names, attachments and movement functions.
Are expensive anatomy models worth it?
It depends on your needs. A more expensive model may provide features such as removable parts, better labeling or greater anatomical detail, but those features aren’t essential for everyone. Beginners can often learn effectively with a simpler physical or digital model.
Can I study anatomy without buying a model?
Yes. You can use reputable anatomy textbooks, labeled diagrams and digital 3D resources. Free resources such as the NIH 3D collection can also provide access to three-dimensional anatomical models without requiring you to purchase a physical model.
Final Thoughts: Make Anatomy Easier to See
A muscular anatomy model can make human anatomy much easier to visualize because it shows structures in three dimensions rather than only on a flat page.
For beginners, focus on the major muscle groups first. Learn their locations, identify them without labels and then connect each structure to nearby bones, joints and movements.
You don’t need the most complicated model available. A clear, accurate resource that matches your learning level will usually be more useful than a model overloaded with details you aren’t ready to study.
If you’re building an anatomy study setup, consider pairing a 3D muscular anatomy model, a labeled muscle chart and a reputable anatomy reference. Together, they can give you a much clearer picture of how the muscular system is organized.