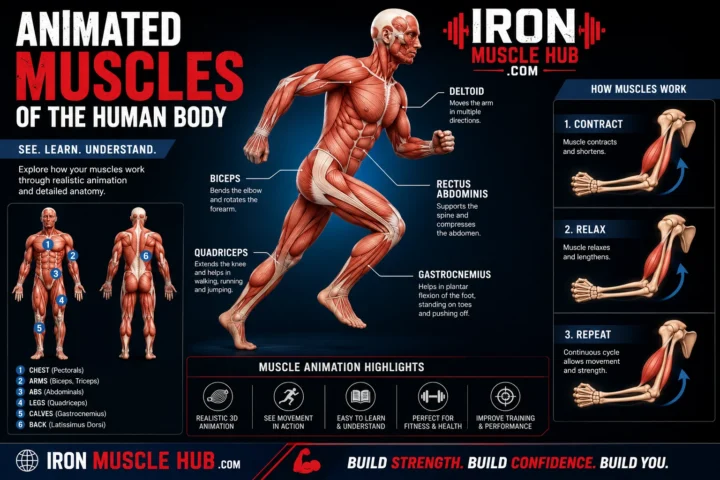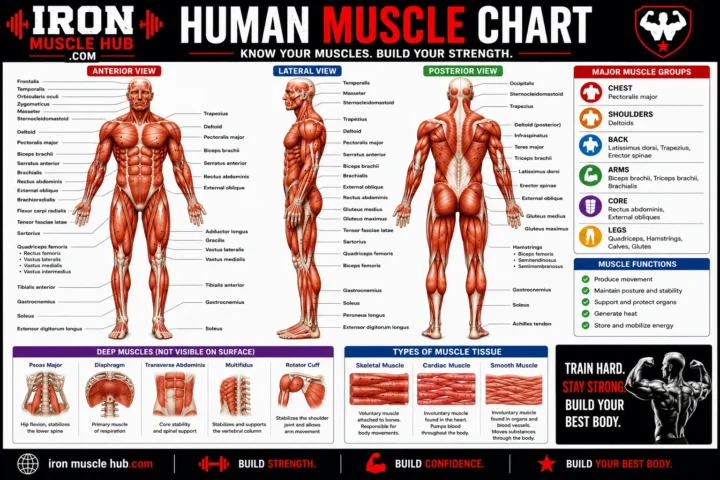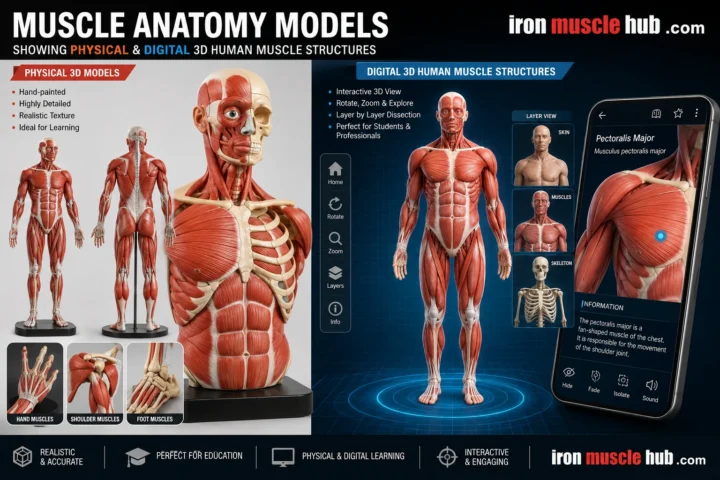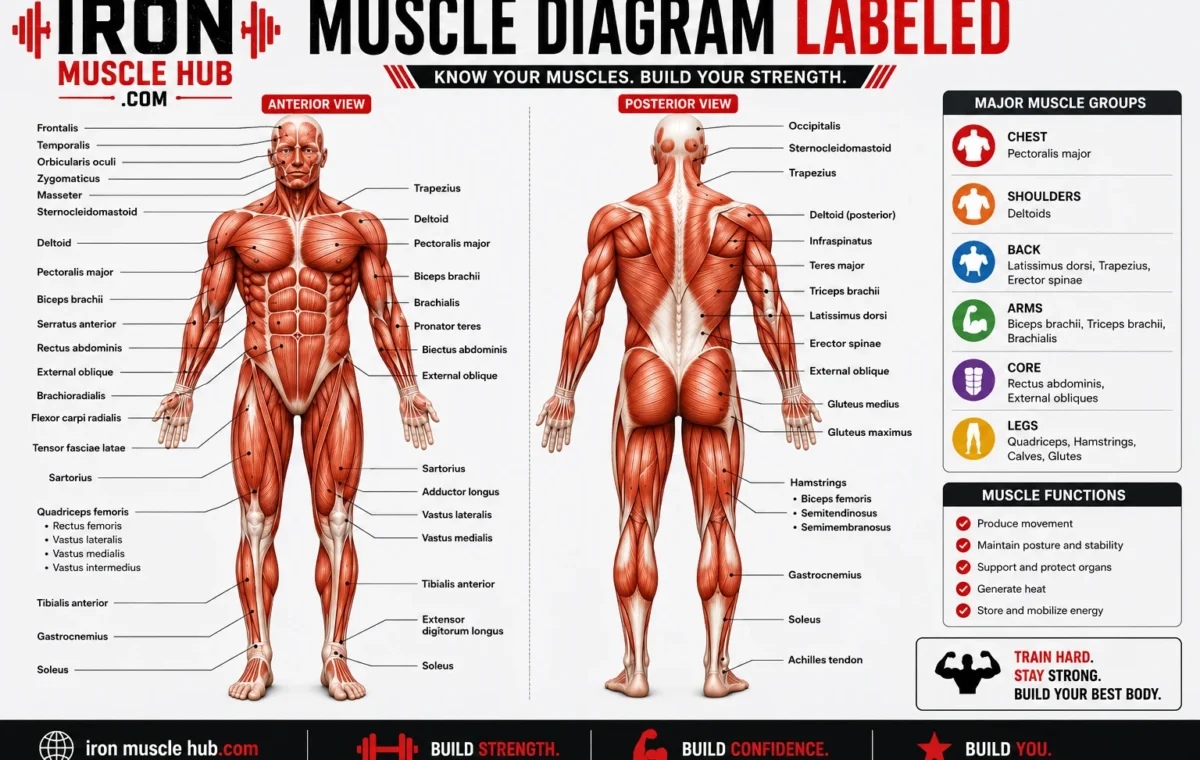
A muscle diagram labeled with the main muscles of the body can make anatomy much easier to understand. Instead of trying to memorize hundreds of names at once, you can use a labeled diagram to connect each muscle’s name with its location and basic function.
- Muscle Diagram Labeled: Quick Reference
- What Is a Labeled Muscle Diagram?
- Front vs. back views
- Major Muscles on the Front of the Body
- 1. Deltoids
- 2. Pectoralis major
- 3. Biceps brachii
- 4. Rectus abdominis
- 5. External obliques
- 6. Quadriceps
- Major Muscles on the Back of the Body
- 1. Trapezius
- 2. Latissimus dorsi
- 3. Triceps brachii
- 4. Gluteus maximus
- 5. Hamstrings
- 6. Gastrocnemius
- How to Read a Muscle Diagram
- Step 1: Start with body regions
- Step 2: Learn location before function
- Step 3: Look for opposing muscles
- Step 4: Hide the labels
- A Simple Worked Example
- Common Mistakes When Studying Muscle Diagrams
- Mistake 1: Trying to memorize everything
- Mistake 2: Learning names without locations
- Mistake 3: Using only a front view
- Mistake 4: Treating a fitness chart as a complete anatomy reference
- Mistake 5: Looking at the answers too quickly
- How Many Muscles Are in the Human Body?
- What Are the Three Types of Muscle?
- Where to Find a Copyright-Safe Muscle Diagram
- Internal Link Ideas for Iron Muscle Hub
- Frequently Asked Questions
- What is a muscle diagram labeled?
- What are the major muscles shown on a human muscle diagram?
- Should I study a front or back muscle diagram first?
- How can I memorize the muscles on a labeled diagram?
- What is the difference between a muscle chart and a muscle diagram?
- Is a labeled muscle diagram enough to learn anatomy?
- A Better Way to Use a Muscle Diagram
- Head and Neck Muscles
- Shoulder Muscles
- Chest Muscles
- Arm Muscles
- Forearm Muscles
- Core and Abdominal Muscles
- Rectus Abdominis
- External Obliques
- Transversus Abdominis
- Back Muscles
- Trapezius
- Latissimus Dorsi
- Erector Spinae
- Hip and Glute Muscles
- Thigh Muscles
- Quadriceps
- Hamstrings
- Adductors
- Lower-Leg Muscles
- Gastrocnemius
- Soleus
- Tibialis Anterior
- How to Memorize a Labeled Muscle Diagram Faster
- Use the 3-part memory method
- Study in pairs
- Use front and back diagrams together
- Labeled vs. Unlabeled Muscle Diagrams
- A 10-Minute Muscle Diagram Study Routine
- Why Muscle Diagrams Differ From Each Other
- Quick Muscle-Identification Test
- Answers
- Key Takeaway
- Major Muscle Groups at a Glance
- What Do Muscle Names Mean?
- Common Anatomical Direction Terms
- Why Some Muscles Are Missing From a Diagram
- Superficial vs. Deep Muscles
- Superficial muscles
- Deep muscles
- Muscle Origin, Insertion and Action
- A Better Way to Study Muscle Anatomy
- Stage 1: Identify
- Stage 2: Explain
- Stage 3: Connect
- Stage 4: Recall
- A Simple Weekly Practice Plan
- Day 1: Front view
- Day 2: Back view
- Day 3: Review
- Day 4: Correct mistakes
- Day 5: Mixed test
- Muscle Diagram for Fitness Beginners
- Muscle Diagram for Students
- What a Good Labeled Muscle Diagram Should Include
- Don't Confuse Muscle Diagrams With Medical Diagnosis
- Muscle Diagram Labeled: Final Review
- Frequently Asked Questions
- What is the easiest way to learn a muscle diagram?
- How do I remember the front and back muscles?
- What are the most important muscles to know first?
- Why do different muscle charts show different muscles?
- Can I learn anatomy using only a labeled muscle chart?
- Is the biceps the only muscle that bends the elbow?
- Final Thoughts: Make the Diagram Work for You
The most useful beginner diagrams usually show the front and back of the body and identify muscles such as the deltoids, pectoralis major, biceps, triceps, rectus abdominis, quadriceps, hamstrings, trapezius, latissimus dorsi, gluteus maximus, and gastrocnemius. Skeletal muscles attach to bones through tendons and help produce movement, maintain posture, stabilize joints, and perform other important functions. For more insights read here :- how to gain muscle fast and how to grow muscle .
Quick answer: A labeled muscle diagram is a visual anatomy reference that shows where major muscles are located. For beginners, studying the body by regions and then testing yourself with an unlabeled version is usually easier than trying to memorize every muscle at once.
Muscle Diagram Labeled: Quick Reference
| Body region | Major muscle(s) to know | Basic role |
|---|---|---|
| Shoulders | Deltoid | Helps move the arm at the shoulder |
| Chest | Pectoralis major | Helps move the upper arm |
| Upper arm, front | Biceps brachii | Helps flex the elbow |
| Upper arm, back | Triceps brachii | Helps extend the elbow |
| Upper back | Trapezius | Helps move and stabilize the shoulder region |
| Mid-back | Latissimus dorsi | Helps move the upper arm |
| Abdomen | Rectus abdominis | Helps flex the trunk |
| Side of abdomen | External oblique | Helps rotate and flex the trunk |
| Buttocks | Gluteus maximus | Important for hip extension |
| Front thigh | Quadriceps | Extends the knee |
| Back thigh | Hamstrings | Help flex the knee and extend the hip |
| Lower leg, back | Gastrocnemius | Helps point the foot downward |
| Lower leg, front | Tibialis anterior | Helps lift the front of the foot |
This is a beginner’s overview, not a complete anatomical inventory. The human body contains more than 600 muscles, and anatomy references differ in exactly how individual muscles or muscle groups are counted.
What Is a Labeled Muscle Diagram?
A labeled muscle diagram is an illustration of the muscular system with names pointing to specific muscles. Depending on its purpose, it may show only large superficial muscles or include smaller and deeper structures as well.
A basic diagram is useful because anatomy is spatial. Seeing the deltoid on the shoulder, for example, gives you information that is harder to remember from a list of names alone.
For more detailed study, anatomy resources commonly organize muscles by regions such as the head and neck, trunk, upper limb, and lower limb.
Front vs. back views
A good full-body diagram normally includes both an anterior view and a posterior view.
The front view makes muscles such as the pectoralis major, biceps, abdominal muscles and quadriceps easier to locate. The back view reveals structures including the trapezius, latissimus dorsi, triceps, gluteus maximus and hamstrings.
Educational anatomy diagrams commonly use these two views because many muscles are easier to identify from one side of the body than the other.
Major Muscles on the Front of the Body
If you’re starting with a front-view muscle diagram, learn these areas first.
1. Deltoids
The deltoids cover the shoulder area. They help move the upper arm in several directions, making them one of the easiest shoulder muscles to recognize on a diagram.
2. Pectoralis major
The pectoralis major is the large superficial muscle covering much of the front of the chest. It contributes to movements of the upper arm.
3. Biceps brachii
The biceps brachii sits on the front of the upper arm. It is strongly associated with elbow flexion and is one of the most recognizable muscles on a basic anatomy chart.
4. Rectus abdominis
The rectus abdominis runs vertically along the front of the abdomen. It helps flex the trunk and is commonly shown on fitness-oriented muscle diagrams.
5. External obliques
The external obliques are positioned along the sides of the abdomen. They contribute to trunk movement and rotation.
6. Quadriceps
The quadriceps femoris group occupies the front of the thigh. It contains four major muscles and plays an important role in extending the knee.
Major Muscles on the Back of the Body
The posterior view can look more complicated at first, but a few landmarks make it easier.
1. Trapezius
The trapezius spans the upper back and neck region. It helps with movement and stabilization of the shoulder blade and related structures.
2. Latissimus dorsi
The latissimus dorsi, often called the “lats,” covers a large portion of the back. It participates in movements of the upper arm.
3. Triceps brachii
The triceps brachii is located at the back of the upper arm. It works in opposition to the biceps in movements involving the elbow.
4. Gluteus maximus
The gluteus maximus is the large superficial muscle of the buttock. It plays an important role in hip extension.
5. Hamstrings
The hamstrings are a group of muscles on the back of the thigh. They contribute to knee flexion and hip extension.
6. Gastrocnemius
The gastrocnemius is the prominent superficial calf muscle. It helps produce movement at the ankle, including pointing the foot downward.
OpenStax’s anatomy material provides anterior and posterior muscle views with many of these structures labeled, while the National Center for Biotechnology Information explains how skeletal muscles attach to bones and produce movement.
How to Read a Muscle Diagram
You don’t need to memorize every label in one sitting. Try this simple method.
Step 1: Start with body regions
Break the diagram into sections:
- Head and neck
- Chest and abdomen
- Shoulder and arm
- Back
- Hip and glutes
- Thigh
- Lower leg
This regional approach is also recommended by anatomy-learning resources because it reduces the amount of information you have to handle at once.
Step 2: Learn location before function
First ask, “Where is this muscle?”
Once you can recognize its location, add one simple function.
For example:
Quadriceps → front of thigh → extends the knee.
That is easier to remember than trying to learn a long anatomical description immediately.
Step 3: Look for opposing muscles
Some pairs become easier to remember when you study them together.
| Muscle | Location | Simple association |
| Biceps brachii | Front upper arm | Elbow flexion |
| Triceps brachii | Back upper arm | Elbow extension |
| Quadriceps | Front thigh | Knee extension |
| Hamstrings | Back thigh | Knee flexion |
| Tibialis anterior | Front lower leg | Lifts the foot |
| Gastrocnemius | Back lower leg | Points the foot downward |
This approach gives you a mental map rather than a collection of disconnected names.
Step 4: Hide the labels
This is one of the most useful ways to turn a labeled diagram into a study tool.
Look at the labeled version first. Then cover the names or switch to an unlabeled version and try to identify each muscle yourself.
Anatomy-learning resources specifically recommend moving from labeled diagrams to blank labeling exercises as a way to test recall.
A Simple Worked Example
Suppose you’re looking at a front-view diagram and see a large muscle covering the front of the thigh.
Instead of immediately trying to remember every individual muscle, work through three questions:
1. What region is it in?
The thigh.
2. Is it on the front or back?
The front.
3. What major muscle group belongs there?
The quadriceps.
Now add the key movement: knee extension.
You’ve learned its location, group and basic function without memorizing a textbook paragraph.
Once that becomes familiar, you can move to the individual quadriceps muscles and more detailed anatomy.
Common Mistakes When Studying Muscle Diagrams
Mistake 1: Trying to memorize everything
A diagram containing dozens of labels can feel overwhelming. Start with the major superficial muscles and expand your knowledge gradually.
Mistake 2: Learning names without locations
Knowing that a muscle is called the “trapezius” isn’t very useful if you can’t identify it on the body.
Always connect name + location + basic action.
Mistake 3: Using only a front view
Many important muscles are easier to understand from the back. Use both anterior and posterior views when studying a full-body chart.
Mistake 4: Treating a fitness chart as a complete anatomy reference
A beginner fitness graphic may show only selected muscles. A medical or anatomy study resource can contain much more detail, including smaller muscles, attachments, nerves and functions.
Mistake 5: Looking at the answers too quickly
If you’re using a labeling worksheet, give yourself time to recall the answer before checking it. Active recall makes the exercise more useful than simply rereading the labels.
How Many Muscles Are in the Human Body?
There isn’t one universally agreed number because anatomical sources can classify and count muscles differently.
The National Institute of Arthritis and Musculoskeletal and Skin Diseases says there are more than 650 muscles in the human body, while other educational anatomy resources commonly describe the body as having more than 600 skeletal muscles.
For beginners, the exact total matters less than understanding the major muscle groups and how they relate to movement.
What Are the Three Types of Muscle?
Human muscle tissue is generally divided into three main types:
- Skeletal muscle: attached to bones and primarily responsible for voluntary movement.
- Cardiac muscle: the specialized muscle tissue of the heart.
- Smooth muscle: found in structures such as parts of the digestive, urinary and vascular systems.
A typical full-body muscle diagram is mainly showing skeletal muscles, not every type of muscle tissue in the body.
Where to Find a Copyright-Safe Muscle Diagram
If you need an image for educational or website use, don’t simply copy the first anatomy image you find in Google Images.
One useful option is the OpenStax anterior-and-posterior muscle illustration hosted on Wikimedia Commons. The file states that it is licensed under Creative Commons Attribution 4.0, which permits reuse under the license conditions. You should still provide the required attribution and indicate if you modify the image.
View the OpenStax muscle diagram and its CC BY 4.0 license information
Another option is to commission or generate an original diagram specifically for your website. That gives you greater control over the labels, layout, colors and level of anatomical detail.
Internal Link Ideas for Iron Muscle Hub
Consider linking this guide to related articles such as:
- Muscle Anatomy Chart: Major Muscles and Their Functions
- Body Muscle Chart: A Beginner’s Guide to Muscle Groups
- Muscular System Diagram: Front and Back Views Explained
These links can help readers move from a simple labeled overview to more detailed anatomy topics.
Frequently Asked Questions
What is a muscle diagram labeled?
A labeled muscle diagram is an illustration that identifies muscles by name and shows where they are located on the body. Beginner diagrams generally focus on major skeletal muscles and may include front and back views. More advanced charts can include smaller muscles, attachments, nerve supply and functions.
What are the major muscles shown on a human muscle diagram?
Common major muscles include the deltoids, pectoralis major, biceps brachii, triceps brachii, rectus abdominis, external obliques, trapezius, latissimus dorsi, gluteus maximus, quadriceps, hamstrings and gastrocnemius. The exact labels vary depending on how detailed the diagram is.
Should I study a front or back muscle diagram first?
For most beginners, a front view is a straightforward starting point because it makes several familiar landmarks easy to identify. After learning the major front muscles, add the back view and focus on landmarks such as the trapezius, latissimus dorsi, triceps, gluteus maximus and hamstrings.
How can I memorize the muscles on a labeled diagram?
Study by body region rather than trying to memorize the whole diagram at once. Learn each muscle’s name, location and basic action, then switch to an unlabeled diagram and test yourself. Repeating the recall exercise is more useful than simply looking at the labels repeatedly.
What is the difference between a muscle chart and a muscle diagram?
The terms are often used interchangeably, but a diagram usually emphasizes visual identification and location. A more detailed muscle chart may organize muscles into regions and add information such as attachments, innervation and functions.
Is a labeled muscle diagram enough to learn anatomy?
It’s a useful starting point, but it isn’t enough for advanced anatomy. A basic diagram helps you learn locations and major landmarks; deeper study requires information about attachments, actions, nerves, blood supply and anatomical relationships.
A Better Way to Use a Muscle Diagram
A labeled muscle diagram works best as a map, not as the entire lesson.
Start by identifying the large muscle groups. Then learn where each muscle sits, what movement it contributes to, and which neighboring muscles you can use as landmarks. Finally, test yourself with a blank diagram.
You don’t need to know hundreds of names before the picture starts making sense. Once you recognize a few major landmarks, the rest of the muscular system becomes easier to organize. Keep your first study sessions simple, use both front and back views, and return to the diagram regularly rather than attempting to memorize everything in one sitting.
A labeled muscle diagram becomes much easier to study once you stop treating the body as one giant collection of names. Think of it as a map divided into regions. Each region contains several muscles that work together to create movement and maintain stability.
The sections below give you a practical way to read a muscle diagram labeled from head to toe, with special attention to the muscles beginners are most likely to encounter in anatomy, fitness, and exercise resources.
Head and Neck Muscles
The head and neck contain numerous small muscles, so beginner diagrams often show only selected structures.
The sternocleidomastoid, commonly abbreviated SCM, is a prominent muscle on each side of the neck. It contributes to movements of the head and neck.
The masseter is one of the major muscles involved in chewing. It is located near the jaw and is relatively easy to identify because of its position.
For basic study, focus on recognizing the region before trying to memorize every smaller facial or neck muscle.
Shoulder Muscles
The deltoid is the rounded muscle covering much of the shoulder. On a front-view diagram, it sits above the upper arm and forms an important visual landmark.
The shoulder also involves several deeper muscles that are part of the rotator cuff. These aren’t always included on simple full-body charts because they sit beneath or around other structures.
If you’re studying a beginner diagram, learn the deltoid first. Later, you can move to the more detailed anatomy of the shoulder.
Chest Muscles
The pectoralis major is the large, superficial muscle on the front of the chest.
It contributes to movement of the upper arm and is therefore commonly highlighted on fitness and anatomy diagrams.
Underneath it are deeper structures, including the pectoralis minor, which may appear on more detailed anatomical illustrations.
A useful visual landmark is the relationship between the chest, shoulder and upper arm. Once those three areas make sense, the upper-body diagram becomes easier to read.
Arm Muscles
The upper arm is a particularly useful place to learn the idea of opposing muscle actions.
The biceps brachii is positioned toward the front of the upper arm. The triceps brachii occupies the back.
For a beginner, remember the pair like this:
| Muscle | Where to find it | Main movement to remember |
|---|---|---|
| Biceps brachii | Front of upper arm | Elbow flexion |
| Triceps brachii | Back of upper arm | Elbow extension |
This doesn’t describe everything these muscles do, but it gives you a useful starting point for reading a labeled anatomy chart.
Forearm Muscles
Forearm diagrams can become crowded because the region contains many individual muscles.
Instead of attempting to memorize every label immediately, first divide the forearm into broad areas and learn a few major landmarks.
More advanced anatomy charts may distinguish muscles involved in wrist movement, finger movement and rotation of the forearm.
For beginner study, it’s completely reasonable to master the upper arm before moving into detailed forearm anatomy.
Core and Abdominal Muscles
The abdominal area is one of the most recognizable sections on a muscle diagram.
Rectus Abdominis
The rectus abdominis runs vertically along the front of the abdomen. It contributes to flexion of the trunk.
It’s often the muscle people recognize first because of its position and its familiar appearance in many fitness illustrations.
External Obliques
The external obliques sit on the sides of the abdomen. They contribute to trunk movement, including rotation and lateral flexion.
A useful way to remember their location is to think of them as the muscles bordering the sides of the abdominal area.
Transversus Abdominis
The transversus abdominis is a deeper abdominal muscle. It wraps around the trunk and is not normally as visible on a basic superficial muscle chart.
This is a good example of why different muscle diagrams can look very different: one chart may focus on visible superficial muscles, while another may remove layers to show deeper anatomy.
Back Muscles
The back contains several major muscles that appear prominently on a posterior-view diagram.
Trapezius
The trapezius covers much of the upper back and extends toward the neck and shoulders.
It helps move and stabilize the shoulder region.
On a back-view diagram, it is one of the easiest large landmarks to identify.
Latissimus Dorsi
The latissimus dorsi is a broad muscle extending across much of the back.
It contributes to movements of the upper arm and is often highlighted in fitness-focused diagrams because of its location and size.
A simple visual clue is its position below and to the side of the trapezius.
Erector Spinae
The erector spinae refers to a group of muscles running along the back of the spine.
They are important for maintaining and moving the trunk.
On a detailed posterior muscle chart, these muscles may be shown as several distinct columns rather than one simple shape.
Hip and Glute Muscles
The hip area connects the trunk and lower limbs, so diagrams often show several muscles in this region.
The gluteus maximus is the large superficial muscle of the buttock. It is strongly involved in hip extension.
The gluteus medius sits more toward the upper and lateral portion of the hip and plays an important role in movement and stabilization of the hip.
A beginner diagram may label only the gluteus maximus, while a more detailed chart can identify several smaller muscles.
Thigh Muscles
The thigh is usually divided into three broad compartments: anterior, medial and posterior.
Quadriceps
The quadriceps femoris is a group of four muscles on the front of the thigh.
Its primary group action to remember is knee extension.
On a front-view diagram, the quadriceps occupy a large portion of the thigh, making them an excellent anatomical landmark.
Hamstrings
The hamstrings are located on the back of the thigh.
They contribute to knee flexion and hip extension.
A simple study trick is to learn the quadriceps and hamstrings together:
Front thigh → quadriceps → knee extension
Back thigh → hamstrings → knee flexion
This gives you two clear reference points when you’re looking at an unlabeled diagram.
Adductors
The adductor muscles are found on the medial, or inner, thigh.
Their primary role is bringing the thigh toward the body’s midline.
They can be easy to overlook on simple muscle diagrams because many charts don’t show every individual adductor muscle.
Lower-Leg Muscles
The lower leg contains several muscles that influence movement of the foot and ankle.
Gastrocnemius
The gastrocnemius is the large superficial calf muscle.
It contributes to plantar flexion of the foot and also crosses the knee joint.
Soleus
The soleus lies deep to the gastrocnemius.
Because of its position, it may not be visible on a simple superficial muscle diagram.
This is another reminder that a labeled chart is only a selected view of anatomy, not a complete representation of every structure.
Tibialis Anterior
The tibialis anterior is located toward the front of the lower leg.
It helps with dorsiflexion, which means lifting the front of the foot upward.
These three names give beginners useful lower-leg landmarks:
- Front lower leg → tibialis anterior
- Superficial calf → gastrocnemius
- Deep calf → soleus
How to Memorize a Labeled Muscle Diagram Faster
Don’t simply read the labels again and again. Turn the diagram into a recall exercise.
Use the 3-part memory method
For every major muscle, learn:
Name → location → action
For example:
Triceps → back of upper arm → elbow extension
Then move to another muscle.
Once you’ve learned 10 or so major landmarks, test yourself without looking at the names.
Study in pairs
Muscles become easier to remember when you compare related structures.
Try these pairs:
- Biceps and triceps
- Quadriceps and hamstrings
- Tibialis anterior and gastrocnemius
- Pectoralis major and latissimus dorsi
The goal isn’t to memorize every anatomical detail at once. It’s to build relationships between structures.
Use front and back diagrams together
A front-only diagram leaves out many important posterior muscles.
Study the body in two passes:
Pass 1: anterior/front view
Pass 2: posterior/back view
Then switch between the two views and identify the same body region from different angles.
Labeled vs. Unlabeled Muscle Diagrams
Both versions have a place in studying anatomy.
| Diagram type | Best use |
| Labeled diagram | Learning where muscles are located |
| Partially labeled diagram | Checking recognition |
| Unlabeled diagram | Testing memory |
| Detailed anatomical chart | Deeper study |
| Simple fitness diagram | Quick reference |
A good study routine is to begin with the labeled version and finish with the unlabeled one.
If you can identify the muscle without seeing its name, you’ve moved from recognition toward actual recall.
A 10-Minute Muscle Diagram Study Routine
If you only have a short amount of time, try this:
- Minute 1–2: Look at the complete labeled diagram.
- Minute 3–4: Study the shoulders, chest and arms.
- Minute 5–6: Study the abdomen, back and glutes.
- Minute 7–8: Study the thighs and lower legs.
- Minute 9: Hide the labels.
- Minute 10: Write down every muscle you can remember.
Don’t worry if you miss several names at first.
Your goal is to identify the mistakes and review those specific areas during the next session.
Why Muscle Diagrams Differ From Each Other
You may notice that two anatomy charts don’t look identical. That doesn’t automatically mean one is wrong.
There are several reasons.
Different levels of detail: A beginner chart might show 20–30 major structures, while an advanced chart can show many more.
Different anatomical layers: One illustration may show superficial muscles, while another removes them to reveal deeper structures.
Different views: Front, back, side and sectional views reveal different anatomy.
Different educational purposes: A fitness diagram may emphasize major muscles, while a medical anatomy illustration may focus on precise structures and relationships.
For that reason, always consider what a diagram was designed to teach before comparing it with another chart.
Quick Muscle-Identification Test
Try answering these without looking back at the article:
- Which major muscle is on the front of the upper arm?
- Which major muscle is on the back of the upper arm?
- Which muscle group occupies the front of the thigh?
- Which muscle group is located at the back of the thigh?
- Which large muscle covers much of the upper back?
- Which large muscle is found on the buttocks?
- Which prominent muscle forms much of the calf?
- Which muscle is located toward the front of the lower leg?
Answers
- Biceps brachii
- Triceps brachii
- Quadriceps
- Hamstrings
- Trapezius
- Gluteus maximus
- Gastrocnemius
- Tibialis anterior
This type of self-test is more useful than simply rereading the same labels because it forces you to retrieve the information from memory.
Key Takeaway
A muscle diagram labeled is most useful when you turn it into an active study tool. Learn the major muscles by body region, connect each name to its location and basic action, then test yourself using an unlabeled version.
Start with the large landmarks: deltoids, pectoralis major, biceps, triceps, abdominal muscles, trapezius, latissimus dorsi, gluteus maximus, quadriceps, hamstrings and major calf muscles.
Once those are familiar, adding smaller and deeper muscles becomes much less confusing.
A muscle diagram labeled is more useful when you know what each label represents and how the muscles relate to one another. You don’t need to memorize an entire anatomy textbook to get started. A small set of major landmarks can give you a strong foundation.
This final section focuses on practical identification, common terminology, study strategies, and ways to use a labeled muscle chart without confusing a simplified fitness illustration with a detailed anatomical reference.
Major Muscle Groups at a Glance
Before studying individual muscles, learn the body’s main regions.
| Region | Important muscles or groups | What to recognize |
|---|---|---|
| Neck | Sternocleidomastoid | Prominent muscle on each side of the neck |
| Shoulder | Deltoid | Rounded shoulder muscle |
| Chest | Pectoralis major | Large superficial chest muscle |
| Upper back | Trapezius | Broad upper-back muscle |
| Side/back | Latissimus dorsi | Large muscle covering much of the back |
| Front upper arm | Biceps brachii | Major anterior upper-arm muscle |
| Back upper arm | Triceps brachii | Major posterior upper-arm muscle |
| Abdomen | Rectus abdominis, obliques | Major anterior and lateral abdominal muscles |
| Buttocks | Gluteus maximus | Large superficial gluteal muscle |
| Front thigh | Quadriceps | Four-muscle group |
| Back thigh | Hamstrings | Posterior thigh muscle group |
| Calf | Gastrocnemius, soleus | Major posterior lower-leg muscles |
| Front lower leg | Tibialis anterior | Important muscle on the anterior lower leg |
This table is intentionally simplified. Some entries represent a single muscle, while others represent a group of muscles.
What Do Muscle Names Mean?
One of the easiest ways to learn anatomy is to understand that many muscle names contain clues.
A muscle’s name may describe its location, shape, size, direction, number of attachments, or relationship to another structure.
For example, biceps refers to a muscle with two heads, while triceps refers to one with three heads. Maximus means larger or greatest, while minimus means smaller or least.
You don’t need to memorize Latin and Greek terminology to study a basic diagram, but recognizing these naming patterns can make unfamiliar labels less intimidating.
Common Anatomical Direction Terms
Muscle diagrams often use anatomical terms that may be unfamiliar to beginners.
Here are some of the most useful ones:
| Term | Simple meaning |
| Anterior | Toward the front |
| Posterior | Toward the back |
| Medial | Toward the body’s midline |
| Lateral | Away from the body’s midline |
| Superior | Toward the head or upper part |
| Inferior | Toward the feet or lower part |
| Proximal | Closer to the point of attachment or trunk |
| Distal | Farther from the point of attachment or trunk |
| Superficial | Closer to the surface |
| Deep | Farther beneath the surface |
These terms help explain why an anatomy chart might describe one muscle as “posterior” or another as “deep.”
Why Some Muscles Are Missing From a Diagram
If you compare two labeled muscle diagrams, you may notice that one includes muscles that another doesn’t.
That’s normal.
A simple chart might show only large superficial muscles because its purpose is quick identification. A more advanced chart may show deeper muscles after superficial structures have been removed.
For example, the soleus lies deep to the gastrocnemius in much of the calf region. A basic posterior diagram may emphasize the gastrocnemius, while a deeper anatomical illustration may reveal the soleus.
The same principle applies throughout the body.
A diagram is a teaching tool, not a complete list of every structure.
Superficial vs. Deep Muscles
This distinction is particularly important when studying anatomy.
Superficial muscles
Superficial muscles are closer to the body’s surface.
They are generally the muscles you see first on a basic full-body muscular diagram.
Examples include:
- Deltoid
- Pectoralis major
- Biceps brachii
- Triceps brachii
- Rectus abdominis
- Gluteus maximus
- Gastrocnemius
Deep muscles
Deep muscles are located underneath more superficial structures.
They may be difficult or impossible to see on a simple external muscle chart.
Examples include certain rotator cuff muscles and deeper muscles of the abdomen, back and lower leg.
This is why a detailed anatomy course normally uses several diagrams rather than one “complete” picture.
Muscle Origin, Insertion and Action
Once you’ve mastered basic labels, you may encounter three additional terms:
Origin: Traditionally, the attachment considered more stationary during a particular movement.
Insertion: Traditionally, the attachment considered to move toward the origin during that movement.
Action: The movement produced or assisted by the muscle.
These concepts become more important in advanced anatomy and exercise science.
For beginners, don’t try to learn all three for every muscle immediately. Start with the muscle’s location and a basic action, then add attachment information as your knowledge improves.
A Better Way to Study Muscle Anatomy
Reading a chart repeatedly can create the feeling that you know the material because the labels look familiar.
Testing yourself is different.
Try this four-stage approach.
Stage 1: Identify
Look at the labeled diagram and locate each major muscle.
Don’t worry about memorizing the action yet.
Stage 2: Explain
Close the labels and say the muscle name aloud when you point to it.
If you can’t identify it, check the diagram and try again.
Stage 3: Connect
Add one simple piece of information.
For example:
Gluteus maximus → buttocks → hip extension
Stage 4: Recall
Use a blank diagram and label it from memory.
This final step shows whether you’ve actually learned the location rather than simply recognizing the word.
A Simple Weekly Practice Plan
You don’t need long study sessions.
Day 1: Front view
Focus on:
- Deltoids
- Pectoralis major
- Biceps
- Rectus abdominis
- Obliques
- Quadriceps
- Tibialis anterior
Day 2: Back view
Focus on:
- Trapezius
- Latissimus dorsi
- Triceps
- Erector spinae
- Gluteus maximus
- Hamstrings
- Gastrocnemius
Day 3: Review
Use an unlabeled diagram and identify as many structures as possible.
Day 4: Correct mistakes
Study only the muscles you missed.
Day 5: Mixed test
Switch between front and back views.
This approach keeps your study sessions focused instead of forcing you to memorize a huge list in one sitting.
Muscle Diagram for Fitness Beginners
If you’re using a muscle diagram to understand exercise, remember that a labeled chart shows anatomical structures, not necessarily every muscle working during an exercise.
For example, a pressing movement may involve several muscles and joints rather than a single isolated muscle.
Likewise, a pulling movement can involve muscles in the back and upper arm working together.
So don’t assume that an exercise “belongs” to one muscle simply because a fitness graphic highlights that area.
A basic anatomy chart is best used to understand where muscles are, while exercise-specific resources can help explain how muscles work together during particular movements.
Muscle Diagram for Students
Students can make a labeled diagram much more useful by turning it into a blank quiz.
Start with a printed or digital image containing labels. Study it briefly, then hide the labels.
Write down the names from memory.
Next, check the answers and mark the areas you missed.
Repeat the exercise until the major landmarks become familiar.
You can also create separate quizzes for the:
- Upper body
- Abdomen
- Back
- Hip
- Thigh
- Lower leg
Breaking one large chart into smaller study sections makes mistakes easier to identify.
What a Good Labeled Muscle Diagram Should Include
If you’re choosing a chart for learning, look for a diagram that:
- Clearly distinguishes front and back views
- Uses readable labels
- Identifies major superficial muscles
- Avoids excessive visual clutter
- Uses anatomically appropriate terminology
- States the intended level of detail
- Provides a source or licensing information when appropriate
For serious anatomy study, favor educational or medical references over anonymous social-media graphics.
Don’t Confuse Muscle Diagrams With Medical Diagnosis
A muscle chart can help you understand anatomy, but it isn’t a diagnostic tool.
Pain in a particular body area doesn’t necessarily mean that the muscle shown directly underneath that area is the source. Several tissues and structures can be involved, and symptoms can have different causes.
If you’re using an anatomy diagram because of persistent pain, weakness, numbness or another health concern, a qualified healthcare professional can provide appropriate assessment.
Muscle Diagram Labeled: Final Review
Here’s a quick memory map:
Shoulder: Deltoid
Chest: Pectoralis major
Front upper arm: Biceps brachii
Back upper arm: Triceps brachii
Upper back: Trapezius
Broad back: Latissimus dorsi
Abdomen: Rectus abdominis and obliques
Buttocks: Gluteus maximus
Front thigh: Quadriceps
Back thigh: Hamstrings
Calf: Gastrocnemius and soleus
Front lower leg: Tibialis anterior
If you can locate these structures on both a labeled and unlabeled diagram, you’ve built a useful foundation for more detailed anatomy study.
Frequently Asked Questions
What is the easiest way to learn a muscle diagram?
Start with large, recognizable muscle groups rather than individual small muscles. Learn the name, location and one basic action for each structure. Then use an unlabeled diagram to test yourself. Once the major landmarks are familiar, gradually add smaller and deeper muscles.
How do I remember the front and back muscles?
Use consistent landmarks. On the front, start with the deltoids, chest, biceps, abdominal muscles and quadriceps. On the back, learn the trapezius, latissimus dorsi, triceps, glutes, hamstrings and calf muscles. Repeatedly switching between the two views improves recognition.
What are the most important muscles to know first?
For a beginner, major landmarks include the deltoid, pectoralis major, biceps brachii, triceps brachii, trapezius, latissimus dorsi, rectus abdominis, gluteus maximus, quadriceps, hamstrings, gastrocnemius and tibialis anterior. The exact list depends on your course or purpose.
Why do different muscle charts show different muscles?
Muscle diagrams are created for different purposes. A basic chart may focus on large superficial muscles, while an advanced anatomy chart can reveal deeper structures and smaller individual muscles. Different views and levels of detail can therefore produce very different-looking diagrams.
Can I learn anatomy using only a labeled muscle chart?
A labeled chart is an excellent starting point, but advanced anatomy requires more than visual identification. You may eventually need to study muscle attachments, actions, nerve supply, blood supply and relationships with bones and other tissues.
Is the biceps the only muscle that bends the elbow?
No. The biceps brachii contributes to elbow flexion, but it isn’t the only muscle involved. The brachialis is another important elbow flexor, and other muscles can contribute depending on the movement and position of the forearm.
Final Thoughts: Make the Diagram Work for You
A muscle diagram labeled can turn a confusing anatomy lesson into something much easier to organize. The trick is to use the picture actively instead of simply staring at the labels.
Begin with the major regions of the body. Learn each important muscle’s location and one basic action. Then cover the labels and test yourself. When you make a mistake, review that specific area instead of starting the entire chart from scratch.
Over time, you’ll develop a mental map of the muscular system. That foundation makes more detailed anatomy charts, exercise explanations and study materials much easier to understand.