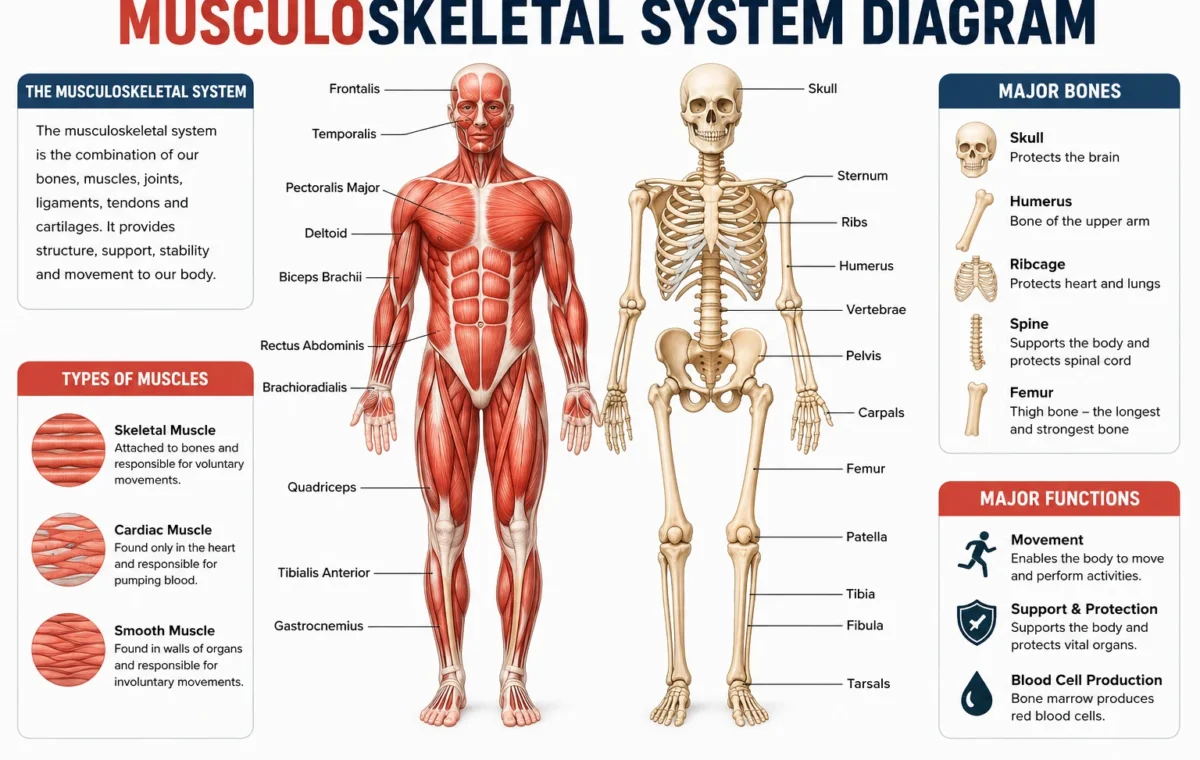
A musculoskeletal system diagram shows how your bones, muscles, joints, cartilage, tendons, and ligaments fit together to support your body and produce movement. Think of it as your body’s structural and movement system: bones provide the framework, muscles create force, and connective tissues help hold everything together.
- Musculoskeletal System Diagram: Key Parts at a Glance
- What Is the Musculoskeletal System?
- A simple movement example
- Major Bones Shown on a Musculoskeletal System Diagram
- Major Muscles on a Musculoskeletal System Diagram
- Upper body
- Core and lower body
- How Muscles and Bones Work Together
- Tendons vs. Ligaments: What's the Difference?
- What Are Joints?
- Why is cartilage important?
- How to Read a Musculoskeletal System Diagram
- 1. Find the skeleton first
- 2. Locate the major limbs
- 3. Add the major joints
- 4. Identify muscles by region
- 5. Trace the connections
- A Simple Worked Example: Understanding the Knee
- Common Mistakes When Studying Anatomy Diagrams
- Mistake 1: Confusing tendons and ligaments
- Mistake 2: Learning names without locations
- Mistake 3: Treating bones as the whole musculoskeletal system
- Mistake 4: Trying to memorize everything at once
- Why the Musculoskeletal System Matters
- Related Resources to Add to Your Site
- Frequently Asked Questions
- What does a musculoskeletal system diagram show?
- What are the main parts of the musculoskeletal system?
- What is the difference between a tendon and a ligament?
- How many bones are in the human body?
- What are the major bones beginners should learn first?
- Are muscles part of the musculoskeletal system?
- A Simple Way to Remember the Whole System
- Musculoskeletal System Diagram: Front View vs. Back View
- Anterior view
- Posterior view
- The Axial and Appendicular Skeleton
- Axial skeleton
- Appendicular skeleton
- The Spine in a Musculoskeletal System Diagram
- Understanding the Shoulder Complex
- Understanding the Hip
- Why Skeletal Muscles Are Important
- Major Joint Types to Recognize
- Hinge joints
- Ball-and-socket joints
- Pivot joints
- Gliding joints
- Musculoskeletal System Diagram: A Beginner Study Method
- Step 1: Learn the body regions
- Step 2: Learn 10-15 major bones
- Step 3: Add major muscle groups
- Step 4: Learn the connections
- Step 5: Study movement
- Musculoskeletal System Diagram vs. Skeletal System Diagram
- Why Diagram Labels Can Look Confusing
- A Practical Example: What Happens When You Walk?
- How to Use a Musculoskeletal Diagram for Fitness
- The Most Important Things to Memorize
- Frequently Asked Questions About Musculoskeletal System Diagrams
- What is the easiest way to learn a musculoskeletal system diagram?
- What is the difference between the skeletal and musculoskeletal systems?
- Which bones should I learn first?
- What are the main muscles shown on a body diagram?
- Why are tendons and ligaments shown on anatomy diagrams?
- Can a musculoskeletal diagram help with exercise?
- Final Takeaway: Learn the Connections, Not Just the Names
- Final Thoughts
If you’re looking at an anatomy diagram for the first time, it can seem like a confusing collection of names. The good news is that you don’t need to memorize every bone or muscle. Once you understand what each major part does and how the pieces connect, the entire diagram becomes much easier to read. For more insights read here :- A musculoskeletal system diagram gives you a clear picture of how the body’s bones, muscles, joints, tendons, ligaments, and cartilage work together. You don’t need to memorize every anatomical term at once. Start with the major bones and muscle groups, then gradually learn the smaller structures and their connections.
The easiest way to remember the system is to focus on function: bones provide support, muscles create force, joints allow movement, tendons connect muscles to bones, and ligaments connect bones to bones. Once those relationships make sense, even a detailed anatomy diagram becomes much easier to under .For more insights read here :- how to build muscle and naming of muscles .
Quick answer: The musculoskeletal system consists mainly of bones, skeletal muscles, joints, cartilage, tendons, and ligaments. Together, these structures provide support, protect organs, maintain posture, and allow the body to move.
Musculoskeletal System Diagram: Key Parts at a Glance
| Part | What it does | Easy way to remember it |
|---|---|---|
| Bones | Support the body and protect organs | The framework |
| Skeletal muscles | Contract to create movement | The engines |
| Joints | Allow movement between bones | The meeting points |
| Cartilage | Cushions and supports certain joints | The shock absorber |
| Tendons | Connect muscles to bones | Muscle-to-bone cables |
| Ligaments | Connect bones to bones | Joint-supporting bands |
This basic division is useful because anatomy diagrams often show several of these structures at once. Bones aren’t working alone: movement depends on coordinated action between muscles, joints and connective tissues.
What Is the Musculoskeletal System?
The musculoskeletal system is the collection of structures that gives your body its shape, supports it and helps you move. It includes the skeleton and skeletal muscles along with connective tissues such as tendons, ligaments and cartilage.
Your skeleton also has less obvious jobs. Bones help protect organs, contain bone marrow that produces blood cells, and store minerals. For example, the skull protects the brain, while the rib cage helps protect organs in the chest.
The system works as a team rather than as separate parts. A muscle contracts, its force is transferred through a tendon, the tendon pulls on a bone, and the movement occurs around a joint.
A simple movement example
Imagine bending your elbow to bring a glass toward your mouth.
- Your nervous system signals the appropriate skeletal muscles.
- The muscle contracts.
- The contraction produces tension.
- A tendon transfers that force to a bone.
- The bones move around the elbow joint.
- Other muscles help control and stabilize the movement.
That simple action involves several components of the musculoskeletal system working together.
Major Bones Shown on a Musculoskeletal System Diagram
An adult human skeleton is commonly described as having 206 bones, although individual anatomy can vary.
You don’t need to learn all 206 names to understand a basic diagram. Start with the major landmarks below.
| Body region | Major structures to recognize | Main role |
| Head | Skull, mandible | Protects the brain and forms the structure of the face |
| Shoulder | Clavicle, scapula | Connects the upper limb with the trunk |
| Chest | Ribs, sternum | Supports and protects the chest |
| Spine | Vertebrae | Supports the trunk and protects the spinal cord |
| Upper arm | Humerus | Connects shoulder and elbow |
| Forearm | Radius, ulna | Helps position and move the hand |
| Pelvis | Pelvic bones | Supports the trunk and connects the legs |
| Thigh | Femur | Major weight-bearing bone of the thigh |
| Knee | Patella | Forms the kneecap |
| Lower leg | Tibia, fibula | Supports and positions the lower limb |
| Foot | Tarsals, metatarsals, phalanges | Supports standing, balance and movement |
The femur is the thigh bone, while the tibia and fibula form the lower leg. The patella is the kneecap. These are among the easiest landmarks to identify when you’re studying a full-body skeleton diagram.
Major Muscles on a Musculoskeletal System Diagram
A full musculoskeletal diagram may show dozens of muscles, but beginners can start with the major muscle groups.
Upper body
- Pectoral muscles: Located across the chest.
- Deltoids: Cover the shoulder region.
- Biceps: Located at the front of the upper arm.
- Triceps: Located at the back of the upper arm.
- Trapezius: A large muscle extending across the upper back and neck region.
- Latissimus dorsi: A broad muscle across much of the back.
Core and lower body
- Abdominal muscles: Cover the front and sides of the trunk.
- Gluteal muscles: Form much of the buttock region.
- Quadriceps: A group of muscles at the front of the thigh.
- Hamstrings: A group of muscles at the back of the thigh.
- Calf muscles: Major muscles at the back of the lower leg.
Skeletal muscles are the muscle type most directly associated with voluntary movement of the skeleton. They contract and relax in response to signals from the nervous system.
How Muscles and Bones Work Together
A common mistake is to think that muscles simply “move bones.” More precisely, muscles generate force by contracting, and that force is transferred to bones through tendons.
A useful mental picture is a lever system.
Muscle → tendon → bone → joint → movement
For example, when a muscle around the upper arm contracts, the resulting force can be transferred through its tendon to a bone. Because the bones meet at joints, the force can produce controlled movement.
Muscles also commonly work in opposing groups. One muscle may produce a particular movement while another helps create the opposite movement or control the action.
Tendons vs. Ligaments: What’s the Difference?
This is one of the easiest anatomy questions to mix up.
Tendons connect muscle to bone. Ligaments connect bone to bone.
Think of a tendon as the connection that lets muscle force reach the skeleton. A ligament, by comparison, helps stabilize a joint by connecting bones and limiting excessive movement.
| Feature | Tendon | Ligament |
| Connects | Muscle to bone | Bone to bone |
| Main job | Transfers muscle force | Supports and stabilizes joints |
| Example | Tendon connecting a muscle to a bone around the knee | Ligaments supporting the knee joint |
| Easy memory trick | Tendon = muscle To bone | Ligament = helps bones stay Linked |
If you’re studying a diagram, look at what each structure connects before trying to memorize its name.
What Are Joints?
A joint is a location where bones meet. Joints vary considerably in their structure and the amount of movement they permit.
Three broad categories are commonly used:
- Fibrous joints — connected by strong fibrous tissue and generally allow little movement.
- Cartilaginous joints — connected by cartilage and allow limited movement.
- Synovial joints — have a joint cavity and generally allow substantial movement.
Examples of synovial joints include the knee, shoulder and elbow. Their structures can include cartilage, ligaments, tendons and other supporting tissues.
Why is cartilage important?
Cartilage is strong but flexible connective tissue. In joints, it can provide cushioning and help surfaces move smoothly against one another.
That’s why a musculoskeletal system diagram may label cartilage even though it isn’t as visually obvious as a bone.
How to Read a Musculoskeletal System Diagram
If you’re studying anatomy, don’t try to memorize everything simultaneously. Use this five-step method.
1. Find the skeleton first
Identify the skull, spine, rib cage and pelvis. These give you the body’s basic orientation.
2. Locate the major limbs
Find the humerus, radius and ulna in the upper limb. Then identify the femur, tibia and fibula in the lower limb.
3. Add the major joints
Look for the shoulder, elbow, wrist, hip, knee and ankle.
4. Identify muscles by region
Instead of memorizing isolated names, group them by chest, back, shoulder, arm, abdomen, thigh and lower leg.
5. Trace the connections
Finally, look for tendons and ligaments. Ask yourself whether each structure connects muscle-to-bone or bone-to-bone.
This approach turns a complicated anatomy picture into several smaller pieces you can understand one at a time.
A Simple Worked Example: Understanding the Knee
The knee is a good example because several musculoskeletal structures meet in one place.
The bones include the femur, tibia and patella. The joint also contains supporting structures such as ligaments, tendons, cartilage and a meniscus.
When you straighten your knee, skeletal muscles in the thigh generate force. That force is transferred through tendons to the bones, while ligaments and other connective tissues help provide joint stability.
So instead of viewing the knee as simply “three bones,” think of it as a coordinated mechanical system.
Common Mistakes When Studying Anatomy Diagrams
Mistake 1: Confusing tendons and ligaments
Fix: Remember tendon = muscle to bone and ligament = bone to bone.
Mistake 2: Learning names without locations
Knowing “femur” isn’t very useful if you can’t point to it. Always learn the name and location together.
Mistake 3: Treating bones as the whole musculoskeletal system
Bones are important, but the system also includes muscles, joints, cartilage, tendons and ligaments.
Mistake 4: Trying to memorize everything at once
Start with major landmarks. Add smaller structures only after you can confidently identify the big ones.
Why the Musculoskeletal System Matters
The system does much more than help you exercise or walk.
It provides structural support, contributes to posture and movement, and protects important organs. Skeletal muscle also contributes to body movement and heat production. Bones contain marrow and serve as mineral stores.
This is why problems affecting muscles, bones, joints or connective tissues can influence everyday activities such as walking, lifting, reaching or maintaining balance.
Related Resources to Add to Your Site
For a broader anatomy and fitness content cluster, consider linking this article internally to:
- What Are Muscles? — explain muscle tissue, contraction and the major muscle groups.
- What Are Some Major Muscles in the Human Body? — provide a beginner-friendly muscle-by-muscle guide.
- Cardiac vs. Skeletal Muscle — explain how skeletal muscle differs from cardiac muscle.
For additional medically reviewed anatomy information, readers can consult Cleveland Clinic’s skeletal system guide and the NCBI Bookshelf anatomy resources.
Frequently Asked Questions
What does a musculoskeletal system diagram show?
A musculoskeletal system diagram typically illustrates the bones, skeletal muscles and supporting structures involved in movement. Depending on the diagram, it may also label joints, cartilage, tendons and ligaments. A detailed diagram can show individual bones and muscles, while a beginner diagram usually focuses on major anatomical landmarks.
What are the main parts of the musculoskeletal system?
The main parts include bones, skeletal muscles, joints, cartilage, tendons and ligaments. Bones provide structural support, muscles create movement, joints allow bones to move relative to one another, and connective tissues help connect, cushion and stabilize these structures.
What is the difference between a tendon and a ligament?
A tendon connects a muscle to a bone, allowing muscle force to be transferred to the skeleton. A ligament connects one bone to another bone, helping stabilize joints and limit excessive movement. This distinction is one of the most important basics to remember when reading an anatomy diagram.
How many bones are in the human body?
A commonly used figure for the adult human skeleton is 206 bones. Children have more separate bones because some structures that are separate during development later fuse together. Individual anatomical variation also exists, so 206 is best understood as the standard reference figure rather than an absolute count for every person.
What are the major bones beginners should learn first?
Start with the skull, clavicle, scapula, sternum, ribs, vertebrae, pelvis, humerus, radius, ulna, femur, patella, tibia and fibula. Learning these large landmarks first makes a full-body musculoskeletal diagram much easier to understand before you move on to smaller bones.
Are muscles part of the musculoskeletal system?
Yes. Skeletal muscles are a major component of the musculoskeletal system and work with bones, tendons, ligaments and joints to produce and control movement. Muscles also contribute to posture and heat production.
A Simple Way to Remember the Whole System
If you only remember one sequence from this guide, use this:
Bones provide the framework → joints provide movement points → muscles create force → tendons transfer that force to bones → ligaments help stabilize joints → cartilage helps cushion and support certain joints.
Once that relationship makes sense, most basic musculoskeletal system diagrams become much easier to read.
The goal isn’t to memorize a giant list of anatomical terms in one sitting. Learn the major bones and muscles first, understand the difference between tendons and ligaments, then add smaller structures as your knowledge grows. That’s a much more useful foundation for understanding human anatomy.
Musculoskeletal System Diagram: Front View vs. Back View
Many full-body musculoskeletal system diagrams use anterior (front) and posterior (back) views. Understanding the difference makes labels much easier to follow.
Anterior view
An anterior view shows the body from the front. You can usually identify structures such as:
- Clavicles
- Sternum
- Rib cage
- Abdominal muscles
- Pectoral muscles
- Biceps
- Quadriceps
- Tibia and fibula
This view is particularly useful for learning the muscles and bones visible from the front of the body.
Posterior view
A posterior view shows the body from the back. Commonly labeled structures include:
- Scapulae
- Vertebral column
- Trapezius
- Latissimus dorsi
- Triceps
- Gluteal muscles
- Hamstrings
- Calf muscles
Looking at both views is important because some structures are much easier to understand from behind than from the front.
The Axial and Appendicular Skeleton
A useful way to organize a musculoskeletal system diagram is to divide the skeleton into two major sections: the axial skeleton and the appendicular skeleton.
Axial skeleton
The axial skeleton forms the body’s central framework. It includes the:
- Skull
- Vertebral column
- Ribs
- Sternum
These structures form the central axis of the body and help support and protect important organs.
Appendicular skeleton
The appendicular skeleton includes the bones of the limbs and the structures that connect them to the body’s central framework.
It includes the:
- Shoulder girdle
- Arms
- Hands
- Pelvic girdle
- Legs
- Feet
This distinction is especially helpful when studying anatomy because it gives you a simple map of the skeleton instead of one enormous list of bones.
The Spine in a Musculoskeletal System Diagram
The spine, or vertebral column, is one of the most important structures you’ll see in a full-body diagram.
It provides structural support for the trunk while also helping protect the spinal cord. The vertebral column is made up of individual vertebrae arranged into regions.
The main regions are:
| Region | Location |
|---|---|
| Cervical | Neck |
| Thoracic | Upper and middle back |
| Lumbar | Lower back |
| Sacral | Pelvic region |
| Coccygeal | Tailbone region |
The cervical region is associated with the neck, while the thoracic region connects with the ribs. The lumbar region forms much of the lower back.
When reading a spine diagram, look at the vertebral column from top to bottom rather than trying to memorize every individual vertebra immediately.
Understanding the Shoulder Complex
The shoulder is another excellent example of how several musculoskeletal structures work together.
Important bones include the clavicle and scapula, along with the humerus of the upper arm.
The shoulder allows a wide range of movement. That freedom of movement also means the joint relies on muscles, tendons and ligaments for support and control.
The rotator cuff is a group of muscles and tendons associated with shoulder movement and stability. A detailed musculoskeletal diagram may label individual rotator cuff muscles, while a beginner diagram may simply identify the region.
Understanding the Hip
The hip connects the lower limb to the pelvis.
Unlike the shoulder, the hip is designed to provide substantial stability while still allowing movement. Its structure includes the head of the femur and a socket in the pelvis.
Major muscles around the hip and pelvis contribute to movements such as:
- Walking
- Running
- Climbing stairs
- Standing up
- Rotating the leg
- Maintaining balance
When studying a hip diagram, don’t focus only on the joint itself. Look at the surrounding muscles as well because they help produce and control movement.
Why Skeletal Muscles Are Important
Skeletal muscles are attached to the skeleton through tendons and are responsible for much of the body’s voluntary movement.
They also play an important role in maintaining posture. Even when you’re standing relatively still, muscles can remain active to help keep your body positioned.
Muscle contractions can also generate heat, which contributes to maintaining body temperature.
A useful way to think about skeletal muscle is:
Nervous system signal → muscle contraction → tendon force → bone movement
This simplified sequence helps connect the muscular and skeletal sides of an anatomy diagram.
Major Joint Types to Recognize
Not every joint moves in the same way. Some allow considerable movement, while others are designed mainly for stability.
Hinge joints
Hinge joints primarily allow bending and straightening movements.
Examples include the:
- Elbow
- Knee
Ball-and-socket joints
These joints allow movement in several directions.
Examples include the:
- Shoulder
- Hip
Pivot joints
Pivot joints allow rotational movement around an axis. A well-known example is the joint between the first two cervical vertebrae that contributes to head rotation.
Gliding joints
Some joints allow bones to glide relative to one another. Several joints in the wrist and ankle regions have this type of movement.
You don’t need to memorize every joint classification immediately. Start by recognizing the major joints and the types of movement they permit.
Musculoskeletal System Diagram: A Beginner Study Method
If you’re using a diagram for school, fitness education, or general anatomy learning, try this simple routine.
Step 1: Learn the body regions
Start with:
Head → neck → chest → abdomen → pelvis → upper limbs → lower limbs
This gives every structure a location.
Step 2: Learn 10-15 major bones
Begin with the skull, clavicle, scapula, sternum, ribs, vertebrae, pelvis, humerus, radius, ulna, femur, patella, tibia and fibula.
Step 3: Add major muscle groups
Learn the chest, shoulders, back, arms, abdomen, glutes, thighs and calves.
Step 4: Learn the connections
Remember:
Tendon = muscle to bone
Ligament = bone to bone
Step 5: Study movement
Pick one movement and trace what happens.
For example, during a squat, muscles around the hips and thighs produce force while the hip, knee and ankle joints move in coordination.
This method is generally easier than memorizing anatomical terms without understanding what they do.
Musculoskeletal System Diagram vs. Skeletal System Diagram
These terms are related but aren’t identical.
A skeletal system diagram mainly focuses on the bones and related skeletal structures.
A musculoskeletal system diagram can show a broader collection of structures involved in movement, including:
- Bones
- Skeletal muscles
- Joints
- Tendons
- Ligaments
- Cartilage
So if you’re specifically trying to understand movement, a musculoskeletal diagram usually provides more information than a skeleton-only image.
Why Diagram Labels Can Look Confusing
Medical and anatomy diagrams sometimes use terms that aren’t familiar to beginners.
For example, the same general area may be described using anatomical directions such as:
- Anterior: toward the front
- Posterior: toward the back
- Medial: closer to the body’s midline
- Lateral: farther from the body’s midline
- Proximal: closer to the point where a limb connects to the body
- Distal: farther from that point
These words become much easier once you understand the basic body orientation.
For example, the elbow is distal to the shoulder because it is farther from the trunk along the upper limb.
A Practical Example: What Happens When You Walk?
Walking may look simple, but it requires coordinated action throughout the musculoskeletal system.
Your nervous system controls the timing of muscle activity. Muscles around the hips, thighs and lower legs generate forces that move the limbs. Bones provide the rigid structures through which those forces act, while joints allow the limbs to move.
At the same time, muscles and connective tissues help maintain balance and control the movement.
This is why a musculoskeletal system diagram can be much more useful than a simple list of body parts: it shows relationships.
How to Use a Musculoskeletal Diagram for Fitness
A basic anatomy diagram can also help you understand exercise terminology.
For example:
| Exercise | Major regions involved |
| Squat | Thighs, glutes, hips and trunk |
| Push-up | Chest, shoulders, arms and trunk |
| Pull-up | Back, shoulders and arms |
| Lunge | Legs, hips and trunk |
| Calf raise | Calf muscles and ankle region |
| Biceps curl | Upper arm and elbow region |
These descriptions shouldn’t be interpreted as saying that only the listed muscles work. Most movements involve multiple muscles and joints working together.
The key lesson is that exercise doesn’t isolate the entire body into completely separate pieces. Human movement is coordinated.
The Most Important Things to Memorize
If you’re short on study time, prioritize these facts:
- Bones provide structural support and protection.
- Skeletal muscles generate force for movement.
- Joints are locations where bones meet.
- Tendons connect muscles to bones.
- Ligaments connect bones to bones.
- Cartilage provides support and cushioning in several parts of the body.
- The axial skeleton forms the body’s central framework.
- The appendicular skeleton includes the limbs and their connecting structures.
- Muscles, bones and joints work together rather than independently.
- A diagram is easier to learn when structures are grouped by region.
Frequently Asked Questions About Musculoskeletal System Diagrams
What is the easiest way to learn a musculoskeletal system diagram?
Start with body regions instead of individual labels. Learn the major bones first, then add major muscle groups, joints and connective tissues. After that, practice identifying the same structures on both front and back views. Linking each structure to its function makes memorization easier.
What is the difference between the skeletal and musculoskeletal systems?
The skeletal system focuses primarily on the body’s bones and associated structures. The musculoskeletal system is broader and includes bones, skeletal muscles, joints and connective tissues such as tendons and ligaments. It therefore provides a more complete picture of how the body supports itself and produces movement.
Which bones should I learn first?
For beginners, useful landmarks include the skull, clavicle, scapula, sternum, ribs, vertebrae, pelvis, humerus, radius, ulna, femur, patella, tibia and fibula. These provide a strong foundation for understanding a full-body anatomy diagram before learning smaller bones.
What are the main muscles shown on a body diagram?
Commonly labeled muscles include the pectorals, deltoids, biceps, triceps, trapezius, latissimus dorsi, abdominal muscles, gluteal muscles, quadriceps, hamstrings and calf muscles. A detailed medical diagram may identify many additional individual muscles.
Why are tendons and ligaments shown on anatomy diagrams?
They are included because movement and joint stability depend on more than bones and muscles alone. Tendons transfer force from muscles to bones, while ligaments connect bones and contribute to joint stability. Showing these structures gives a more complete picture of how the musculoskeletal system works.
Can a musculoskeletal diagram help with exercise?
Yes. A basic diagram can help you identify the muscles, bones and joints involved in common exercises. It can make fitness terminology easier to understand, but an anatomy diagram alone doesn’t provide personalized exercise or medical advice.
Final Takeaway: Learn the Connections, Not Just the Names
A good musculoskeletal system diagram isn’t simply a picture covered with anatomical labels. It’s a map showing how the body’s structural and movement systems fit together.
Start with the skeleton, identify the major muscles, then add joints, tendons, ligaments and cartilage. Once you understand what connects to what, unfamiliar labels become much easier to place.
The most useful principle to remember is simple: muscles create force, tendons transfer that force to bones, joints allow movement, and ligaments help stabilize the connections between bones. Build your knowledge around that relationship, and even a detailed anatomy diagram becomes far less intimidating.
Final Thoughts
A musculoskeletal system diagram gives you a clear picture of how the body’s bones, muscles, joints, tendons, ligaments, and cartilage work together. You don’t need to memorize every anatomical term at once. Start with the major bones and muscle groups, then gradually learn the smaller structures and their connections.
The easiest way to remember the system is to focus on function: bones provide support, muscles create force, joints allow movement, tendons connect muscles to bones, and ligaments connect bones to bones. Once those relationships make sense, even a detailed anatomy diagram becomes much easier to understand.
Whether you’re studying anatomy, learning more about fitness, or simply curious about how your body moves, building this basic foundation will make more advanced topics much easier to follow.