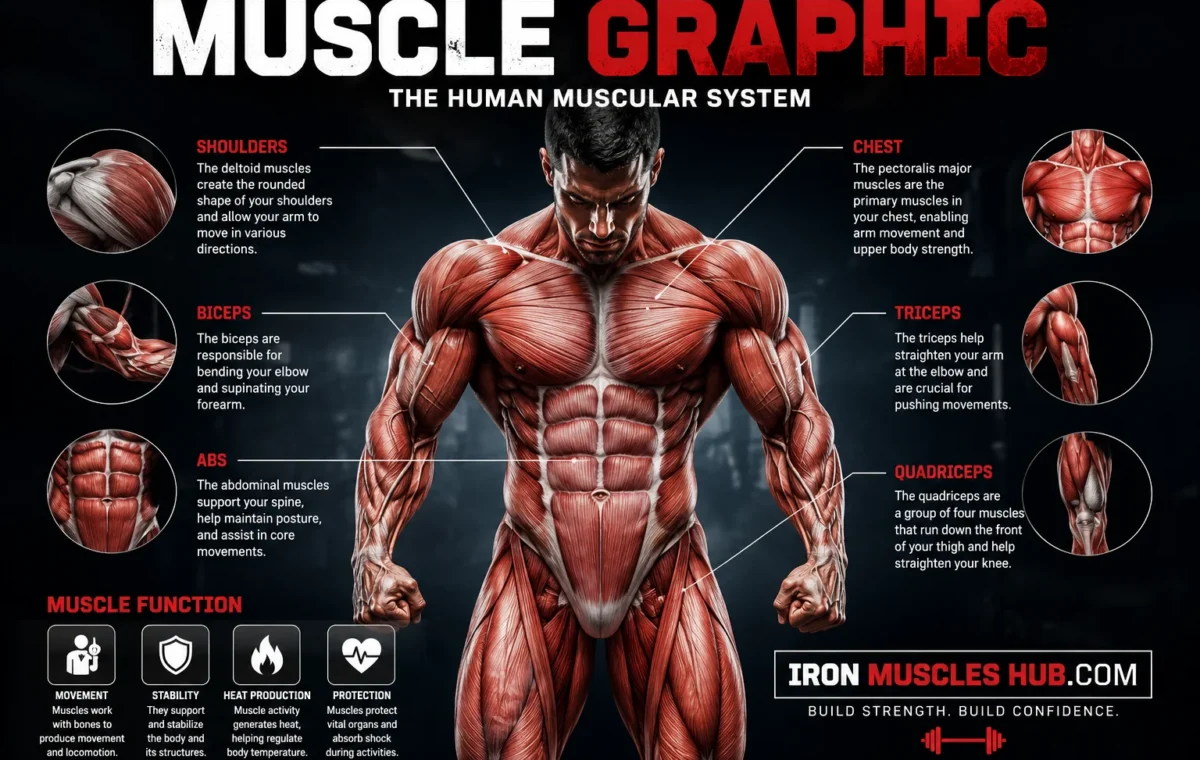
A muscle graphic can make human anatomy much easier to understand, especially if you’re new to lifting. Instead of trying to memorize hundreds of individual muscles, you can start with the major muscle groups you see on a clear front-and-back diagram.
- Quick Answer
- What Is a Muscle Graphic?
- Why Use a Muscle Graphic?
- Major Muscle Groups to Learn From a Muscle Graphic
- 1. Chest
- 2. Back
- 3. Shoulders
- 4. Biceps
- 5. Triceps
- 6. Abdominals
- 7. Glutes
- 8. Quadriceps
- 9. Hamstrings
- 10. Calves
- How to Read a Muscle Graphic Correctly
- Step 1: Check the View
- Step 2: Find the Major Regions
- Step 3: Follow the Label Line
- Step 4: Connect the Muscle to an Action
- Step 5: Connect the Muscle to an Exercise
- Muscle Graphic Comparison: Which Type Is Best?
- How to Use a Muscle Graphic to Build a Beginner Workout
- A Simple Full-Body Example
- Worked Example: Turning a Muscle Graphic Into a Workout
- How Much Training Does a Muscle Need?
- What About Training a Muscle Twice a Week?
- Common Mistakes → Why → Fix
- Mistake 1: Trying to Memorize Every Muscle
- Mistake 2: Only Studying the Front View
- Mistake 3: Treating Every Exercise as an Isolation Exercise
- Mistake 4: Chasing the Heaviest Weight
- Mistake 5: Assuming Muscle Soreness Proves a Good Workout
- Mistake 6: Using a Graphic With Poor Labels
- 30-Second Muscle Graphic Self-Test
- Your Result
- Who This Is NOT For
- How Muscle Growth Connects to the Graphic
- Muscle Graphic vs. Exercise Chart
- How to Choose a Good Muscle Graphic
- Clear Labels
- Front and Back Views
- Accurate Anatomy
- Appropriate Detail
- Useful Size
- A Simple 4-Week Way to Study Muscle Anatomy
- Week 1: Major Regions
- Week 2: Major Individual Muscles
- Week 3: Connect Muscles to Exercises
- Week 4: Test Yourself
- FAQ: Common Muscle Graphic Questions
- What is a muscle graphic?
- How many muscles are in the human body?
- What are the major muscle groups to learn first?
- What is the difference between skeletal, smooth and cardiac muscle?
- Can a muscle graphic help me build muscle?
- Final Takeaway
For a beginner, the goal isn’t to memorize every attachment or anatomical term. You want to know where the main muscles are, what movements they help produce, and which exercises train them. This guide shows you how to read a muscle graphic, understand the major muscle groups, and use that knowledge to build a sensible beginner training routine. For more insights read here :- Muscle Memory and Muscle Activation.
Quick Answer
- A muscle graphic is a visual representation of muscles, often showing their location, shape, names, and sometimes their actions.
- Beginners should first learn the major groups: chest, back, shoulders, arms, abdominals, glutes, quadriceps, hamstrings, and calves.
- You don’t need to memorize every muscle before starting resistance training.
- A useful muscle graphic should show front and back views, clear labels, consistent anatomy, and enough detail to identify each region.
- Resistance training can improve muscle strength and size, but progress depends on consistent training, recovery, nutrition, and appropriate exercise selection.
What Is a Muscle Graphic?
A muscle graphic is a visual guide that shows the location and appearance of muscles in the human body.
Depending on its purpose, a graphic might be very simple, showing only major muscle groups, or highly detailed, showing individual muscles, tendons, muscle fibers, origins, insertions, and surrounding structures.
For a beginner lifter, the most useful version is usually a clear labeled muscle anatomy graphic rather than an extremely detailed medical illustration.
The human body contains more than 600 muscles, so trying to learn every muscle immediately isn’t practical. The U.S. National Cancer Institute’s SEER Training materials group muscles by regions and explain that muscle names often describe characteristics such as size, shape, location, direction, or action.
A good graphic helps turn that complicated information into something you can recognize quickly.
Why Use a Muscle Graphic?
Think of the graphic as a map.
If you’re looking at a workout and see “lat pulldown,” you should eventually be able to look at your muscle graphic and understand that the exercise primarily involves the latissimus dorsi, along with other muscles that assist the movement.
That gives you a better understanding of why an exercise appears in your program.
It also helps you avoid a common beginner problem: training only the muscles that are easy to see in a mirror.
Your chest, biceps and abdominals may get most of your attention, but your back, glutes, hamstrings and other muscles are important parts of a balanced training program.
Major Muscle Groups to Learn From a Muscle Graphic
You don’t need an anatomy degree to get started.
Begin by learning the large regions below. Once you know these, you can gradually add individual muscles.
1. Chest
The main superficial chest muscle you’ll see on a basic muscle graphic is the pectoralis major.
It contributes to movements of the shoulder and upper arm, including pushing movements.
Common gym exercises include:
- Bench press
- Dumbbell press
- Push-ups
- Machine chest press
- Cable flyes
A beginner doesn’t need to divide the chest into dozens of tiny sections. Start by recognizing the pectoral region and understanding that pressing exercises train it.
2. Back
The back contains several important muscles.
A beginner-friendly graphic will commonly identify:
- Latissimus dorsi
- Trapezius
- Rhomboids
- Spinal erectors
The latissimus dorsi, often called the “lats,” contributes to movements that pull the upper arm toward the body.
Examples include:
- Lat pulldowns
- Pull-ups
- Assisted pull-ups
- Rows
The trapezius helps with movement and positioning of the shoulder girdle and neck region.
Rows, carries, shrugs and several pulling movements can involve the trapezius.
A muscle graphic makes the back easier to understand because you can’t see most of these muscles directly while looking in a mirror.
3. Shoulders
The large shoulder muscle shown on most beginner diagrams is the deltoid.
The deltoid surrounds the shoulder and is commonly described in three portions:
- Anterior deltoid
- Lateral deltoid
- Posterior deltoid
Exercises such as overhead presses, lateral raises and rear-delt movements can train different portions of the shoulder.
Don’t assume that one shoulder exercise completely covers every function of the deltoid.
4. Biceps
The biceps brachii is located on the front of the upper arm.
Its functions include assisting elbow flexion and contributing to movement at the shoulder.
Common exercises include:
- Dumbbell curls
- Barbell curls
- Cable curls
- Hammer curls
Your biceps also work during many pulling exercises, so you don’t necessarily need a huge number of direct curl variations.
5. Triceps
The triceps brachii sits on the back of the upper arm.
The triceps are involved in extending the elbow.
Common exercises include:
- Triceps pushdowns
- Overhead triceps extensions
- Close-grip pressing
- Dips
If you’re studying a muscle graphic, remember the simple visual rule:
Biceps = front of upper arm.
Triceps = back of upper arm.
6. Abdominals
The abdominal region includes several muscles rather than one single “ab muscle.”
A basic graphic may show:
- Rectus abdominis
- External obliques
- Internal obliques
- Transversus abdominis
The rectus abdominis is the muscle most people associate with the “six-pack.”
The obliques sit toward the sides of the trunk.
Exercises that challenge the trunk include:
- Planks
- Cable crunches
- Reverse crunches
- Controlled leg-raise variations
- Loaded carries
Visible abdominal definition is not simply a matter of doing more ab exercises. Body composition, genetics, nutrition and overall training also affect how abdominal muscles appear.
7. Glutes
The gluteus maximus is the largest and most prominent muscle of the buttock region.
A muscle graphic may also identify the gluteus medius and gluteus minimus.
The glutes contribute to hip movement and are involved in exercises such as:
- Squats
- Hip thrusts
- Romanian deadlifts
- Lunges
- Step-ups
Learning the glute region is particularly useful for beginners because hip-dominant and leg exercises can involve several muscles at once.
8. Quadriceps
The quadriceps are located on the front of the thigh.
The quadriceps group includes four muscles, which is reflected in the name “quadriceps.”
A basic graphic may label the individual muscles, but beginners can first recognize the whole group.
Exercises include:
- Squats
- Leg presses
- Split squats
- Lunges
- Leg extensions
9. Hamstrings
The hamstrings are on the back of the thigh.
They play important roles in movement at the hip and knee.
Common exercises include:
- Romanian deadlifts
- Leg curls
- Good mornings
- Hip-hinge variations
Your hamstrings don’t work in isolation during many lower-body exercises. Learning this from a muscle graphic can help you understand why compound exercises train several regions simultaneously.
10. Calves
The calf region includes several muscles, with the gastrocnemius being one of the most visible.
The soleus is another important calf muscle.
Common exercises include:
- Standing calf raises
- Seated calf raises
- Single-leg calf raises
A clear graphic can help you see why changing knee position can alter which calf muscles receive more emphasis.
How to Read a Muscle Graphic Correctly
A muscle graphic becomes more useful when you know what you’re looking at.
Start with these five steps.
Step 1: Check the View
Most anatomy graphics use an anterior view and a posterior view.
Anterior means you’re looking at the front of the body.
Posterior means you’re looking at the back.
This sounds simple, but confusing front and back views can make anatomy study frustrating.
Step 2: Find the Major Regions
Don’t start by memorizing Latin terminology.
Locate:
- Chest
- Shoulders
- Arms
- Abdominals
- Back
- Glutes
- Thighs
- Calves
Once you can identify these areas quickly, start learning individual muscle names.
Step 3: Follow the Label Line
On a detailed graphic, labels may point toward a muscle using thin lines.
Don’t assume the text sits directly beside the muscle.
Follow the line all the way to its endpoint.
This is particularly important when several muscles sit close together.
Step 4: Connect the Muscle to an Action
Don’t memorize names without context.
Ask:
“What does this muscle help me do?”
For example:
- Pectorals → pushing and shoulder movement
- Lats → pulling the upper arm downward or toward the body
- Biceps → elbow flexion
- Triceps → elbow extension
- Quadriceps → knee extension
- Hamstrings → knee flexion and hip extension
- Glutes → hip extension and other hip movements
This makes the information easier to remember.
Step 5: Connect the Muscle to an Exercise
Finally, connect anatomy to training.
For example:
Muscle → Action → Exercise
Latissimus dorsi → pulling movement → lat pulldown
Quadriceps → knee extension → squat
Triceps → elbow extension → pushdown
Glutes → hip extension → hip thrust
This three-step system is much more useful for a lifter than memorizing a long list of anatomical names.
Muscle Graphic Comparison: Which Type Is Best?
Not every muscle graphic serves the same purpose.
| Graphic type | Best for | Detail level | Beginner friendly? |
|---|---|---|---|
| Major muscle chart | Learning body regions | Low | Yes |
| Labeled anatomy diagram | Learning individual muscles | Medium | Yes |
| Detailed anatomical plate | Medical/anatomy study | High | Sometimes |
| Exercise muscle map | Connecting exercises to muscles | Medium | Yes |
| Muscle fiber diagram | Understanding microscopic structure | Very high | Later |
| Front-and-back gym poster | Quick reference | Low-medium | Yes |
For most new lifters, start with a front-and-back labeled graphic.
A detailed skeletal-muscle illustration can show structures such as muscle fibers, fascicles, connective tissue layers, tendons and nerves, but that level of detail isn’t necessary for planning a basic workout. NCBI’s StatPearls anatomy resource provides an example of how much more detailed skeletal-muscle anatomy becomes at the microscopic and tissue level.
How to Use a Muscle Graphic to Build a Beginner Workout
Your muscle graphic shouldn’t replace good programming.
It should help you understand the program you’re already following.
For a beginner, a full-body routine performed several times per week is a straightforward starting structure.
The American College of Sports Medicine’s resistance-training position stand recommends 2–3 training days per week for novice lifters, with novice loading commonly prescribed around an 8–12 repetition maximum.
More recent ACSM guidance, published in 2026, reviewed 137 systematic reviews involving more than 30,000 participants. It reports that progressive resistance training improves strength and muscle size, while higher training volume is associated with greater hypertrophy.
A Simple Full-Body Example
| Movement | Main muscle regions | Beginner example |
| Squat | Quads, glutes | Goblet squat |
| Horizontal push | Chest, triceps, shoulders | Dumbbell press |
| Horizontal pull | Back, biceps | Seated cable row |
| Hip hinge | Glutes, hamstrings | Romanian deadlift |
| Vertical push | Shoulders, triceps | Dumbbell shoulder press |
| Vertical pull | Back, biceps | Lat pulldown |
| Trunk exercise | Abdominals | Plank |
You don’t have to perform every exercise shown here in one workout.
The table is a way to see how the major areas on your muscle graphic connect to movement patterns.
Worked Example: Turning a Muscle Graphic Into a Workout
Imagine a beginner weighs 70 kg (154 lb) and has access to dumbbells, a cable machine and a leg press.
Instead of randomly selecting exercises, they can use their muscle graphic to create a balanced session.
A simple example might look like:
- Goblet squat: 2 sets × 8–12 reps
- Dumbbell bench press: 2 × 8–12
- Lat pulldown: 2 × 8–12
- Romanian deadlift: 2 × 8–12
- Dumbbell shoulder press: 1–2 × 8–12
- Plank: 2 controlled sets
The 70 kg / 154 lb bodyweight doesn’t determine the starting weight of the exercises.
That’s important.
A 70 kg beginner might safely start a particular dumbbell exercise with 5 kg (11 lb) in each hand, while another beginner of the same bodyweight might need a different load.
Exercise technique, training history, mobility, equipment and individual strength all matter.
Instead of chasing a specific number, select a load you can control with good technique through the intended range of motion.
As you become stronger, gradually increase the challenge.
The older ACSM progression model gives a practical rule: when a lifter can exceed the desired repetition target by one or two repetitions, a 2–10% load increase can be considered.
That’s a guideline, not a requirement to add weight every workout.
How Much Training Does a Muscle Need?
This is where beginner advice can become confusing.
You may see one program recommending one set and another recommending several sets.
Current evidence supports a simple idea: training volume matters, but more isn’t automatically better for every person.
A PubMed-indexed meta-analysis found a dose-response relationship between weekly resistance-training volume and muscle growth, with higher weekly set volumes generally producing greater hypertrophy.
The 2026 ACSM position stand also reports that muscle hypertrophy is enhanced by higher training volumes, with 10 or more sets per week identified as a useful higher-volume reference in its review.
That doesn’t mean a beginner should immediately perform 10 hard sets for every muscle every week.
Recovery matters.
A beginner can make progress with a manageable amount of training while learning technique and building consistency.
As your work capacity improves, you can adjust volume based on your progress and recovery.
What About Training a Muscle Twice a Week?
Research doesn’t support the idea that every lifter must follow one perfect weekly frequency.
A 2019 systematic review found that, when weekly volume was equated, training frequency itself didn’t produce a meaningful difference in hypertrophy.
In practical terms, you can divide your weekly work across two, three or more sessions according to your schedule and recovery.
For beginners, two or three full-body sessions can be convenient because the major muscle groups are practiced regularly without requiring a complicated split.
Common Mistakes → Why → Fix
Mistake 1: Trying to Memorize Every Muscle
Why: The human body has hundreds of muscles, and many individual structures aren’t relevant to a beginner’s first month in the gym.
Fix: Learn the major muscle groups first. Add individual muscles as your training knowledge develops.
Mistake 2: Only Studying the Front View
Why: The chest, arms and abs are visually obvious, so beginners often focus on them.
Fix: Spend equal time learning the posterior view. Your back, glutes and hamstrings deserve attention too.
Mistake 3: Treating Every Exercise as an Isolation Exercise
Why: A muscle graphic can make it look as if each muscle works independently.
Fix: Remember that compound exercises involve multiple muscles. A squat isn’t simply a “quad exercise,” and a row isn’t simply a “biceps exercise.”
Mistake 4: Chasing the Heaviest Weight
Why: More weight isn’t automatically better if technique deteriorates.
Fix: Use a manageable load and maintain controlled, repeatable technique. Increase resistance gradually as your performance improves.
Mistake 5: Assuming Muscle Soreness Proves a Good Workout
Why: Soreness is noticeable, so it’s tempting to use it as your scorecard.
Fix: Track performance, technique, repetitions, resistance and consistency. Soreness can occur after training, but it isn’t the only sign of an effective session.
Mayo Clinic educational material also recommends starting slowly and progressing gradually rather than overdoing strength training.
Mistake 6: Using a Graphic With Poor Labels
Why: Some graphics are designed for artistic purposes rather than accurate anatomy education.
Fix: Choose a diagram with clear labels and a credible anatomical source. NCBI, for example, provides professionally referenced skeletal-muscle anatomy illustrations.
30-Second Muscle Graphic Self-Test
Here’s a quick test you can use before moving to more detailed anatomy.
Look at a labeled muscle graphic for 30 seconds.
Then hide the labels.
Can you point out:
- Chest
- Deltoids
- Biceps
- Triceps
- Abdominals
- Latissimus dorsi
- Glutes
- Quadriceps
- Hamstrings
- Calves
Your Result
8–10 correct: You have a strong beginner-level map of the major muscle groups.
5–7 correct: You’re on the right track. Review the regions you missed.
0–4 correct: Use a simpler front-and-back diagram and learn the major regions before studying individual muscles.
This test isn’t a medical or fitness assessment. It’s simply a practical learning tool.
Who This Is NOT For
A basic muscle graphic isn’t enough if your goal is advanced anatomy education.
You may need a much more detailed resource if you’re studying:
- Medical anatomy
- Physiotherapy
- Exercise science
- Athletic training
- Muscle origins and insertions
- Nerve supply
- Detailed biomechanics
- Rehabilitation
A beginner gym poster also shouldn’t be treated as a diagnostic tool.
If you’re trying to identify the cause of persistent pain, weakness, numbness, swelling or restricted movement, an anatomy graphic can’t replace an assessment from an appropriately qualified healthcare professional.
How Muscle Growth Connects to the Graphic
Once you know where your muscles are, the next question is obvious:
How do they actually get bigger?
Resistance training provides a stimulus that can lead to adaptations in skeletal muscle.
Current evidence shows that different resistance-training prescriptions can improve muscle hypertrophy, with multiple-set training appearing among the higher-ranked approaches for muscle growth in a large 2023 systematic review and network meta-analysis.
Importantly, you don’t need to use extremely heavy weights to build muscle.
A systematic review and meta-analysis found similar hypertrophy across higher- and lower-load resistance training, although heavier loads produced greater improvements in maximal strength.
For a beginner, that means you have options.
You can use:
- Machines
- Dumbbells
- Barbells
- Cables
- Resistance bands
- Bodyweight exercises
The best choice is usually the one you can perform safely, consistently and with appropriate progression.
Muscle Graphic vs. Exercise Chart
A muscle graphic and an exercise chart aren’t the same thing.
A muscle graphic tells you where muscles are.
An exercise chart tells you what movements you can perform.
Using both can make your training knowledge much stronger.
For example:
Muscle graphic:
Latissimus dorsi
Movement:
Shoulder adduction and extension
Exercise examples:
Lat pulldown, pull-up, rowing variations
Training goal:
Build strength and muscle through progressive resistance training
This approach helps you understand the reason behind an exercise instead of blindly copying a routine.
How to Choose a Good Muscle Graphic
Before downloading or printing one, check these features.
Clear Labels
Labels should be readable without becoming so crowded that lines cross over each other.
Front and Back Views
A front-only image leaves out much of the musculature you need to understand for balanced training.
Accurate Anatomy
Prefer educational resources that identify their sources and use established anatomical terminology.
Appropriate Detail
More detail isn’t always better.
If you’re a beginner, a graphic showing 15–25 major muscles may be more useful than one containing hundreds of tiny labels.
Useful Size
If you’re printing the graphic, make sure the labels remain readable at the finished size.
For a gym reference sheet, a large page or poster can work well.
For phone use, a simpler graphic with fewer labels may be easier to read.
A Simple 4-Week Way to Study Muscle Anatomy
You don’t need to spend hours studying anatomy.
Try this approach.
Week 1: Major Regions
Learn:
- Chest
- Back
- Shoulders
- Arms
- Abs
- Glutes
- Thighs
- Calves
Week 2: Major Individual Muscles
Add:
- Pectoralis major
- Latissimus dorsi
- Trapezius
- Deltoid
- Biceps
- Triceps
- Rectus abdominis
- Gluteus maximus
- Quadriceps
- Hamstrings
- Gastrocnemius
Week 3: Connect Muscles to Exercises
For every major muscle, learn two or three exercises that train it.
Don’t worry about finding a separate exercise for every small muscle.
Week 4: Test Yourself
Hide the labels and identify the muscles yourself.
Then explain what each one does in simple language.
If you can look at a muscle graphic and explain where a muscle is, what movement it helps with, and which exercises train it, you’ve learned something useful for your training.
FAQ: Common Muscle Graphic Questions
What is a muscle graphic?
A muscle graphic is a visual illustration showing muscles of the human body. It may include labels, front and back views, individual muscle names, actions, or anatomical structures. For beginners, a simple labeled diagram of the major muscle groups is usually the easiest place to start. More detailed graphics can show individual muscles and structures such as tendons, fascicles and connective-tissue layers.
How many muscles are in the human body?
The commonly cited figure is more than 600 muscles, although the exact count depends on how anatomical structures are classified. The National Cancer Institute’s SEER Training materials use the “more than 600” description. For gym beginners, there’s no need to memorize all of them. Learning the major muscle groups first gives you a practical foundation for understanding resistance training.
What are the major muscle groups to learn first?
Start with the chest, back, shoulders, arms, abdominals, glutes, quadriceps, hamstrings and calves. These regions cover the major areas typically discussed in beginner resistance training. Once you recognize them, you can learn individual muscles such as the pectoralis major, latissimus dorsi, deltoid, biceps brachii and quadriceps. This regional approach makes anatomy easier to remember.
What is the difference between skeletal, smooth and cardiac muscle?
The body contains three broad types of muscle tissue: skeletal, smooth and cardiac. Skeletal muscle is associated with voluntary movement and works with bones and connective tissues. Cardiac muscle forms the heart, while smooth muscle is found in structures such as the walls of many internal organs. A gym-focused muscle graphic generally concentrates on skeletal muscles.
Can a muscle graphic help me build muscle?
Yes, but indirectly. A graphic can help you understand which muscles are involved in exercises and whether your workout covers the major regions of the body. Actual muscle growth requires appropriate resistance training, sufficient recovery and adequate nutrition. Evidence supports progressive resistance training for improving muscle size and strength, but a diagram itself doesn’t cause hypertrophy.
Final Takeaway
A muscle graphic is one of the simplest tools you can use to improve your understanding of training. You don’t need to memorize hundreds of muscles before touching a dumbbell. Start with the major regions, learn a few important individual muscles, and then connect each muscle to its basic function and common exercises.
For most beginners, a clear front-and-back diagram is enough to build that foundation. Use it alongside a sensible resistance-training program, track your performance, and increase training demands gradually. The aim isn’t to become an anatomy expert overnight. It’s to understand your body well enough to train it intelligently and consistently.
If you’re building a beginner fitness library, keep a simple labeled muscle graphic available as a reference and update your knowledge as your training experience grows.