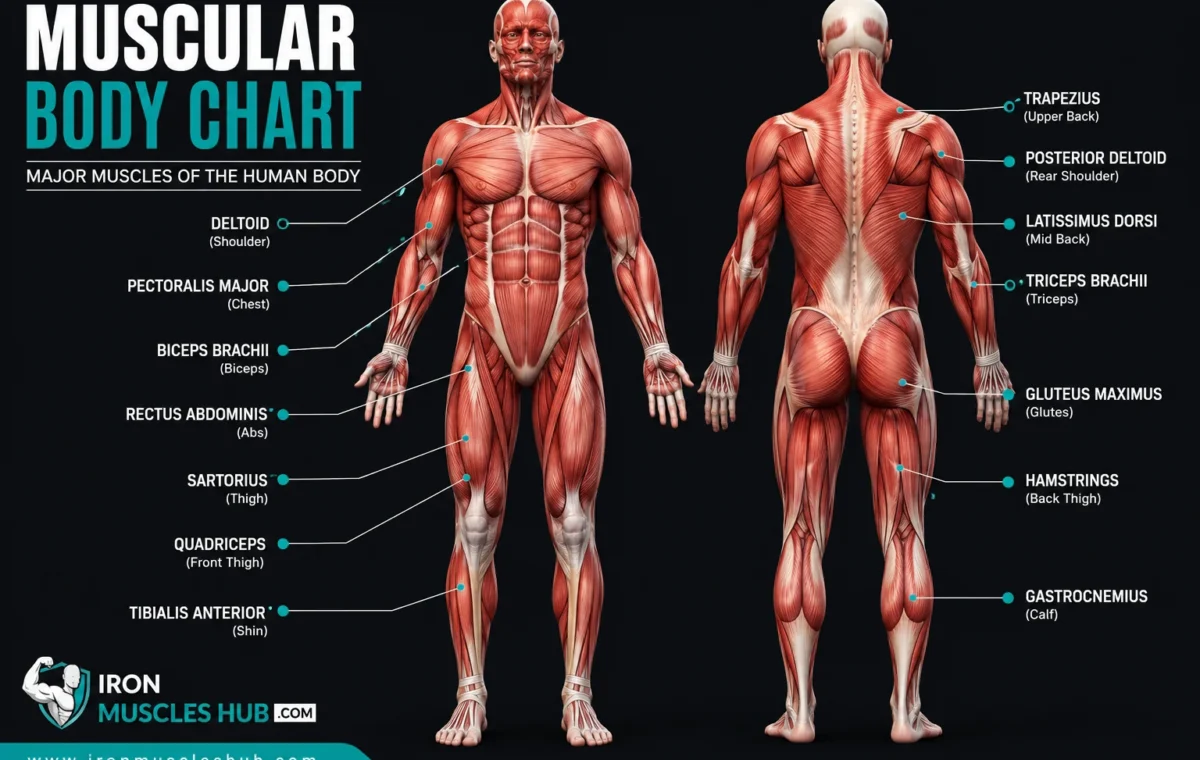
A muscular body chart gives you a simple visual map of the muscles you use during training and everyday movement. For beginners, the most useful approach isn’t memorizing every muscle name. It’s learning where the major muscle groups are, what they generally do, and which basic exercises train them.
- Quick Answer: What Does a Muscular Body Chart Show?
- How to Read a Muscular Body Chart
- Front View: Muscles You Can See From the Front
- Back View: Muscles You Need to Know
- Major Muscle Groups Explained
- 1. Chest: Pectoral Muscles
- 2. Shoulders: Deltoids
- 3. Upper Back: Trapezius and Rhomboid Region
- 4. Lats: Latissimus Dorsi
- 5. Biceps
- 6. Triceps
- 7. Core
- 8. Glutes
- 9. Quadriceps
- 10. Hamstrings
- 11. Calves
- Muscular Body Chart: Front vs. Back
- How to Use a Muscular Body Chart to Build a Beginner Workout
- A Simple Full-Body Framework
- How Often Should You Train Each Muscle?
- Worked Example: Turning the Chart Into a Weekly Plan
- Example Full-Body Session
- Common Mistakes → Why → Fix
- Mistake 1: Training Only the Muscles You Can See
- Mistake 2: Treating Every Muscle as Completely Separate
- Mistake 3: Adding More Exercises Instead of Improving Technique
- Mistake 4: Copying the Anatomy Chart Literally
- Mistake 5: Training to Failure on Everything
- Mistake 6: Ignoring Recovery
- 30-Second Muscular Body Chart Self-Test
- Who This Guide Is Not For
- FAQ: Muscular Body Chart
- What are the major muscle groups in the human body?
- What muscles should a beginner train?
- What is the difference between a muscle chart and a muscular system chart?
- Should I train each muscle twice a week?
- How many sets per muscle should I do for muscle growth?
- How to Get More From Your Muscular Body Chart
- A Simple Rule for Beginners
- Final Takeaway
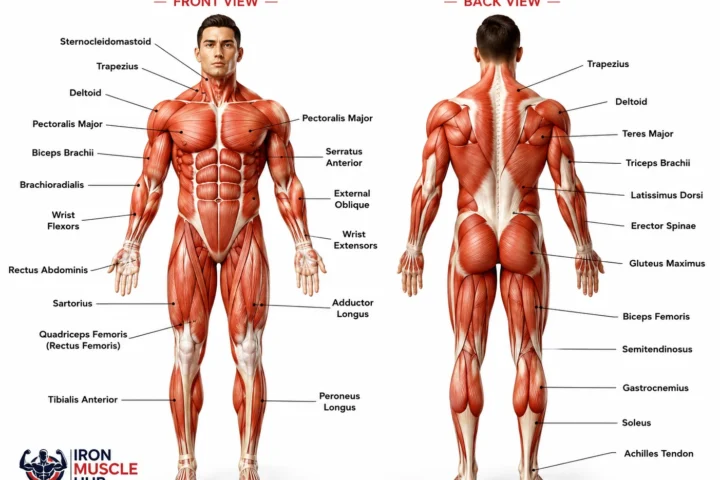
A front-and-back muscle chart makes this much easier. You can use it to identify your chest, shoulders, arms, back, abdominal muscles, glutes, thighs, and calves, then build a more balanced workout around those areas.
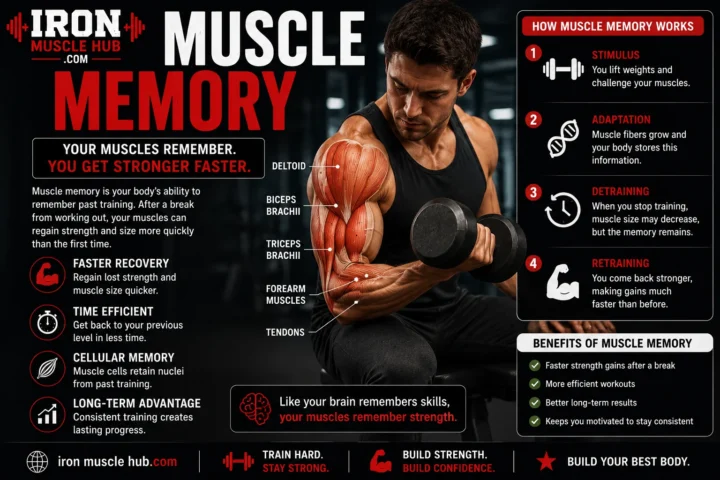
This guide breaks the body down in a practical way, so you can look at a muscular body chart and understand what you’re seeing rather than simply memorizing labels. For more insights read here :- Muscle Memory and Muscle Activation.
Quick Answer: What Does a Muscular Body Chart Show?
- A muscular body chart shows the location and names of major muscles, usually from the front, back, or both views.
- The major training areas include the chest, shoulders, back, arms, core, glutes, thighs, and lower legs.
- Front-view charts make muscles such as the pectorals, deltoids, biceps, abdominals, and quadriceps easier to identify.
- Back-view charts help you find the trapezius, latissimus dorsi, triceps, glutes, hamstrings, and calf muscles.
- You don’t need to train every small muscle separately. Beginner programs can focus on major movement patterns and progressively train the major muscle groups.
How to Read a Muscular Body Chart
A muscular body chart is easiest to understand when you divide the body into regions rather than trying to learn every label at once.
Most beginner-friendly charts use an anterior view, meaning the front of the body, and a posterior view, meaning the back. Educational anatomy resources commonly use these views to identify major muscle groups such as the deltoids, pectorals, biceps, triceps, abdominals, quadriceps, trapezius, latissimus dorsi, gluteals, hamstrings, and calves.
Think of your chart in five broad sections:
- Chest and shoulders
- Back
- Arms
- Core
- Hips and legs
That organization is more useful for a beginner than trying to memorize hundreds of individual anatomical names.
Front View: Muscles You Can See From the Front
The front of a muscular body chart usually makes several familiar muscles easy to spot.
| Muscle or group | Where it is | Main training role | Beginner exercise |
|---|---|---|---|
| Pectoralis major | Chest | Pressing and bringing the upper arm across the body | Push-up |
| Deltoids | Shoulders | Moving the arm in several directions | Dumbbell shoulder press |
| Biceps brachii | Front of upper arm | Bending the elbow | Dumbbell curl |
| Rectus abdominis | Front of abdomen | Trunk flexion and abdominal control | Curl-up |
| External obliques | Sides of torso | Trunk rotation and stability | Side plank |
| Quadriceps | Front of thigh | Straightening the knee | Squat |
| Tibialis anterior | Front of lower leg | Raising the front of the foot | Controlled calf-to-toe raises |
The pectoralis major, commonly called the chest muscle, is heavily involved in pressing movements. A push-up is a simple example.
The deltoid forms much of the rounded shoulder area. It has different portions that contribute to different shoulder movements, so an anatomy chart can help you understand why one shoulder exercise doesn’t train the entire shoulder in exactly the same way.
The biceps brachii sits on the front of the upper arm. The triceps sit on the back of the upper arm, making them an easy pair to compare on a front-and-back chart.
The quadriceps occupy the front of the thigh and are important for knee extension. Squats, split squats, and leg presses can all involve them.
Back View: Muscles You Need to Know
Turn the muscular body chart around and the back view becomes much more useful.
The main beginner labels to learn are:
- Trapezius
- Latissimus dorsi
- Rear deltoids
- Triceps
- Erector spinae
- Gluteus maximus
- Hamstrings
- Gastrocnemius and soleus
The trapezius is a large muscle across the upper back and neck region. The latissimus dorsi, often called the lats, covers a large area of the back and contributes to pulling movements.
The gluteus maximus forms much of the buttock region and contributes strongly to hip extension. The hamstrings occupy the back of the thigh and help with knee flexion and hip movement.
A useful anatomy reference from the National Cancer Institute’s SEER Training program also explains how muscle names can describe location, size, shape, direction, or function. For example, “biceps” refers to a muscle with two heads, while “quadriceps” refers to one with four heads.
Major Muscle Groups Explained
You don’t need to become an anatomy student to train intelligently. Start by understanding the major areas below.
1. Chest: Pectoral Muscles
The chest is dominated by the pectoralis major, with deeper and smaller muscles contributing to shoulder and chest movement.
For beginners, think of the chest as one of the main pressing areas.
Useful exercises include:
- Push-ups
- Dumbbell bench press
- Machine chest press
- Incline dumbbell press
A muscular body chart can help you see that the chest isn’t simply a single flat muscle. The pectoralis major covers a large part of the front upper torso and works with the shoulder and triceps during pressing exercises.
2. Shoulders: Deltoids
The deltoids sit around the shoulder joint.
A simple chart usually identifies the front, middle, and rear portions. These sections contribute differently to shoulder movement.
Beginner exercises include:
- Dumbbell shoulder press
- Lateral raise
- Rear-delt fly
- Machine shoulder press
Don’t assume that heavier weight automatically means better shoulder training. Controlled movement and a range of motion you can perform safely are more useful starting points.
3. Upper Back: Trapezius and Rhomboid Region
The upper back helps position and stabilize the shoulder blades.
Common exercises include:
- Seated row
- Chest-supported row
- Face pull
- Dumbbell shrug
The anatomy matters because a row isn’t simply an “arm exercise.” Your back muscles contribute to moving and controlling the shoulder blades and upper arm.
4. Lats: Latissimus Dorsi
The latissimus dorsi is the large muscle along the sides of the back.
It contributes to movements that pull the upper arm downward and backward.
Beginner-friendly exercises include:
- Lat pulldown
- Assisted pull-up
- Cable row
- One-arm dumbbell row
If your goal is a stronger-looking back, learning where the lats sit on a muscular body chart can make exercise selection much easier.
5. Biceps
The biceps brachii sits on the front of the upper arm.
Its familiar gym role is elbow flexion, which is why curls train it effectively.
Good beginner choices include:
- Dumbbell curl
- Cable curl
- Hammer curl
- Machine curl
Remember that pulling exercises can also train the biceps. You don’t need a separate curl for every back exercise.
6. Triceps
The triceps occupy the back of the upper arm.
They help extend the elbow and contribute to pressing movements.
Common exercises include:
- Cable pressdown
- Overhead cable extension
- Close-grip push-up
- Dumbbell extension
Looking at the front and back views together helps beginners understand why training only curls can leave the arm program incomplete.
7. Core
The word core refers to more than visible abdominal muscles.
A muscular body chart may label the rectus abdominis and external obliques, but the trunk contains several muscles that contribute to movement and stability.
Beginner exercises include:
- Plank
- Side plank
- Dead bug
- Controlled curl-up
- Bird dog
Your goal shouldn’t be to make every abdominal exercise feel exhausting. Good technique and controlled trunk movement matter more.
8. Glutes
The gluteal muscles sit around the hips and buttocks.
The gluteus maximus is particularly important for hip extension.
Exercises that involve the glutes include:
- Squats
- Hip thrusts
- Step-ups
- Split squats
- Romanian deadlifts
A muscular body chart is particularly helpful here because the glutes aren’t visible from the front in the same way they are from the back.
9. Quadriceps
The quadriceps occupy the front of the thigh.
They help extend the knee and contribute strongly to squatting and other lower-body movements.
Beginner options include:
- Squat
- Goblet squat
- Leg press
- Split squat
- Step-up
The quadriceps are actually a group of muscles rather than one single muscle, which is why detailed anatomy charts may show several labels across the front of the thigh.
10. Hamstrings
The hamstrings are located on the back of the thigh.
They contribute to knee flexion and hip movement.
Useful exercises include:
- Leg curl
- Romanian deadlift
- Hip hinge
- Glute-ham raise, if appropriate
For beginners, learning the hamstrings as a group is enough. You can study the individual muscles later if you want more detailed anatomy knowledge.
11. Calves
The lower leg contains several muscles, with the gastrocnemius and soleus being two major muscles commonly shown on fitness charts.
Beginner exercises include:
- Standing calf raise
- Seated calf raise
- Single-leg calf raise
Your chart may also show the tibialis anterior on the front of the lower leg. This is one reason a detailed anatomy chart can be more useful than a simple “bodybuilding muscle map.”
Muscular Body Chart: Front vs. Back
One of the most useful ways to study a muscular body chart is to compare what you can see from each angle.
| Body area | Front view | Back view | Simple training example |
| Chest | Pectorals | Mostly hidden | Push-up |
| Shoulders | Front/middle deltoids | Rear deltoids | Shoulder press |
| Upper arm | Biceps | Triceps | Curl + pressdown |
| Upper back | Limited visibility | Trapezius/rhomboid region | Row |
| Side back | Limited visibility | Latissimus dorsi | Lat pulldown |
| Abdomen | Rectus abdominis/obliques | Deep and posterior structures | Plank |
| Hips | Partly visible | Gluteals | Hip thrust |
| Thigh | Quadriceps | Hamstrings | Squat + leg curl |
| Lower leg | Tibialis anterior | Gastrocnemius/soleus | Calf raise |
Information Gain: The key is not simply memorizing front versus back labels. Use the two views together to check whether your workout is ignoring an entire region.
For example, someone who performs only push-ups, curls, and abdominal exercises may see plenty of front-view muscles in their routine while giving less attention to the lats, upper back, hamstrings, and glutes.
How to Use a Muscular Body Chart to Build a Beginner Workout
A chart becomes much more useful when you connect anatomy to movement.
Instead of asking:
“Which exercise isolates this exact muscle?”
Start with:
“What movement trains this region, and what other muscles help?”
For example, a squat doesn’t belong only to the quadriceps. The movement also involves the hips and trunk.
A row isn’t just a biceps exercise. Your back muscles play a major role.
A push-up isn’t just a chest exercise. The shoulders and triceps also contribute.
This approach keeps your program simpler.
A Simple Full-Body Framework
A beginner can organize training around:
- Knee-dominant movement: squat or split squat
- Hip-dominant movement: hip hinge or Romanian deadlift
- Horizontal push: push-up or chest press
- Horizontal pull: row
- Vertical push: shoulder press
- Vertical pull: pulldown or assisted pull-up
- Core: plank or dead bug
You don’t have to perform every exercise in one session. The goal is to cover the major movement patterns across your training week.
The 2026 ACSM position stand reports that progressive resistance training improves strength and muscle size in healthy adults. It also identifies higher weekly training volume as useful for hypertrophy, with at least 10 sets per muscle group per week associated with better muscle-growth outcomes in its review of the evidence.
That doesn’t mean you should immediately force every muscle to 10 sets.
If you’re new to lifting, consistency and learning the movements come first. The ACSM specifically emphasizes that moving from no resistance training to doing resistance training produces one of the biggest improvements.
How Often Should You Train Each Muscle?
There isn’t one magic schedule.
Research on resistance-training frequency has produced an important practical lesson: frequency and total training volume shouldn’t be confused.
A PubMed-indexed meta-analysis found that when weekly training volume is matched, training frequency by itself doesn’t appear to meaningfully change hypertrophy outcomes.
A newer ACSM position stand recommends progressive resistance training and reports benefits from training at least twice per week for strength, while higher weekly volume is associated with greater hypertrophy.
So, for a beginner, training a muscle group twice per week can be a convenient way to distribute your work, but you don’t need to treat two sessions as a magical threshold.
The important questions are:
- Are you training consistently?
- Are you using good technique?
- Are you gradually improving?
- Are you recovering?
- Are you giving each major muscle group enough work?
Worked Example: Turning the Chart Into a Weekly Plan
Here’s a simple example using a fictional beginner who weighs 60 kg (132 lb).
The body weight is only included to demonstrate the planning process. It doesn’t determine the correct training load.
Example Full-Body Session
| Movement | Main areas | Example workload |
| Goblet squat | Quadriceps, glutes | 2 sets |
| Dumbbell bench press | Chest, shoulders, triceps | 2 sets |
| Seated row | Upper back, lats, biceps | 2 sets |
| Romanian deadlift | Hamstrings, glutes | 2 sets |
| Dumbbell shoulder press | Shoulders, triceps | 2 sets |
| Plank | Core | 2 sets |
The example uses 60 kg (132 lb) body weight, but the dumbbell or machine loads should be selected based on the individual’s ability, technique, experience, and equipment.
If this session is performed twice during a week, you can distribute the workload across the week rather than trying to do everything on one day.
The important point is that a chart can help you spot coverage. You can look at the program and ask:
Chest? Covered.
Back? Covered.
Shoulders? Covered.
Arms? Receiving direct and indirect work.
Legs? Covered through knee- and hip-dominant movements.
Core? Covered.
This is a much more useful application of anatomy than simply memorizing muscle names.
Common Mistakes → Why → Fix
Mistake 1: Training Only the Muscles You Can See
Why: Beginners often choose exercises based on the front-view muscles that are easiest to recognize.
Fix: Check both the anterior and posterior sides of your muscular body chart. Make sure your program includes pulling movements, hip-dominant movements, and lower-body work.
Mistake 2: Treating Every Muscle as Completely Separate
Why: Many exercises train several muscles at once.
Fix: Think in terms of primary muscles and assisting muscles. A chest press involves more than the chest. A row involves more than the lats.
Mistake 3: Adding More Exercises Instead of Improving Technique
Why: A long exercise list can feel productive, but more movements aren’t automatically better.
Fix: Start with a manageable selection. Learn the movement, control the weight, and gradually improve your performance.
Mistake 4: Copying the Anatomy Chart Literally
Why: A chart tells you where muscles are. It doesn’t automatically tell you how much training you need.
Fix: Use the chart for identification and exercise selection, then use evidence-based training principles for programming.
Mistake 5: Training to Failure on Everything
Why: Beginners sometimes assume every set needs to end with complete muscular failure.
Fix: You don’t need to make every set a maximum effort. A 2026 systematic review found that non-failure resistance training can produce similar hypertrophy outcomes to failure training, while showing a small advantage for dynamic strength in its analysis.
Mistake 6: Ignoring Recovery
Why: More work can look better on paper, but your body still needs time to adapt.
Fix: Increase training gradually. If performance, technique, sleep, or general recovery is consistently getting worse, reassess your workload rather than automatically adding more.
30-Second Muscular Body Chart Self-Test
Look at a front-and-back muscle chart and ask yourself these six questions:
- Can you point to the pectorals?
- Can you identify the deltoids?
- Can you find the latissimus dorsi?
- Can you distinguish biceps from triceps?
- Can you identify quadriceps, hamstrings, and glutes?
- Can you find the main abdominal and calf regions?
If you can answer all six, you already understand enough major anatomy to start making better beginner exercise choices.
If you can’t, don’t worry. Pick three labels, learn them, then add three more.
You don’t need to memorize the entire muscular system before you can train effectively.
Who This Guide Is Not For
This beginner muscular body chart guide isn’t designed to replace medical anatomy education.
It also isn’t a substitute for professional assessment if you’re dealing with:
- Persistent or severe pain
- A recent injury
- Neurological symptoms
- A diagnosed musculoskeletal condition
- Restrictions from a healthcare professional
- A return to exercise after surgery
In those situations, speak with an appropriate healthcare professional before changing your training.
For general gym training, a qualified strength-and-conditioning professional can also help you learn exercise technique and build a program appropriate to your experience.
FAQ: Muscular Body Chart
What are the major muscle groups in the human body?
For beginner fitness purposes, useful major groups include the chest, shoulders, upper back, lats, biceps, triceps, abdominal region, glutes, quadriceps, hamstrings, and calves. Anatomy references may divide these areas into many more individual muscles. The National Cancer Institute’s anatomy material explains that muscle names often reflect characteristics such as location, shape, size, direction, or action.
What muscles should a beginner train?
A beginner should aim for balanced resistance training that covers the major movement patterns rather than trying to isolate every muscle individually. A simple program can include a squat or similar knee-dominant movement, a hip hinge, a push, a pull, and core work. The 2026 ACSM position stand supports progressive resistance training for improving strength and muscle size in healthy adults.
What is the difference between a muscle chart and a muscular system chart?
The terms are often used interchangeably in general fitness content, but a detailed anatomical chart can contain much more information than a basic muscle-group chart. A simple fitness chart may label major visible muscles, while a detailed anatomy chart can identify individual muscles, their locations, and other anatomical information. Kenhub, for example, separates charts by regions such as the upper limb, lower limb, head and neck, and trunk.
Should I train each muscle twice a week?
Twice-weekly training can be a convenient way to distribute resistance-training volume, but frequency alone isn’t the entire story. A PubMed meta-analysis found that when total training volume is equated, frequency doesn’t appear to meaningfully change hypertrophy. The 2026 ACSM position stand still supports at least two resistance-training sessions per week for strength-related outcomes.
How many sets per muscle should I do for muscle growth?
The 2026 ACSM position stand reports that hypertrophy is enhanced by higher training volumes, including at least 10 sets per muscle group per week. That figure should be viewed as an evidence-based training landmark rather than a requirement for every beginner on their first week. Start at a manageable level, focus on technique and consistency, and increase training gradually as you adapt.
How to Get More From Your Muscular Body Chart
Keep your chart somewhere you can actually use it.
Before a workout, look at the front and back views and identify the muscles involved in the exercises you’re about to perform.
After several weeks, you should be able to make connections without checking the chart every time:
Push-up → chest, shoulders, triceps.
Row → upper back, lats, biceps.
Squat → quadriceps, glutes, trunk.
Romanian deadlift → hamstrings, glutes, back-supporting musculature.
Curl → biceps and related elbow flexors.
Calf raise → calf musculature.
This is the point where an anatomy chart becomes a training tool rather than a poster on the wall.
A Simple Rule for Beginners
If your workout repeatedly covers the same visible front muscles while ignoring the back and lower body, your chart has already shown you the problem.
Use the front view to check what you can see.
Use the back view to check what you might forget.
Then build your training around balanced movements, sensible progression, and recovery.
Resistance-training research consistently supports the value of progressive training for strength and muscle development. A large 2023 systematic review found that all of the resistance-training prescriptions studied were better than no exercise for strength and hypertrophy, while the 2026 ACSM position stand synthesized evidence from 137 systematic reviews involving more than 30,000 participants.
Final Takeaway
A muscular body chart is one of the simplest tools a beginner can use to understand what they’re training. Start by learning the major muscles from the front and back, then connect those areas to basic movement patterns.
You don’t need to memorize every anatomical detail. Learn the chest, shoulders, back, arms, core, glutes, thighs, and calves first. Then use that knowledge to check whether your workout is balanced.
The best beginner program isn’t the one with the most exercises. It’s the one you can perform consistently, safely, and progressively while giving the major muscle groups appropriate attention.
For more beginner-friendly training guides, explore the related articles on Iron Muscle Hub and keep your chart nearby as your anatomy knowledge grows.